Showing posts with label LEGO city layout. Show all posts

Wednesday, 31 July 2019

Letting Off STEAM

It feels like a lifetime since I last posted (here). On that occasion I was preparing to finish up my railway station MOC in preparation for its appearance as part of a display of modular buildings at the Great Western Brick Show a.k.a. STEAM in Swindon. I'm pleased to report that all the elements that I ordered from Bricklink to complete the build duly arrived as promised, and the MOC (below) was completed in good time for its public unveiling.


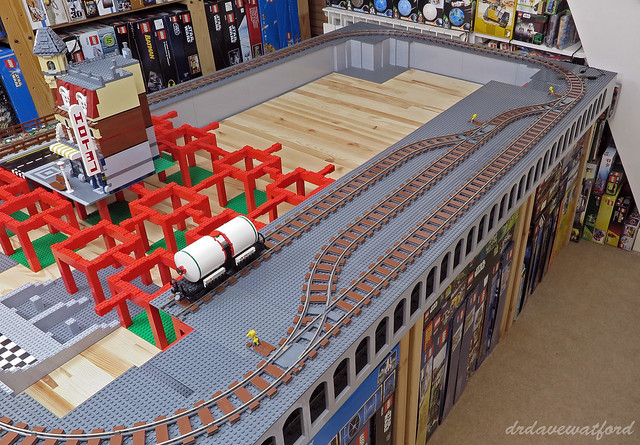
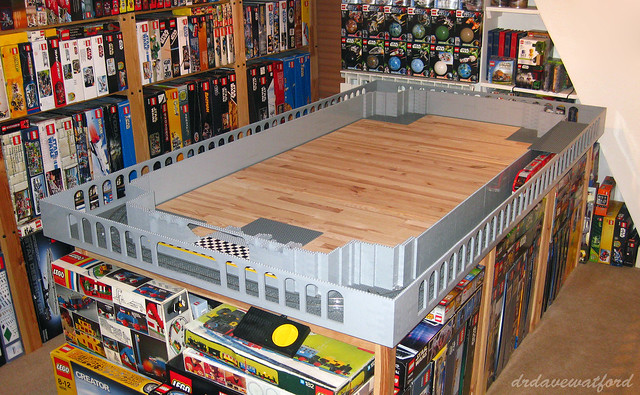
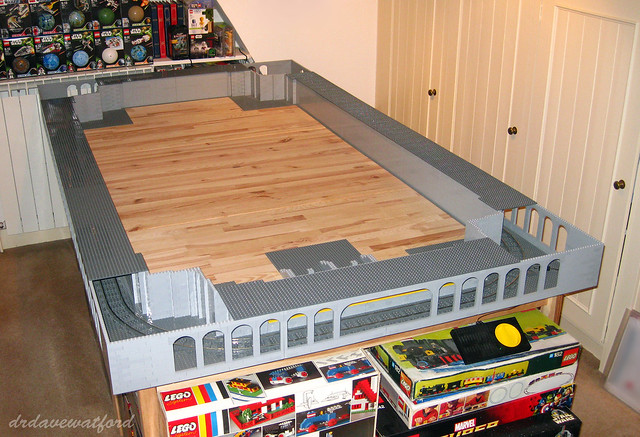
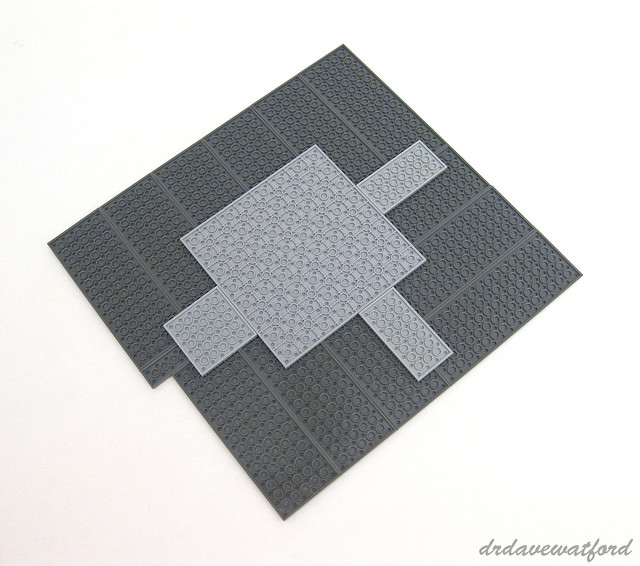
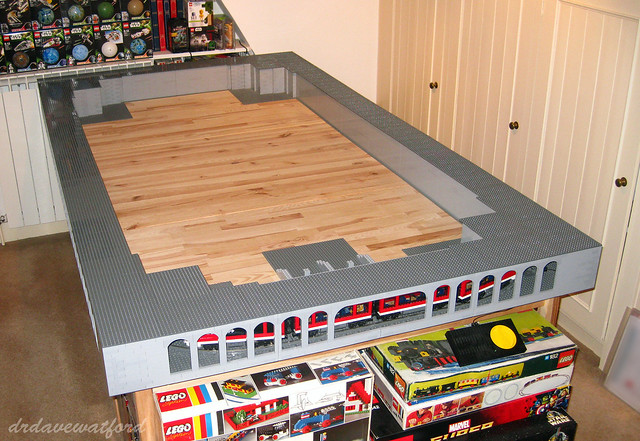
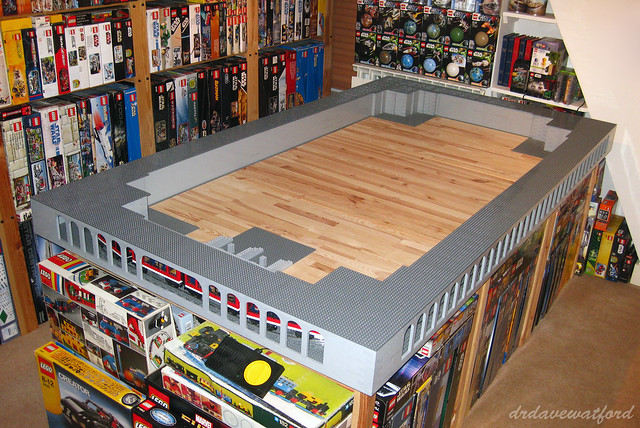
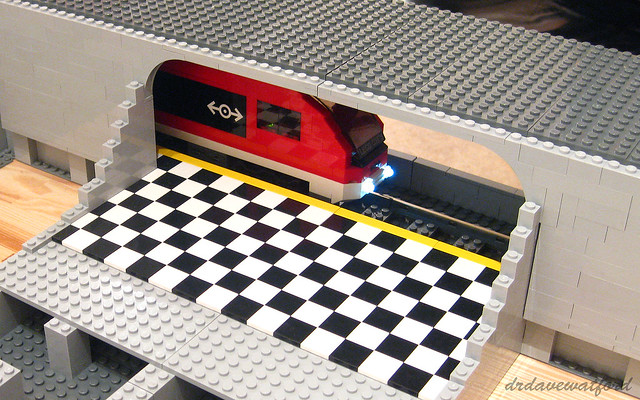
In addition to completing the sides and rear of the station, a couple of modifications were necessary in order to accommodate the transition from my LEGO city layout to the STEAM display. Firstly, I needed to mount the build on baseplates and tile around the edges. Then I needed to figure out what to do about the area under the two arches at the front of the building. In my city layout each of these arches encloses a stairway which descends to a subway platform on the lower level, but this wasn't an option for the STEAM display which is on a single level. In the end I blocked off each arch with a door, using reddish-brown tiles to mimic a wood effect as you can see in the picture below.


The rear of the building (below) follows the LDD design that I shared in my previous post. It's something of a temporary solution - while in place in my city layout the station has track running behind it, and the plan is ultimately to build a station platform at the rear of the building together with a canopy over the platform. Also, if I hadn't been in such a rush to complete the build for STEAM then I'd have embedded a few more skylights into the roof; unfortunately this'll have to wait until I have more time.


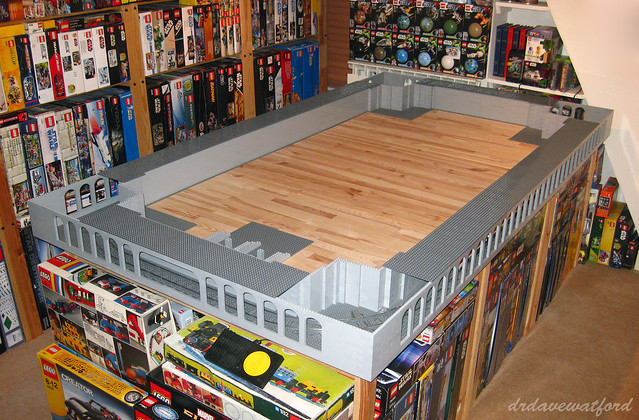
The left and right sides of the building take their design cues from the front, with almost identical designs employed for the various windows, sills and decorative lintels (below).


With the build complete it was time to pack up the station in preparation for the drive down to Swindon. I was planning to separate the building's four floors and pack them into a pair of large rectangular crates, but it turned out that the crates were too small to accommodate the ground floor so I ended up wrapping that section in an old bed sheet and carefully wedging it in the boot of my car. Thankfully all sections survived the journey and arrived at the venue relatively unscathed on the Saturday morning. Many of the exhibitors had already arrived and set up the day before, so I had the simple task of locating the station-sized plot in the almost-complete modular display and re-assembling my build in the allotted space.


You can see the station in position above (thanks to Jamie Douglas for the picture). As well as mobilising Brickish members such as myself to contribute a variety of modular buildings, display organiser Simon Kennedy did an impressive job of recruiting members to construct sections of brick-built road and pavement, vehicles, trees and various roadside structures which really brought the display to life. The lime green Porsche 911 that you can see in front of the station in the picture above was taken from set 75888 Porsche 911 RSR and 911 Turbo 3.0 and is the very car that I built for my Brickset review of the set. More pictures of the completed modular display, together with images of other LEGO creations that were shown at STEAM, can be found here on Jamie's Flickr stream.


Embarrassingly, it's taken me so long to write and publish this post that the 2018 event has long passed and the 2019 Great Western Brick Show is now fast approaching.... I'm pleased to report that thanks to the positive reaction to the 2018 modular display there will be an improved and expanded modular display on show at the 2019 event. This will feature a number of new modulars together with modified versions of some of the existing buildings, and there are also plans to add a canal, a railway and working street lighting. As a result of the inclusion of a railway I've been asked to modify my station to include a platform at the rear. As it passes behind the station the track will be elevated, so my next challenge is to figure out how best to attach a platform halfway up the rear of the building and somehow integrate it into the overall structure. STEAM 2019 will take place on the 5th and 6th of October so I'd better get on with it....

Tuesday, 25 September 2018

Modular Row

Remarkably, in November of this year it'll be fully eight years since I booted up LDD and started to design my own LEGO City. To say that progress has been slow would be an understatement of epic proportions - you could probably have built a real city in the time that it's taken me to build mine so far.... My last update, which described the partial construction and installation of a 10224 Town Hall-inspired railway station MOC (below), was posted a year and a half ago, and since then the project has ground to a halt for the umpteenth time as my LEGO room has once again had to serve as a storage room during a protracted period of real-life building work.


Even though my LEGO room has yet to return to normality, an opportunity to work on the project, albeit in a roundabout way, has nevertheless presented itself. As previously described on these pages (for instance here and here), there's an annual event hosted by the Museum of the Great Western Railway in Swindon which showcases LEGO creations built by members of UK LEGO User Group The Brickish Association. As a Brickish member I'm eligible to exhibit my builds at the show, affectionately known as STEAM. This year one of the displays will be a collaborative display of more than thirty modular buildings designed and built by Brickish members. Anyway, I figured that if I signed up my railway station for the collaborative build then I'd have extra incentive to get off my backside and finish it off. It seemed like an excellent idea at the time, so I went ahead and signed up as a participant, figuring that it shouldn't take too much work to make my build display-ready. In hindsight, however, perhaps I should have taken a closer look at the back of my work-in-progress MOC (below) before being quite so dismissive about the amount of work involved....


With no clear idea of how to complete the build I powered up LDD, dug out the LDD file for the build thus far, and had a play with it. Ultimately I'm planning to replace the back of the building with a full length station platform complete with a canopy which will overhang the platform and railway track. With STEAM fast approaching, however, and with elements to source and little time to play with I decided to keep things simple for the upcoming display and follow the design used for the back of 10224 Town Hall, extending it for the full width of the expanded building. The side walls, meanwhile, would take inspiration from the front of the station which I'd already completed. Having settled on a plan of action I went ahead and completed two-thirds of the building in LDD, both to reassure myself that I'd be happy with the overall look, and also to help me estimate what additional elements I'd need; you can see an LDD screen grab of part of the back of the building below.


With the design now sketched out in LDD I was ready to crack on with the actual build. In order to integrate the railway station into my City layout I'd had to mount it on an idiosyncratic arrangement of small baseplates, so my first job was to strip these away and replace them with standard 32 x 32 baseplates. When it came to the rest of the building I thankfully already had most of the basic bricks and plates required to construct the outer shell, but I was predictably lacking when it came to the huge number of windows that I'd need, not to mention the larger white plates for the individual floors and various other bits and pieces. I therefore built as much as I could before diving into Bricklink to order the elements that I didn't have. All told I ended up having to order almost 450 elements to complete the build, but at least I was able to find a single EU-based seller who had everything I needed (thanks, Kepes!)

My Bricklink order duly arrived a few days ago which leaves me with the best part of 2 weeks to finish my railway station. I'll post pictures of the build on Gimme LEGO after the event, so stay tuned. Or better still why not come to STEAM a.k.a. the Great Western Brick Show and see it for yourself?!

Monday, 7 March 2016

Sidetracked

Regular readers of Gimme LEGO might recall that I signed off last time with the picture below. For the uninitiated, the picture shows a pile of LEGO 9 volt (9V) track. LEGO no longer makes 9V track, and in fact it hasn't done so for the best part of ten years now. Unlike the currently available LEGO track, which incorporates plastic rather than metal rails, 9V track is electrified via the mains electricity supply. I've written previously about the merits of 9V versus plastic track, for instance here, but in summary one of the advantages of a 9V set-up is that the trains which run on it don't need to carry their own bulky batteries, battery box or remote sensor - all you need to do is incorporate a svelte 9V motor into your LEGO train and it'll run forever. Or at least until the motor burns out or you forget to pay your electricity bill....


So that's all well and good then, but there's a catch. Because LEGO don't make 9V track any more, and because 9V is the system of choice for many LEGO enthusiasts who build and exhibit train layouts, the supply of 9V track and compatible electric motors is limited and ever diminishing. So it's hard to find in any real quantity and expensive, basically, particularly if you want your track to be dark bluish grey to match the rest of your layout rather than the more common older dark grey.

My plan had initially been to use currently available plastic track at ground level as there wouldn't be the same issue with line of sight leading to possible problems controlling the trains as there was for the enclosed lower track loop. In the end, however, I had a change of heart and decided to go with 9V track instead as it'll enable me to run a host of classic older LEGO trains such as the Santa Fe Super Chief and the Burlington Northern Santa Fe (BNSF) Locomotive on the upper track loop in their original, unmodified form - delicious! Thankfully, as you can see from the picture above I just about managed to find what I'd need to fashion the upper track loop plus some track sidings on Bricklink, although the switch tracks (or points if you prefer) were pretty hard to find.


Laying the 9V track was very straightforward and I was quickly able to complete most of the upper track loop as you can see in the picture above. As I'd done previously when constructing the lower track loop I used dark bluish grey plates to raise the straight track sections off the base by one plate in height and rested the curved track sections on dark bluish grey tiles. I did briefly consider trying to anchor the curved sections to the base in a few places via judicious use of 2 x 2 turntables or 2 x 2 plates with one stud, but it became clear that it wasn't necessary as the curves were anchored securely at their ends and the tiles beneath offered sufficient support. I'd previously experimented with covering the exposed dark bluish grey studs on the track sections with reddish brown tiles to give the appearance of wooden sleepers, filling the gaps between sleepers and the area just outside the rails with ballast in the form of 1 x 1 dark tan plates, and adding a few plants for good measure; having been pleased with the overall effect I'm planning on decorating the rest of the upper track loop in the same way and I started with the curved track section below.


Prior to dropping the last few track sections into place I needed to spend a bit of time getting things prepped for the addition of some track sidings which would attach to the upper track loop on the right side of the layout  My first job was to extend the network of red scaffolding modules so that they ran along the entire length of the right side of the layout. With the scaffolds completed and in place I was then able to drop a number of dark bluish grey baseplates on top of them. Obviously baseplates don't have anti-studs on their lower surface, so at this stage the baseplates were just 'floating' on top of the scaffolds; the scaffolds are however specifically designed to be just the right height to support the baseplates at the same height as the neighbouring plates.


As was the case for both the lower and upper track loops, dark bluish grey plates are used to lift the track sidings up by a single plate in height, as well as securely attaching the track sections to the baseplates below. You can see the area beneath the track sidings in the pictures above and below, all ready to receive the track sections. Dark bluish grey tiles are used instead of plates where there isn't anywhere for studs to attach on the underside of the track sections but where some support is nevertheless still required, for instance beneath switch tracks.


With the area beneath the track sidings suitably prepared, all that was left to do was to attach the track sections which make up the sidings to the baseplates below and then complete the upper track loop. You can see the results in the picture below. The baseplates, which had previously just rested on top of the supporting scaffolds, are now held in position as a consequence of being attached to the tracks above, and everything seems to stay in place pretty well.


What's much more obvious in person than in the photographs is that the dark bluish grey baseplates which underpin the track sidings are significantly lighter in colour than the neighbouring dark bluish grey plates. This presumably reflects the fact that baseplates are thinner than standard plates. Given that most if not all of the baseplate area will eventually be covered with ballast or trackside structures this shouldn't be a problem, but I thought I'd mention it as the difference in colour is so marked.


Having completed the upper track loop and sidings I connected the newly-laid track to a 9V speed regulator and power adaptor and plugged the adaptor into the mains to run a quick test; I can confirm that everything is working fine, and when I've gotten around to putting together one of my classic 9V trains I'll shoot some video to prove it.


Previous City Layout update here.

Tuesday, 2 June 2015

Raising the Roof

Having spent the last few weeks reviewing the largest of LEGO's new Jurassic World sets (here) and checking out TIE Fighters new and old (here and here respectively) in excruciating detail, not to mention taking some welcome holiday, I was starting to get withdrawal symptoms from my newly-resurrected LEGO City Layout. I was therefore delighted to find some time to work on it over the past week or so.


At the time of my most recent update (here) I'd pretty much completed the walls of the lower level of the layout (picture above) with only the front right section of wall needing to be finished off. This was therefore the obvious place to jump back in, and as you can see from the pictures below I completed the straightforward job of building the walls of the front right section up to the required height fairly quickly.

 https://www.flickr.com/gp/drdavewatford/FxoF01

Having reached this point in the build I figured that it would be as good a time as any to briefly pause and take stock of my parts usage to date. According to the original rough sketch I put together on LDD which I've followed reasonably closely, I've used around 500 light bley 1 x 1 bricks, 670 light bley 1 x 2 bricks, 240 light bley 1 x 4 bricks, 800 light bley 1 x 6 bricks and 810 light bley 1 x 8 bricks so far; the total part count currently stands at approximately 5,600 bricks, which seems a lot given how little there is to look at yet....


Having completed the walls of the lower level it was time to finish the job of enclosing the lower track loop by building a roof over the top of it; for those of you unfamiliar with the intended design, the roof over the lower track loop will form the floor of the planned upper track loop, thus providing a double-decker arrangement.


Covering the straight sections of track with a sturdy roof (pictures above and below) was a quick and simple task - the roof over these sections only has to span 15 studs so I was able to efficiently complete the job using a combination of dark bley 6 x 16 and 2 x 16 plates. The only real discomfort was financial - the 96 dark bley 6 x 16 plates needed to cover just the straight track sections alone don't exactly come cheap....


Although putting a roof over the straight track sections was simple enough, the corners required a little more thought as covering the curved track sections would necessitate spanning an area 34 studs square. My first thought was to use a 32 x 32 baseplate for each corner and support it at the edges, but because I wanted the corner roof sections to be at the same height as the straight roof sections this wasn't really viable. I therefore needed to use standard plates, but there obviously aren't any plates remotely large enough to span a 34 x 34 area on their own. I consequently needed to come up with a 'mosaic' of plates which would cover the area while providing at least a modicum of structural rigidity so that the roof wouldn't cave in under the slightest pressure. In the end I went with the arrangement below; the dark bley roof sections, again predominantly a combination of 6 x 16 and 2 x 16 plates, are supported underneath by a light bley 16 x 16 plate and a few smaller plates. The use of the large 16 x 16 plate turned out to be key, conferring an unexpectedly high degree of strength and rigidity.


It didn't take long to construct three more assemblies similar to the one above, and you can see the layout with all four corner roof sections in place in the pictures below. Time will tell whether this corner roof arrangement will prove to be sufficiently robust; a section of curved track will run over each corner, so the roof will need to support the weight of trains running over it, not to mention me accidentally leaning on it now and again.... Having tested the corner roof sections under modest weight-bearing, however, the early signs are that they'll do the job OK.


So that's the visible part of the lower level now pretty much done apart from the subway station, then. I still of course need to build the structures which will support the upper level, though, and I also need to figure out a way of rescuing stricken trains from the lower loop in the event of a breakdown; at present I can access the subway train through the arches, and the large opening in front of the subway platform is just about big enough to squeeze the train through when I need to remove it, but it's fiddly and not ideal.


Because I designed the lower level such a long time ago, I've predictably come up with a whole bunch of new ideas during the intervening period to tweak and potentially improve it. I'm going to do my best to keep a lid on those tweaks for now, though - having already taken the best part of 4 years just to get to this point it's high time I moved on, put the lower level to bed for the time being at least, and started to focus on the upper level so that's what I'm going to do.


With the lower track loop now fully enclosed I figured it was high time to power up the track and get the subway train running. You can see a brief video clip below of my modified 7938 Passenger Train running around the lower track loop at about 2/3 speed; click here to view the clip on YouTube if you can't access the embedded video on your device.


Friday, 20 March 2015

Back on Track!

Long-time readers of this blog might recall that ages back I posted a number of entries about the design and construction of my own LEGO City Layout. The first time I posted about it (here) was way back in November 2010 when, while suffering from LEGO withdrawal after a few days away from home, I'd fired up my laptop, loaded up LDD and started to play around with a possible design. As described in that initial post, what I had in mind was a city layout on two levels, with a subway train running below ground and a cityscape on the upper level featuring an outer oval of railway track enclosing a central area. The central area would be filled with roads lined with modular buildings and hopefully some structures that I'd designed myself, plus some railway sidings and a small railway tunnel running through a LEGO rock formation. The upper level would be landscaped so that it didn't just look like a bunch of baseplates chucked together with a few buildings on top, and the icing on the cake would be to make the whole layout modular so that it was feasible to deconstruct, transport and reassemble it for the purpose of displaying it at events.


Over the subsequent weeks and months the basics of the design gradually came together in LDD as you can see from the June 2011 LDD screengrab above (click to enlarge); many of the original concepts, such as a train layout on two levels and a tunnel on the upper level running through a rock formation, were included in the LDD design. I also started to think about how I might integrate my modular buildings into the layout as you can see below (click to enlarge).


As the design continued to take shape it was time to turn my attention to the question of where in my house I could build my layout. I wanted it to be a permanent fixture that I could work on over time and enjoy, and ideally it needed to be in a location where it would remain undisturbed and unmolested when I wasn't working on it. I eventually identified an area of around 1.25 metres x 2.5 metres in my study; suitable tables were then identified, purchased, constructed and installed in the designated space (picture below), at which point the process of sourcing the necessary LEGO elements to build the layout really began in earnest.


LEGO elements for the layout soon started to arrive from Bricklink sellers and elsewhere, at which point building could begin. There were predictably a few changes of plan along the way; I toyed, for instance, with the idea of linking the upper and lower loops of track (more details and video here) but quickly discounted that notion when it became clear how much space that would require; I also decided to ditch road plates for brick-built roads to save on space and because I thought brick-build roads looked a lot better (details here); finally, I decided to electrify the subterranean track loop using LEGO's 9V train system when it became evident that I wouldn't be able to control trains remotely on the enclosed lower loop using a Power Functions remote control due to an absence of 'line of sight' (details and video here). Slowly and painstakingly, my layout started to materialise as you can see in the picture below.


There was a problem, though. If you compare the earlier photograph of the empty tables taken in June 2011 with the picture immediately above which was taken in April 2012 you can see that the area around the layout was gradually filling up with LEGO sets as all my available LEGO storage space had become exhausted. And as you can probably imagine, as my collection expanded further, the problem worsened, with more and more floor space taken up by LEGO sets. It consequently became harder and harder to physically get to the layout to work on it, and eventually all available space around the layout, and indeed on the tables themselves, became filled with sets piled one on top of another. It was obviously impossible to continue, and thus all building ground to a halt until a storage solution could be found. This really wasn't as straightforward as it might sound, and I soon realised that for the adult LEGO collector who's in it for the long haul, storage might just be the biggest, and potentially most expensive, challenge that they'll face in respect of their hobby. Suffice to say that the complete lack of progress on the project since the last update I posted in April of 2012 is entirely down to me grappling with the storage issue.


Challenging though the problem was, I had no choice but to get to grips with it, partly because I wanted to continue building my layout, but more importantly because my wife wasn't willing to tolerate my LEGO collection taking over the whole house, which it eventually would have done. So I had to bite the bullet - I identified an external storage solution, came to terms with the associated costs, and commenced the task of sorting through all my sets. Those sets which I considered to be the core of my collection - Star Wars and a few other licensed themes such as Indiana Jones and Harry Potter, modular buildings and other Exclusives, space-related sets (vintage and more recent), plus a variety of other favourites - remained at home while everything else was carefully catalogued, packed into numbered, double-walled boxes and placed into secure storage over a 6 month period. What I'll do with all the stored items is another important question, of course - if our much-discussed house extension ever materialises then it'll all come back home, but otherwise..... Even so, one step at a time - the task of identifying non-core items and duplicate sets, cataloguing, packing and storing is now nearly done, and it feels good. For the sake of posterity I'm a little frustrated that I didn't take pictures when things were at their worst and the layout was completely inaccessible, but I at least remembered to take the "work in progress" picture above - better late than never; admittedly much of the work had already been done by that point and I was on the home straight, but at least it gives you a flavour of how things were. A few weeks on from then and I'm finally organised and ready to crack on, as you can see from the picture below.


So, the wheel has gone full circle and I'm basically back where I was a couple of years ago, albeit better equipped to accommodate any further expansion of my LEGO collection but also definitely more restrained on the aquisitions front.... And to all those patient and intrepid souls who've continued to e-mail me since my last update in April 2012 and ask when I was going to post a progress report, I salute you - those reminders definitely helped to push me along, and I hope that this post provides an explanation of sorts.


So now we're all caught up and it's high time to get building again. Next time I post there'll hopefully be some real progress to report on this project, so stay tuned!

< -- LEGO City Layout : previous blog entry                           LEGO City Layout : next blog entry -- >

Wednesday, 4 April 2012

Whoops...

Honestly, what was I thinking ? Infrared remote control requires line of sight in order to operate the device - it won't work through walls. So if you place the device that you wish to control, for instance a LEGO train, in a place without line of sight to the controller, say in a long, enclosed section of railway tunnel, then it won't work. Duh.


Above (as with all the pictures, click to enlarge) you can see where I'd got to with my LEGO city layout the last time I blogged about it; eventually the whole loop of track will be fully enclosed, and the plan is to ultimately run an extended 5-car version of Set 7938 Passenger Train on this loop. Problem is that the standard, unmodified train is operated by infrared remote control, so for the majority of its progress around the enclosed loop of track I won't be able to control it. Whoops.... So what to do ? Well it's thankfully not an insurmountable problem, but it has once again necessitated an unplanned excursion into my wallet for what I think is the optimal solution.

For those of you of a more tender age, it's probably time for a quick history lesson. Since the appearance of LEGO trains in the mid-nineteen sixties, the company has utilised a variety of methods for making trains move by themselves. Initially it was 4.5V motors powered by huge on-board battery boxes. Then in the late sixties LEGO introduced a system of 12V motors running on electrified track; this system gave rise to some of the most iconic and revered trains that LEGO have ever produced, not least Set 7740 Inter-City Passenger Train (below).


This 12V system endured for two decades, eventually being phased out in the early nineties when LEGO transitioned to a system of 9V motors running on a different, moulded type of electrified track. This 'era' ran until 2006, and the introduction of the Remote Controlled, or RC, system which reverted to non-electrified track and motors once again powered by on-board battery boxes. Importantly, however, as the name suggests trains could for the first time be controlled remotely without the need for a physical connection between train and operator. The RC system was short-lived, however, giving way to the Power Functions-based system a few years later. This PF system, which is what LEGO currently sells, also employs non-electrified track, motors powered by on-board battery boxes and infra-red remote control which requires line of sight in order to control the train. Bringing things back to the present, it's this PF system which is used by the train I plan to use in my underground track loop, and hence my little problem....

So the solution ? 9V. Despite having been officially phased out by the LEGO company a while ago now, 9V is still probably the standard for AFOL builders of public LEGO train displays. The track is no longer produced by LEGO and is relatively expensive on the secondary market, as are the motors, but critically for me, train control is via a speed regulator attached to a section of track by wires so there's no need for line of sight, nor is there the potential for batteries to run out with the train stuck deep in a section of tunnel.... Talking of public train displays, and the observation that most seem to employ 9V, there's also another possible advantage - when I finally complete my layout and my attention shifts to the question of public display, if I use 9V track then it raises the possibility of linking my layout with that of someone else to produce a much larger collaborative build.

Anyway, once I'd sourced (and paid for....) the required quantity of dark bley 9V track, it took no time at all to replace the existing track in my layout with the 9V alternative and wire it up to a speed regulator. You can see where I've currently got to with my layout in the pictures below (click to enlarge); use of a wired system is certainly messier and less elegant, but it"s a compromise I'm willing to make in this case.


The other thing I needed to do, of course, was to convert my train from PF to 9V. Having previously had few dealings with 9V beyond buying a couple of old 9V sets for my collection, I approached this task with some trepidation. I needn't have worried, however - it was incredibly simple. From the outside, the standard 9V motor seems to be pretty much identical to the PF motor included with Set 7938 Passenger Train, so it was literally a matter of disconnecting the PF motor from the battery, removing it from the train chassis, and attaching the 9V motor in its place. I could have stripped out the PF remote receiver and battery box at this point given they were no longer needed to make the train move, but decided instead to retain the PF components to power and control the front and rear lights of the train instead.


You can see the train running on the newly laid 9V track loop in the (decidedly ropey) video clip below, complete with PF-powered front and rear lights. These are turned off and then back on again about halfway through the clip using the remote control.


So another small step forwards, then - ever onwards !

<-- LEGO City Layout : previous blog entry                  LEGO City Layout : next blog entry -->

Wednesday, 18 January 2012

One step back and two steps forward....

You could be forgiven for thinking that I'd given up on my city layout, last the subject of a blog posting almost 6 months ago. I'm well aware that things have gone rather quiet on that front, and apologies to those who've e-mailed me asking for progress reports. To be fair, my activities came to a grinding halt not as a result of unforgiveable sloth, but as a consequence of not having the pieces I needed to proceed and the delays I encountered while trying to source them. To my delight, however, I eventually took delivery of a few thousand light bley bricks of various sizes at the end of November, and it was game on....

City Layout : Lower Level on LDD
For those of you that haven't been following along, here's the story so far : the design of the lower level of my layout is done and has been consigned to LDD (screen grab above - click to enlarge). I've cleared sufficient space for the layout in my study, found some tables of an appropriate size to support it, and started to lay down some baseplates and railway track. While waiting for a large order of parts, I experimented with brick-built roads, which I decided to go with, and investigated the possibility of linking the upper and lower levels of the layout by way of a inclined loop of track (see picture below - click to enlarge) which I eventally decided not to do. And now you're caught up with everybody else....


Having rejected the notion, I have to confess that it was still with a somewhat heavy heart that I dismantled the lengthy section of inclined track and supports, thus stripping things back to the bare bones of basically just a loop of track on a bunch of 16 x 32 baseplates (below). I loved the idea of linking the two levels of the layout, but given the relatively small area I have to work with, it just wasn't practical and would have seriously limited what I could have built on the upper level, so it got the boot.

As you were....back to basics
Once the debris had been cleared, there was one final thing to figure out before I could start building in earnest. Having previously convinced myself that a one-stud clearance between the track and the outer tunnel walls of the lower level would be sufficient to allow my subway train of choice (the red Passenger Train) to be comfortably accommodated during its travels round the loop, I started to wonder whether it wouldn't in fact be better to give myself the option of using other trains as well, for the sake of variety if nothing else. Predictably, a one stud clearance wasn't nearly enough to allow most other trains I own to travel round the track, specifically at the corners where at least a 2 or 3 stud clearance was needed. Cue another delay while I pondered whether to just press on as planned and restrict myself to only using the red Passenger Train in the tunnels for all eternity, or whether I should bite the bullet and increase the clearance to give me more options. In the end, I decided to do the decent thing and increase the clearance between the track and the outer tunnel walls from one to three studs; this of course rendered my LDD mock-up somewhat obsolete and meant that I'd be to some extent flying blind. It also meant that the edges of the layout would overhang the tables by around 4 cm on each side. While this doesn't sound like much, only time will tell whether the loss of support around the edges will turn out to be a problem....

Having made my decision, I could finally get building. A combination of dark bley 32 x 32, 16 x 32 and 16 x 16 baseplates were used for the corners and held together with dark bley tiles; as well as loosely holding the baseplates together, the tiles also serve as support for the curved track sections. The curved sections are only attached at their very ends to the baseplates via a couple of 1 x 2 plates, but having run the red Passenger Train round and round the loop with my little boy more times than I care to recall, this hasn't been a problem thus far.


Below you can see the first few light bley bricks that I put into place. Having waited so long for these bricks to arrive, it was strangely exciting to be finally using them in earnest.....


From a very early stage I've planned for the layout to be modular. This'll allow for easier disassembly and subsequent reassembly, and hence potentially enable me to eventually display it at AFOL events if it turns out OK. The sections will be joined to each other via the track connections plus a few technic pins which fit into holes in the adjoining wall sections as you can see below. The intent is not to produce a strong join, merely to hold the sections in place and prevent them from moving around too much, while making it relatively easy to pull the different sections apart when desired.


A few subsequent build pics can be seen below (click to enlarge); it was actually pretty liberating to be able to temporarily stop scratching my head about design issues and instead just do some building and watch my LDD mock-up start to come to life.


The pictures below (click to enlarge) reveal where I'm at currently - an enormous amount still to do to complete the lower level, of course, but it's a start at least. The rear right corner section has reached the required height, and next it's just a case of building the walls up to the same height all the way round. Reassuringly, the red Passenger Train is comfortably accommodated within the tunnel and can move without obstruction; I suspect that this would also be the case for all the other trains that I own, with the notable exception of Emerald Night which needs an obscene amount of space when it negotiates curves, certainly more than I'm willing to provide it with....


As an aside, you can see from some of the pictures above that I'm afflicted by that scourge of AFOLs the world over - storage issues. I've had to resort to using the area to the right of the layout for 'temporary' set storage while I make alternative arrangements. I guess that subsequent layout progress reports will reveal whether I've been successful in doing this or not. I'm not a gambling man, but if I was, I unfortunately know where I'd place my bet....


Further updates to follow, as and when I have more to show you.

<-- LEGO City Layout : previous blog entry            LEGO City Layout : next blog entry -->