Showing posts with label Great Western Brick Show. Show all posts

Tuesday, 21 April 2020

Unfinished Business

Back in the summer of 2019 I revealed that I'd be exhibiting my 10224 Town Hall-inspired railway station MOC (below) as part of a collaborative display at the 2019 Great Western Brick Show, but that it'd need some fairly substantial modifications in order to fit into the display.


The display, a LEGO city made up of fan-designed modular-style buildings complemented by brick-built roads, roadside structures, a canal and appropriate landscaping, would also feature a working passenger railway. The plan was for the railway to be elevated for part of its course, and Simon the display organiser asked if I'd be willing to modify my MOC to incorporate a platform at the rear in order to serve the elevated section of track. This seemed like an interesting challenge so I agreed. Simon sent over some specifications and a few photographs to illustrate how my station would fit into the overall display, including the exact dimensions of the plot it would occupy and how high the platform needed to be, so I got to work. As usual I worked in LDD, modifying a previous LDD file to reflect the new design brief, and eventually I came up with the sketch below.


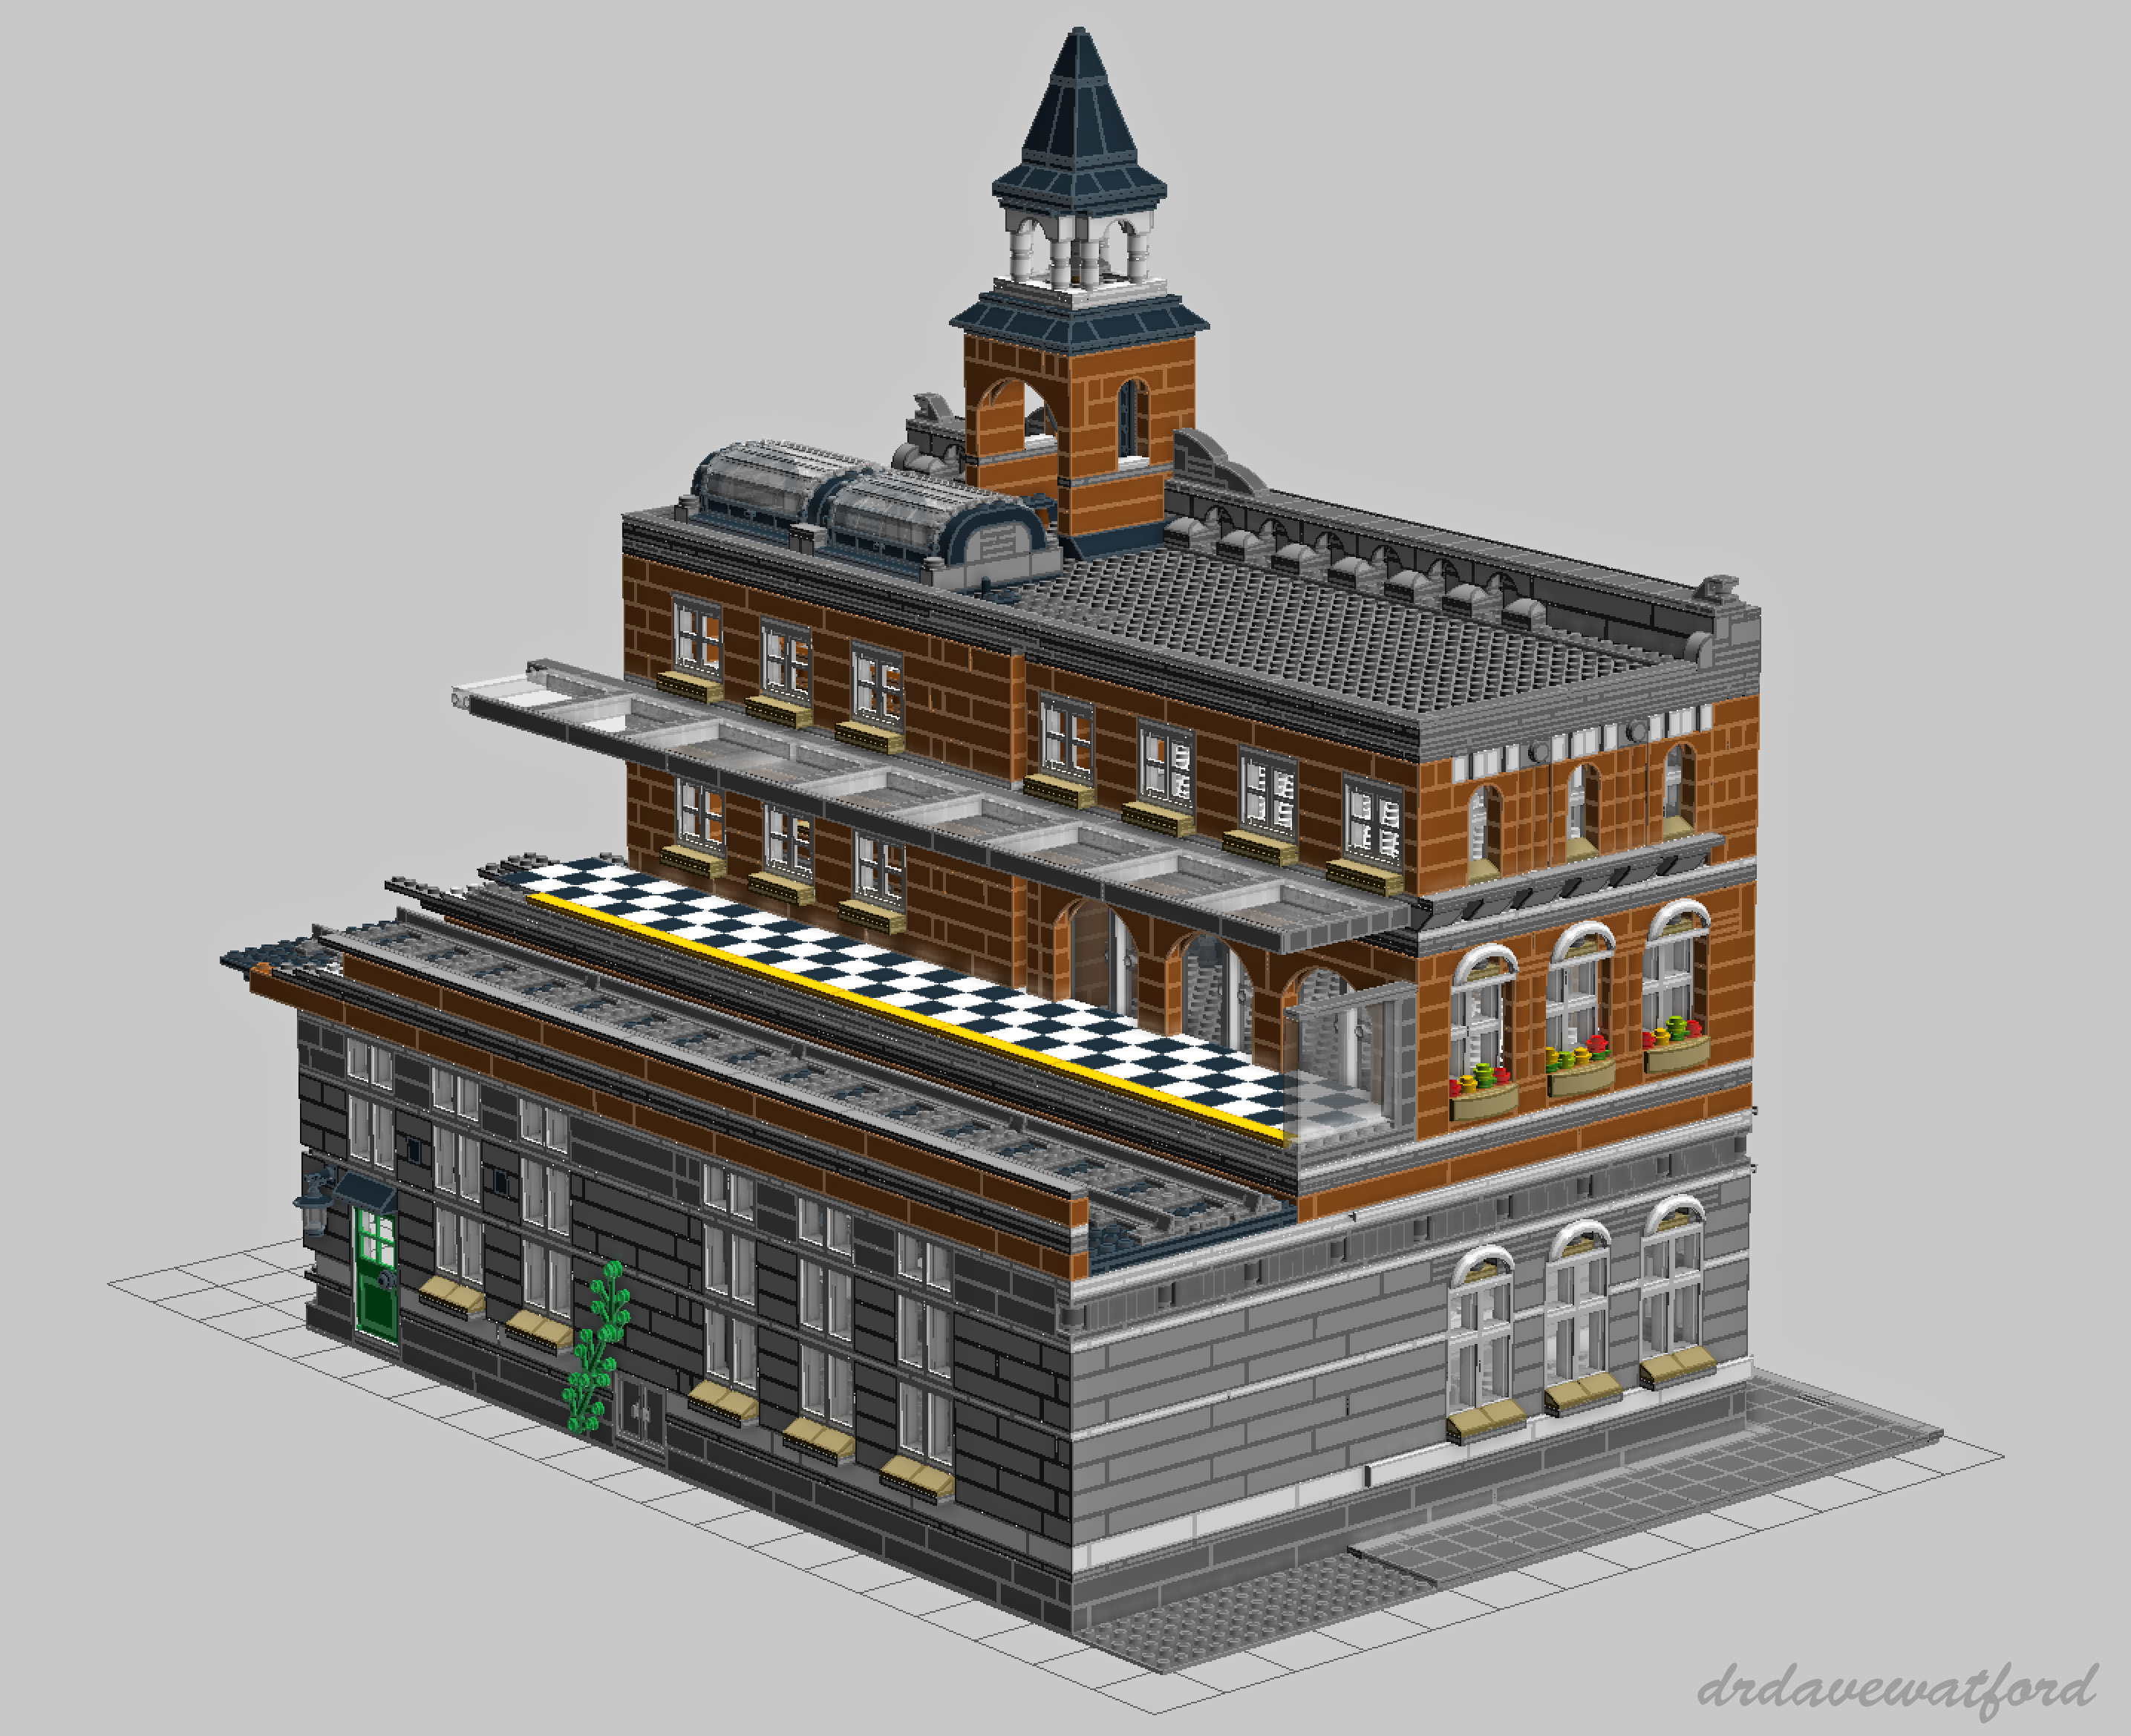
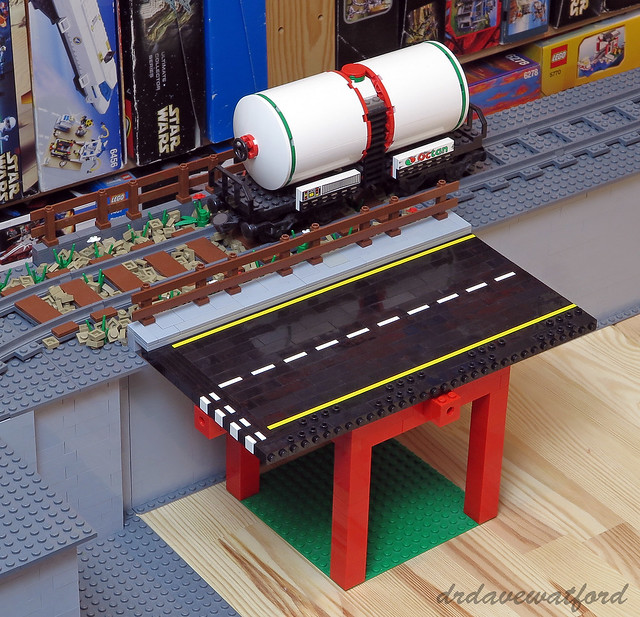
As you can see, my plan was for the elevated section of railway to run on top of the ground floor of the building, which would mean that I had to extend the ground floor backwards to a considerable extent. The roof of the new, extended ground floor section would serve as the track bed, meaning that it would have to bear the weight of the track and train and be constructed accordingly. I'd also need to build a station platform at second floor level and attach a canopy a suitable height above it. The 16 x 6 area of open studs at the rear and to the side would eventually accommodate a bridge support, carrying the rail track from a bridge onto the station. From a purely technical perspective the build would be pretty straightforward, but the existing rear of the station (below) would nevertheless require substantial modification.


After double- and triple-checking that my design would fit the specified dimensions I sent an LDD screengrab to Simon for his approval, and after a bit of back-and-forth he was happy with it and I had the green light to get cracking with the modifications. To my surprise it turned out that I already had most of the LEGO elements that I needed for the build, but there were inevitably a few parts that I didn't have. This necessitated a gratifyingly small, if depressingly expensive, Bricklink order. Still, at least the parts arrived quickly and in perfect condition, so I was soon ready to build. It was the first meaningful LEGO project that I'd undertaken for a while on account of work, holidays and family commitments and it felt great to get my head down and do some building, so much so that I really got into it, burned the midnight oil and managed to complete most of the work in just a couple of nights.


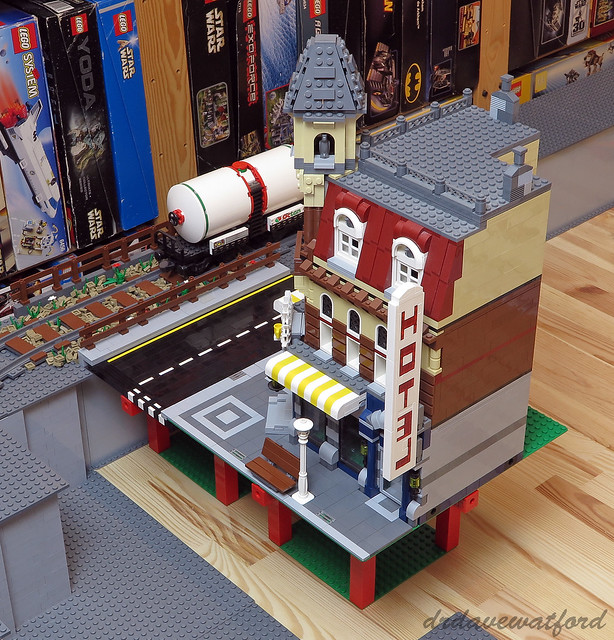
As you can see from the picture above, I didn't make any modifications to the front of the building. The rear (below) was however much altered. I followed my LDD sketch pretty much to the brick, although I did make a couple of additional minor tweaks at the end, supporting the floating platform canopy with four lengths of black rigid 3mm hose and swapping out the old window sills with tan 2 x 4 tiles to make them look a bit less chunky. The building remains modular and splits into four sections, namely the expanded ground floor complete with track bed, the second floor which includes the station platform, a third floor to which the canopy attaches, and the roof which features the clock tower.


With the modified station now complete my next job was to figure out how to get it to the Great Western Brick Show venue in Swindon intact, and transporting it turned out to be a bigger challenge than I had anticipated. While the upper levels of the building just about squeezed into a large plastic crate, the expanded lower level was too big to fit into any box or crate that I owned or could lay my hands at short notice. I therefore ended up having to wrap it in a bed sheet and shoehorn it into the pitifully inadequate boot/trunk of my car and just pray that it survived the 80 mile journey without disintegrating, which it thankfully did, just about. Simon had arrived at the venue the previous evening, as had many of the other exhibitors, so the display was already in an advanced state of completion when I arrived at the venue on the morning of the show. All that was left for me to do was drop the station into the vacant plot, stand back and admire the view.


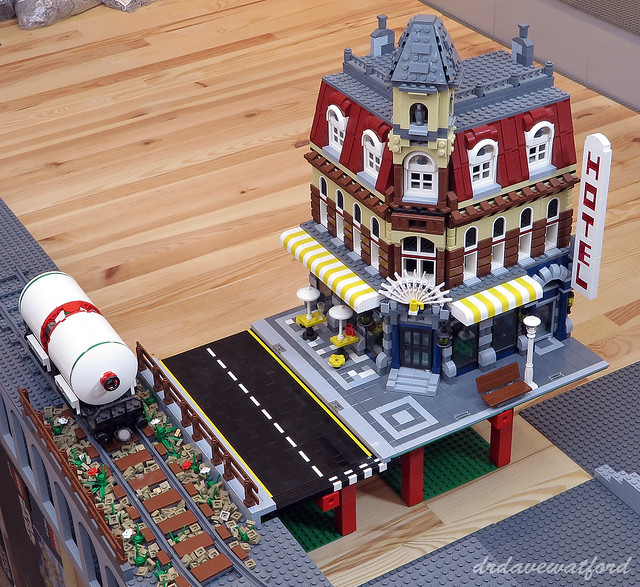
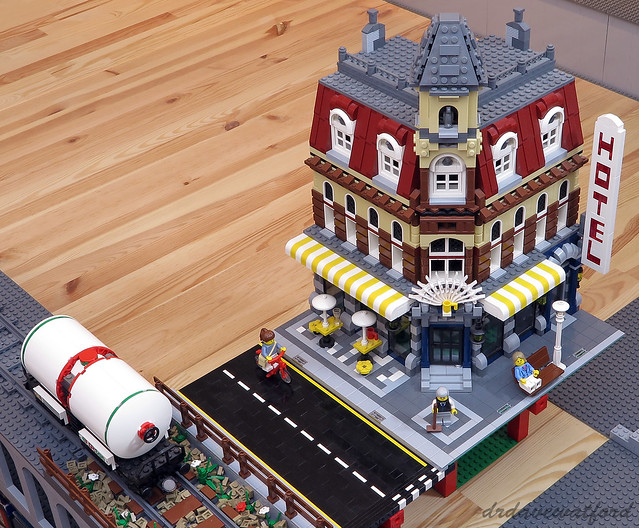
My station was assigned a nice central position in the display. Thanks to some impressive planning by Simon the station was flawlessly integrated into the display's rail loop by way of a pair of elegant dark green railway bridges complete with tan bridge supports which flanked the station on either side as you can see in the picture above. The narrow pavement in front of the station conceals electrical wiring which supplies a number of working LED street lamps, and beyond the pavement lies a section of brick-built road, some more pavement, and then a canal which is spanned by a pair of brick-built humpback bridges. A small courtyard completely enclosed by a number of buildings lies to the rear of the station beyond the rail track (below).


In addition to the integration of new features such as a working railway loop, an automated level crossing and LED street lights, the display had also physically expanded to a significant degree since its debut appearance at the 2018 Great Western Brick show. Click on the image below for a brief video tour of the city; if you're having difficulty viewing the embedded video then click here to watch it on Flickr or here to watch it on YouTube.


To my knowledge there aren't any plans to display the modular city at any further events. Even if future displays materialise I'd probably be hesitant to include my station as I don't think it's ideal for the same MOCs to keep appearing at multiple events over an extended period. It's therefore time for my station to come home and once again grace my own MOC City Layout. That'll mean that a lot of the recent changes will need to be reversed in order for the station to fit into its allocated space, but hey - it's all part of the fun!

Stay at home if you can, and keep safe.


Wednesday, 31 July 2019

Letting Off STEAM

It feels like a lifetime since I last posted (here). On that occasion I was preparing to finish up my railway station MOC in preparation for its appearance as part of a display of modular buildings at the Great Western Brick Show a.k.a. STEAM in Swindon. I'm pleased to report that all the elements that I ordered from Bricklink to complete the build duly arrived as promised, and the MOC (below) was completed in good time for its public unveiling.


In addition to completing the sides and rear of the station, a couple of modifications were necessary in order to accommodate the transition from my LEGO city layout to the STEAM display. Firstly, I needed to mount the build on baseplates and tile around the edges. Then I needed to figure out what to do about the area under the two arches at the front of the building. In my city layout each of these arches encloses a stairway which descends to a subway platform on the lower level, but this wasn't an option for the STEAM display which is on a single level. In the end I blocked off each arch with a door, using reddish-brown tiles to mimic a wood effect as you can see in the picture below.


The rear of the building (below) follows the LDD design that I shared in my previous post. It's something of a temporary solution - while in place in my city layout the station has track running behind it, and the plan is ultimately to build a station platform at the rear of the building together with a canopy over the platform. Also, if I hadn't been in such a rush to complete the build for STEAM then I'd have embedded a few more skylights into the roof; unfortunately this'll have to wait until I have more time.


The left and right sides of the building take their design cues from the front, with almost identical designs employed for the various windows, sills and decorative lintels (below).


With the build complete it was time to pack up the station in preparation for the drive down to Swindon. I was planning to separate the building's four floors and pack them into a pair of large rectangular crates, but it turned out that the crates were too small to accommodate the ground floor so I ended up wrapping that section in an old bed sheet and carefully wedging it in the boot of my car. Thankfully all sections survived the journey and arrived at the venue relatively unscathed on the Saturday morning. Many of the exhibitors had already arrived and set up the day before, so I had the simple task of locating the station-sized plot in the almost-complete modular display and re-assembling my build in the allotted space.


You can see the station in position above (thanks to Jamie Douglas for the picture). As well as mobilising Brickish members such as myself to contribute a variety of modular buildings, display organiser Simon Kennedy did an impressive job of recruiting members to construct sections of brick-built road and pavement, vehicles, trees and various roadside structures which really brought the display to life. The lime green Porsche 911 that you can see in front of the station in the picture above was taken from set 75888 Porsche 911 RSR and 911 Turbo 3.0 and is the very car that I built for my Brickset review of the set. More pictures of the completed modular display, together with images of other LEGO creations that were shown at STEAM, can be found here on Jamie's Flickr stream.


Embarrassingly, it's taken me so long to write and publish this post that the 2018 event has long passed and the 2019 Great Western Brick Show is now fast approaching.... I'm pleased to report that thanks to the positive reaction to the 2018 modular display there will be an improved and expanded modular display on show at the 2019 event. This will feature a number of new modulars together with modified versions of some of the existing buildings, and there are also plans to add a canal, a railway and working street lighting. As a result of the inclusion of a railway I've been asked to modify my station to include a platform at the rear. As it passes behind the station the track will be elevated, so my next challenge is to figure out how best to attach a platform halfway up the rear of the building and somehow integrate it into the overall structure. STEAM 2019 will take place on the 5th and 6th of October so I'd better get on with it....

Tuesday, 25 September 2018

Modular Row

Remarkably, in November of this year it'll be fully eight years since I booted up LDD and started to design my own LEGO City. To say that progress has been slow would be an understatement of epic proportions - you could probably have built a real city in the time that it's taken me to build mine so far.... My last update, which described the partial construction and installation of a 10224 Town Hall-inspired railway station MOC (below), was posted a year and a half ago, and since then the project has ground to a halt for the umpteenth time as my LEGO room has once again had to serve as a storage room during a protracted period of real-life building work.


Even though my LEGO room has yet to return to normality, an opportunity to work on the project, albeit in a roundabout way, has nevertheless presented itself. As previously described on these pages (for instance here and here), there's an annual event hosted by the Museum of the Great Western Railway in Swindon which showcases LEGO creations built by members of UK LEGO User Group The Brickish Association. As a Brickish member I'm eligible to exhibit my builds at the show, affectionately known as STEAM. This year one of the displays will be a collaborative display of more than thirty modular buildings designed and built by Brickish members. Anyway, I figured that if I signed up my railway station for the collaborative build then I'd have extra incentive to get off my backside and finish it off. It seemed like an excellent idea at the time, so I went ahead and signed up as a participant, figuring that it shouldn't take too much work to make my build display-ready. In hindsight, however, perhaps I should have taken a closer look at the back of my work-in-progress MOC (below) before being quite so dismissive about the amount of work involved....


With no clear idea of how to complete the build I powered up LDD, dug out the LDD file for the build thus far, and had a play with it. Ultimately I'm planning to replace the back of the building with a full length station platform complete with a canopy which will overhang the platform and railway track. With STEAM fast approaching, however, and with elements to source and little time to play with I decided to keep things simple for the upcoming display and follow the design used for the back of 10224 Town Hall, extending it for the full width of the expanded building. The side walls, meanwhile, would take inspiration from the front of the station which I'd already completed. Having settled on a plan of action I went ahead and completed two-thirds of the building in LDD, both to reassure myself that I'd be happy with the overall look, and also to help me estimate what additional elements I'd need; you can see an LDD screen grab of part of the back of the building below.


With the design now sketched out in LDD I was ready to crack on with the actual build. In order to integrate the railway station into my City layout I'd had to mount it on an idiosyncratic arrangement of small baseplates, so my first job was to strip these away and replace them with standard 32 x 32 baseplates. When it came to the rest of the building I thankfully already had most of the basic bricks and plates required to construct the outer shell, but I was predictably lacking when it came to the huge number of windows that I'd need, not to mention the larger white plates for the individual floors and various other bits and pieces. I therefore built as much as I could before diving into Bricklink to order the elements that I didn't have. All told I ended up having to order almost 450 elements to complete the build, but at least I was able to find a single EU-based seller who had everything I needed (thanks, Kepes!)

My Bricklink order duly arrived a few days ago which leaves me with the best part of 2 weeks to finish my railway station. I'll post pictures of the build on Gimme LEGO after the event, so stay tuned. Or better still why not come to STEAM a.k.a. the Great Western Brick Show and see it for yourself?!

Monday, 9 November 2015

The Countdown Begins....

Regular readers may recall that I posted a piece on Gimme LEGO a couple of weeks back about my preparations for this year's Great Western Brick Show, a.k.a. STEAM, and my experience of exhibiting at the show - you can read it here if you missed it. As luck would have it, I was allocated display space next to Brickset's Huw Millington who was exhibiting his excellent Brickton train layout (picture below) at the show. Because our displays were adjacent to each other, I ended up babysitting Brickton on a few occasions when Huw took a break, and I therefore got to have a play with the trains (which mysteriously derailed a couple of times on my watch, but we'll not dwell on those unfortunate incidents....).

Brickton by Huw Millington, Photograph by Jamie Douglas
I have to say that it was great fun to spend some time presiding over Brickton during the STEAM weekend, so much so that it's inspired me to crack on with my own work-in-progress City Layout. Not only that, but I've somewhat rashly decided that I'm going to try to get my layout sufficiently display-worthy to exhibit at next year's Great Western Brick Show. Yes, really.... I accept that those of you who've been patiently following my painfully slow progress are probably shaking your heads in bemusement at this news - I have after all been working on my layout since November 2010 and I don't exactly have much to show for it - but I'm going to give it a go. As an added incentive, Huw has confirmed that he's going to continue to develop Brickton and plans to show a new and improved version of it at STEAM next year; if I can get my layout ready in time, and if STEAM organiser Martin Long will let me display it there, then Huw's agreed that we can link our displays together at the show so that trains can run from one layout to the other. So I'd better crack on, then....


Last time I posted an update on my City Layout I'd just completed putting a roof over the subterranean track loop as you can see in the picture above. Since then I've started to think about how the next level of my city will fit together. The first thing I did was lay down a few track sections at what will be ground level. Dark bley track on a dark bley base looked predictably monotonous, so to address that I used some reddish brown tiles as sleepers and filled the space between and around the sleepers with ballast consisting of dark tan 1 x 1 plates as you can see in the picture below (click to enlarge). The sleepers are obviously too wide to be true to life, but I still think that the effect is quite pleasing. The ballast also looks okay I reckon, and the addition of a few plant stalks and the odd flower here and there helps to give the track a slightly more realistic feel, not to mention perfectly complementing the colour scheme of the tanker truck (Set 10016) that I've posed on the track.... Running some dark reddish brown fencing down the outside of the track helps to stop the ballast from falling off the sides of the layout, as well making things look nice and tidy.


Having made a start on the ground level track loop, the next thing I wanted to do was to attach a section of road alongside the track. It's interesting that having recently experimented with a variety of techniques for constructing and integrating brick-built roads I've ended up going back to something not too dissimilar to what I worked out back in August 2011 when I first played around with with brick-built roads here. One of the things I needed to figure out was how best to neatly transition from track to road; I ended up building a three stud-wide pavement to separate them (picture below - click to enlarge) with more reddish brown fencing employed trackside to protect pedestrians. The road is supported underneath by a modular brick-built scaffold, and I envision that the whole ground level of the city inside the outer track loop will eventually be supported by similar scaffolds. The road itself is predominantly built from one stud-wide black bricks which are laid on their sides; by building the roads in this way I figure that I'll be able to create a studless road surface relatively inexpensively, and it also enables me to fashion suitably thin road markings out of yellow and white plates and tiles sandwiched between the black bricks. I spent a while debating what colour the roads should be before eventually deciding to build them in black rather than dark bley; while black is probably less realistic I do think that it'll provide a better contrast with the surrounding structures - my city already features more than enough bley and dark bley I reckon. The outer edges of the road section incorporate a number of modified 1 x 4 bricks with four studs on one side; the studs on the side of these bricks attach to the underside of the pavement, thus holding the road firmly in position.


With a section of brick-built road in place the next task was to neatly transition from the road to a building, and for this I called upon my trusty Cafe Corner (below - click to enlarge). Modified 1 x 4 bricks with four studs on one side attached to the edge of the road section are again used to anchor the road to the underside of the pavement next to the building and hold everything nicely in position.


I'm planning on populating my city with a mixture of modular buildings, for example Cafe Corner and Green Grocer, and a selection of MOCs. Over time my intention is to gradually phase out the official sets and replace them with more of my own creations, but until that time comes LEGO's beautiful and iconic modulars will more than suffice I think.


And that's as far as I've got for now. Having started to figure out how the various components making up my city will fit together, the next step will be to get to work in earnest on the modular scaffold which will underpin all the ground level structures, although given that I've used up most of my supply of loose red bricks on the frame of my Manic Miner mosaic, it looks like I'm going to need to raid Bricklink once again to stock up. So raid Bricklink I shall - there's no time to waste as the countdown to STEAM 2016 has well and truly begun.....


Thursday, 22 October 2015

Fun and Games

So, another year, and another thoroughly enjoyable weekend spent at the Great Western Brick Show, a.k.a. STEAM. This event, which is held at the Museum of the Great Western Railway in Swindon, features builds by members of the Brickish Association, the UK's largest LEGO User Group. The show is now in its 13th year, and as in previous years it offered up a dizzying array of superb LEGO creations. Having first visited STEAM in 2010, I ended up going back in 2011 as an exhibitor and I've exhibited there every year since then, displaying the likes of the UCS AT-AT in 2013 and my Ghostbusters HQ and ECTO 1 last year. Having reached September without anything new to show this year,  however, I 'd pretty much resigned myself to attending STEAM 2015 as a tourist rather than an exhibitor. Thankfully, with the show rapidly approaching I unexpectedly had a flash of inspiration and managed to design, source the parts for and build a brand new MOC for STEAM in double-quick time - most out of character....

Photo courtesy of Andrew Tipping/Bricks Magazine
My STEAM display (above - click to enlarge) was an homage to Manic Miner, one of my favourite ever video games. Written in just six weeks by eccentric eighties gaming enigma Matthew Smith and first released on the Sinclair ZX Spectrum home computer in 1983, it's no exaggeration to say that Manic Miner was something of a phenomenon back in the day. The game was basically a fiendishly sadistic platformer which required pixel-perfect jumps and meticulously precise timing; I shudder to think how many hundreds of hours I spent trying to safely negotiate the game's twenty increasingly bastard-hard levels. Certainly it felt like an eternity before I finally defeated the game and emerged dischevelled and squinting into the sunlight. Leap forward more than 30 years to a couple of months ago and I randomly stumbled across a couple of Flash versions of Manic Miner online; the memories immediately came flooding back, and amid the waves of nostalgia it occurred to me that the first level of the game (below) might translate rather nicely into a LEGO mosaic....

Image from Girny Gamer
My initial idea was to reproduce the whole screen in LEGO, with one LEGO stud representing one ZX Spectrum pixel. I quickly realised, however, that building a 256 x 192 stud LEGO mosaic (equivalent to 8 x 6 standard 32 x 32 baseplates), not to mention a frame that would be sufficiently robust to safely and securely support the mosaic at a public event, wouldn't be feasible in the time available. I therefore opted to compromise by only reproducing a 120 x 88 pixel section of the screen, and while even this ended up being a bit of a stretch time-wise I thankfully managed to complete it a few days before the show.

Although I was pleased with the finished build, I do have to admit that I was far from sure how visitors to STEAM would react to it. While I was confident that there would be at least some visitors of a certain age who'd immediately recognise what I'd built, I was also concerned that there would be a whole lot of people who would have absolutely no idea what it was.... Just 48 hours prior to the show, however, I stumbled upon a possible solution to the problem - a video clip (embedded below, or click here to view it on YouTube) posted by kingqueen3065 featuring the Manic Miner ZX Spectrum loading sequence followed by a five-level play-though.


I figured that if took my iPad along to the show and used it to display the video clip on a loop it'd provide a useful reference point for visitors who hadn't previously come across the game. Decision made, I quickly constructed a suitable LEGO frame to slot my iPad into and I was ready to go. Transporting the mosaic and its 108 cm x 81 cm frame to the show was a bit of a pain thanks to my impractical choice of car, although my long-suffering wife was thankfully on hand to fashion a huge protective sleeve out of deconstructed cardboard boxes and polythene sheets to protect the mosaic in transit, and I was able to break the brick-built frame into manageable sections and box them up without too much difficulty. Having eventually managed to shoehorn everything into the car, I drove to Swindon at the crack of dawn on the first day of the show. Setting up was pretty straightforward, and at 10 a.m. the doors opened and STEAM was underway. As things turned out, using the iPad alongside my build proved to be a masterstroke. While a steady flow of grown ups recognised the mosaic and happily reminisced about the game, there were at least as many kids who were transfixed by the gameplay video running on the iPad and quickly made the connection with my display, so everybody was happy.

So that's STEAM done and dusted for another year, and there's just one final loose end to tie up - what to do with my mosaic now it's back home. I wonder if my wife wants some new artwork for the sitting room....?