Showing posts with label 10224. Show all posts

Tuesday, 21 April 2020

Unfinished Business

Back in the summer of 2019 I revealed that I'd be exhibiting my 10224 Town Hall-inspired railway station MOC (below) as part of a collaborative display at the 2019 Great Western Brick Show, but that it'd need some fairly substantial modifications in order to fit into the display.


The display, a LEGO city made up of fan-designed modular-style buildings complemented by brick-built roads, roadside structures, a canal and appropriate landscaping, would also feature a working passenger railway. The plan was for the railway to be elevated for part of its course, and Simon the display organiser asked if I'd be willing to modify my MOC to incorporate a platform at the rear in order to serve the elevated section of track. This seemed like an interesting challenge so I agreed. Simon sent over some specifications and a few photographs to illustrate how my station would fit into the overall display, including the exact dimensions of the plot it would occupy and how high the platform needed to be, so I got to work. As usual I worked in LDD, modifying a previous LDD file to reflect the new design brief, and eventually I came up with the sketch below.


As you can see, my plan was for the elevated section of railway to run on top of the ground floor of the building, which would mean that I had to extend the ground floor backwards to a considerable extent. The roof of the new, extended ground floor section would serve as the track bed, meaning that it would have to bear the weight of the track and train and be constructed accordingly. I'd also need to build a station platform at second floor level and attach a canopy a suitable height above it. The 16 x 6 area of open studs at the rear and to the side would eventually accommodate a bridge support, carrying the rail track from a bridge onto the station. From a purely technical perspective the build would be pretty straightforward, but the existing rear of the station (below) would nevertheless require substantial modification.


After double- and triple-checking that my design would fit the specified dimensions I sent an LDD screengrab to Simon for his approval, and after a bit of back-and-forth he was happy with it and I had the green light to get cracking with the modifications. To my surprise it turned out that I already had most of the LEGO elements that I needed for the build, but there were inevitably a few parts that I didn't have. This necessitated a gratifyingly small, if depressingly expensive, Bricklink order. Still, at least the parts arrived quickly and in perfect condition, so I was soon ready to build. It was the first meaningful LEGO project that I'd undertaken for a while on account of work, holidays and family commitments and it felt great to get my head down and do some building, so much so that I really got into it, burned the midnight oil and managed to complete most of the work in just a couple of nights.


As you can see from the picture above, I didn't make any modifications to the front of the building. The rear (below) was however much altered. I followed my LDD sketch pretty much to the brick, although I did make a couple of additional minor tweaks at the end, supporting the floating platform canopy with four lengths of black rigid 3mm hose and swapping out the old window sills with tan 2 x 4 tiles to make them look a bit less chunky. The building remains modular and splits into four sections, namely the expanded ground floor complete with track bed, the second floor which includes the station platform, a third floor to which the canopy attaches, and the roof which features the clock tower.


With the modified station now complete my next job was to figure out how to get it to the Great Western Brick Show venue in Swindon intact, and transporting it turned out to be a bigger challenge than I had anticipated. While the upper levels of the building just about squeezed into a large plastic crate, the expanded lower level was too big to fit into any box or crate that I owned or could lay my hands at short notice. I therefore ended up having to wrap it in a bed sheet and shoehorn it into the pitifully inadequate boot/trunk of my car and just pray that it survived the 80 mile journey without disintegrating, which it thankfully did, just about. Simon had arrived at the venue the previous evening, as had many of the other exhibitors, so the display was already in an advanced state of completion when I arrived at the venue on the morning of the show. All that was left for me to do was drop the station into the vacant plot, stand back and admire the view.


My station was assigned a nice central position in the display. Thanks to some impressive planning by Simon the station was flawlessly integrated into the display's rail loop by way of a pair of elegant dark green railway bridges complete with tan bridge supports which flanked the station on either side as you can see in the picture above. The narrow pavement in front of the station conceals electrical wiring which supplies a number of working LED street lamps, and beyond the pavement lies a section of brick-built road, some more pavement, and then a canal which is spanned by a pair of brick-built humpback bridges. A small courtyard completely enclosed by a number of buildings lies to the rear of the station beyond the rail track (below).


In addition to the integration of new features such as a working railway loop, an automated level crossing and LED street lights, the display had also physically expanded to a significant degree since its debut appearance at the 2018 Great Western Brick show. Click on the image below for a brief video tour of the city; if you're having difficulty viewing the embedded video then click here to watch it on Flickr or here to watch it on YouTube.


To my knowledge there aren't any plans to display the modular city at any further events. Even if future displays materialise I'd probably be hesitant to include my station as I don't think it's ideal for the same MOCs to keep appearing at multiple events over an extended period. It's therefore time for my station to come home and once again grace my own MOC City Layout. That'll mean that a lot of the recent changes will need to be reversed in order for the station to fit into its allocated space, but hey - it's all part of the fun!

Stay at home if you can, and keep safe.


Wednesday, 31 July 2019

Letting Off STEAM

It feels like a lifetime since I last posted (here). On that occasion I was preparing to finish up my railway station MOC in preparation for its appearance as part of a display of modular buildings at the Great Western Brick Show a.k.a. STEAM in Swindon. I'm pleased to report that all the elements that I ordered from Bricklink to complete the build duly arrived as promised, and the MOC (below) was completed in good time for its public unveiling.


In addition to completing the sides and rear of the station, a couple of modifications were necessary in order to accommodate the transition from my LEGO city layout to the STEAM display. Firstly, I needed to mount the build on baseplates and tile around the edges. Then I needed to figure out what to do about the area under the two arches at the front of the building. In my city layout each of these arches encloses a stairway which descends to a subway platform on the lower level, but this wasn't an option for the STEAM display which is on a single level. In the end I blocked off each arch with a door, using reddish-brown tiles to mimic a wood effect as you can see in the picture below.


The rear of the building (below) follows the LDD design that I shared in my previous post. It's something of a temporary solution - while in place in my city layout the station has track running behind it, and the plan is ultimately to build a station platform at the rear of the building together with a canopy over the platform. Also, if I hadn't been in such a rush to complete the build for STEAM then I'd have embedded a few more skylights into the roof; unfortunately this'll have to wait until I have more time.


The left and right sides of the building take their design cues from the front, with almost identical designs employed for the various windows, sills and decorative lintels (below).


With the build complete it was time to pack up the station in preparation for the drive down to Swindon. I was planning to separate the building's four floors and pack them into a pair of large rectangular crates, but it turned out that the crates were too small to accommodate the ground floor so I ended up wrapping that section in an old bed sheet and carefully wedging it in the boot of my car. Thankfully all sections survived the journey and arrived at the venue relatively unscathed on the Saturday morning. Many of the exhibitors had already arrived and set up the day before, so I had the simple task of locating the station-sized plot in the almost-complete modular display and re-assembling my build in the allotted space.


You can see the station in position above (thanks to Jamie Douglas for the picture). As well as mobilising Brickish members such as myself to contribute a variety of modular buildings, display organiser Simon Kennedy did an impressive job of recruiting members to construct sections of brick-built road and pavement, vehicles, trees and various roadside structures which really brought the display to life. The lime green Porsche 911 that you can see in front of the station in the picture above was taken from set 75888 Porsche 911 RSR and 911 Turbo 3.0 and is the very car that I built for my Brickset review of the set. More pictures of the completed modular display, together with images of other LEGO creations that were shown at STEAM, can be found here on Jamie's Flickr stream.


Embarrassingly, it's taken me so long to write and publish this post that the 2018 event has long passed and the 2019 Great Western Brick Show is now fast approaching.... I'm pleased to report that thanks to the positive reaction to the 2018 modular display there will be an improved and expanded modular display on show at the 2019 event. This will feature a number of new modulars together with modified versions of some of the existing buildings, and there are also plans to add a canal, a railway and working street lighting. As a result of the inclusion of a railway I've been asked to modify my station to include a platform at the rear. As it passes behind the station the track will be elevated, so my next challenge is to figure out how best to attach a platform halfway up the rear of the building and somehow integrate it into the overall structure. STEAM 2019 will take place on the 5th and 6th of October so I'd better get on with it....

Tuesday, 25 September 2018

Modular Row

Remarkably, in November of this year it'll be fully eight years since I booted up LDD and started to design my own LEGO City. To say that progress has been slow would be an understatement of epic proportions - you could probably have built a real city in the time that it's taken me to build mine so far.... My last update, which described the partial construction and installation of a 10224 Town Hall-inspired railway station MOC (below), was posted a year and a half ago, and since then the project has ground to a halt for the umpteenth time as my LEGO room has once again had to serve as a storage room during a protracted period of real-life building work.


Even though my LEGO room has yet to return to normality, an opportunity to work on the project, albeit in a roundabout way, has nevertheless presented itself. As previously described on these pages (for instance here and here), there's an annual event hosted by the Museum of the Great Western Railway in Swindon which showcases LEGO creations built by members of UK LEGO User Group The Brickish Association. As a Brickish member I'm eligible to exhibit my builds at the show, affectionately known as STEAM. This year one of the displays will be a collaborative display of more than thirty modular buildings designed and built by Brickish members. Anyway, I figured that if I signed up my railway station for the collaborative build then I'd have extra incentive to get off my backside and finish it off. It seemed like an excellent idea at the time, so I went ahead and signed up as a participant, figuring that it shouldn't take too much work to make my build display-ready. In hindsight, however, perhaps I should have taken a closer look at the back of my work-in-progress MOC (below) before being quite so dismissive about the amount of work involved....


With no clear idea of how to complete the build I powered up LDD, dug out the LDD file for the build thus far, and had a play with it. Ultimately I'm planning to replace the back of the building with a full length station platform complete with a canopy which will overhang the platform and railway track. With STEAM fast approaching, however, and with elements to source and little time to play with I decided to keep things simple for the upcoming display and follow the design used for the back of 10224 Town Hall, extending it for the full width of the expanded building. The side walls, meanwhile, would take inspiration from the front of the station which I'd already completed. Having settled on a plan of action I went ahead and completed two-thirds of the building in LDD, both to reassure myself that I'd be happy with the overall look, and also to help me estimate what additional elements I'd need; you can see an LDD screen grab of part of the back of the building below.


With the design now sketched out in LDD I was ready to crack on with the actual build. In order to integrate the railway station into my City layout I'd had to mount it on an idiosyncratic arrangement of small baseplates, so my first job was to strip these away and replace them with standard 32 x 32 baseplates. When it came to the rest of the building I thankfully already had most of the basic bricks and plates required to construct the outer shell, but I was predictably lacking when it came to the huge number of windows that I'd need, not to mention the larger white plates for the individual floors and various other bits and pieces. I therefore built as much as I could before diving into Bricklink to order the elements that I didn't have. All told I ended up having to order almost 450 elements to complete the build, but at least I was able to find a single EU-based seller who had everything I needed (thanks, Kepes!)

My Bricklink order duly arrived a few days ago which leaves me with the best part of 2 weeks to finish my railway station. I'll post pictures of the build on Gimme LEGO after the event, so stay tuned. Or better still why not come to STEAM a.k.a. the Great Western Brick Show and see it for yourself?!

Tuesday, 14 February 2017

Hit the Road

Some welcome time off over Christmas and New Year gave me a welcome opportunity to crack on with my LEGO city layout after a hiatus of over three months. Last time I posted an update I had started to significantly modify 10224 Town Hall with a view to creating a St Pancras-inspired station building for the layout, with the front of one 'wing' of the building completed (picture below).


Progress on the station subsequently stalled due to a lack of dark orange bricks, but during the run up to Christmas I was able to pick up 31050 Corner Deli from Amazon at a substantial discount; this set contains a selection of dark orange bricks including the ones I was missing, and while I'm generally loathe to buy brand new sets and immediately cannabalise them for parts, it seemed like an excellent opportunity to get what I needed to progress the build without the hassle of putting together a Bricklink order. Mirroring the modifications that I'd previously made to the Town Hall was fairly straightforward once I had the necessary elements, and I was soon able to complete the front of my station building as you can see in the picture below. The trickiest part of the build was figuring out how to fashion the number '1968' on the roof ballustrade in the same style as the '2016' (the year I started the station build) and the '1891' (from the original Town Hall set). It took some trial and error, but I got there in the end, utilising a variety of SNOT techniques to get it right.


The station is still far from complete, of course - I haven't even decided what the back and sides will look like yet, much less started to source parts - but with the footprint and front largely finalised I was at least now in a position to start figuring out how the building would fit into my layout. As a reminder, the station has been designed to occupy the area marked out by the light blue box below, with a canopy of some description protruding from the back of the building and overhanging the track.


Before placing the station into position on the layout there were a couple of things I wanted to do. First I filled the vacant space to the right of Cafe Corner with another of my venerable old Modular Buildings, 10211 Grand Emporium from 2010; as stated in a previous update I'm planning to eventually populate the layout with a mixture of modified 'official' sets and buildings of my own design, but for now the official, unmodified Modulars will do just fine. With the Grand Emporium in place my next job was to construct a few sections of brick-built road to run between the pair of Modulars and the station. As detailed in an earlier update I'd previously decided on the specifications for my brick-built roads in terms of their width and overall appearance, and I'd also figured out how to integrate the roads with the surrounding buildings and other structures. It was therefore a relatively simple task to build some new sections of road to those specifications and drop them into place on the layout as you can see in the picture below.


In addition to building a couple of full-sized road sections (32 studs in length) I also needed to fashion a smaller section to serve as a junction between the new road sections and the older section of road to the left of Cafe Corner. I also tiled the area between and around the railway tracks to the left of the road junction so as to create a level crossing; this will require a barrier of some description, but that's a job for another day....


With the new road sections in place I carefully lowered the station building into position on the layout as you can see below. There's obviously still a lot of tidying up and landscaping to do around the edges, but it was nevertheless nice to see it in place. I was also relieved to discover that the station's considerable weight was adequately supported by the structures below such that the whole building didn't crash through to the lower level of the layout....


If you've been patiently following along with this project for a while now then you'll perhaps recall that the layout includes an underground track loop complete with an underground station platform (more details here if this is news to you). The underground platform sits directly beneath the station building, and the intent is to connect it with the surface via a pair of staircases which emerge from underneath the twin arches at the front of the station. You can just about see the staircases disappearing downwards beneath the arches in the picture below.


The image below, which is taken from behind the station building, shows one of the staircases starting to take shape. The plan is for both staircases to descend down to a common underground concourse featuring a ticket office and a number of ticket barriers, through which the minifigure population of my LEGO city can access the underground platform.


While the station undoubtedly looks imposing from the front, the rear view above provides a sobering reminder of how much work there is still to do on the left and right 'wings' of the building which are currently only half built. Even so, it feels good to have made some tangible progress and moved the project along a bit, as evidenced by the picture below.


I hope you enjoyed the update. Feel free to share any comments below, and I'll provide further updates in due course.

Previous MOC city layout update here.

Monday, 10 October 2016

Station!

Back in June of this year I posted a review of Set 10224 Town Hall (below). One of the reasons for building the Town Hall when I did, and indeed building Set 10243 Parisian Restaurant a few months earlier, is that I was planning to use these and other Modular Buildings to populate my work-in-progress LEGO city layout, at least until such time as I got around to designing and building a few suitable MOCs of my own to take their place.


Having finished building the Town Hall and placed it alongside a couple of other Modular Buildings, however, I started having second thoughts about dropping it into my layout. It dwarfed the surrounding buildings and just didn't look right positioned alongside them. So what to do with it, then - should I just omit it from my layout? Thankfully an alternative solution occurred to me. On account of the Town Hall's clock tower, its dark orange colour and its arched windows I've always thought that it was vaguely reminiscent of London's historic and spectacular St. Pancras railway station (image below from Architecture Week); given that I was planning to include a railway station in my layout, why not try to repurpose the Town Hall into a railway station?


The more I thought about it the more I liked the idea, although it was immediately evident that there would be a fair bit of work to do. For starters, the Town Hall would have to be expanded substantially to do the job. You can see the intended location of the station marked in blue on the picture of my layout below. The plan is for the station to occupy a total area of 96 studs by 48 studs, which would mean expanding the Town Hall to three times its original width and also constructing a 16-stud wide canopy at the rear to overhang the station platform and railway track.  


So how to proceed? Well, I'm a big fan of sketching things out virtually before diving into the bricks, and my sketchpad of choice is LEGO's own virtual building tool LDD which you can download for free from here if you don't already have it. The first thing I needed to do was to find an LDD file for the Town Hall, and in this regard I was indebted to Eurobricks which has a comprehensive library of LDD files of official sets which have been virtually assembled by Eurobricks members. Having located and downloaded the Town Hall LDD file I then spent a couple of hours on LDD virtually sketching out an idea for an expanded version which might conceivably fit into my layout. You can see a screen grab of my sketch below - I basically extended out the ground, first and second floors of the Town Hall, leaving an opening at ground floor level to provide access to a staircase down to the pre-existing subway platform below. A mirror image of the extension would attach to the right side of the Town Hall, creating a building which would occupy the best part of three baseplates in width.


Having arrived at a concept that I was basically happy with I was too impatient to develop the sketch any further and instead turned my attention to the job of sourcing the bricks I'd need to translate the concept into a full-blown LEGO model. Ideally I'd have taken the easy route and just shelled out for two additional Town Hall sets to part out for the elements that I'd need, but the price of the set has skyrocketed since its retirement, to the point where I'd likely have had to stump up between £350 and £400 for just a single unboxed copy. I therefore resigned myself to ordering the elements that I didn't already have from Bricklink and set about putting together a wanted list. This would of course have been a lot easier if I'd completed my LDD design rather than lazily skipping most of it, but as it was I ended up having to make a lot of educated guesses regarding of how many of each element I'd need. With my distinctly flaky wanted list drawn up, I placed a couple of pricy Bricklink orders and waited for the elements to arrive which they duly did over the next couple of weeks.


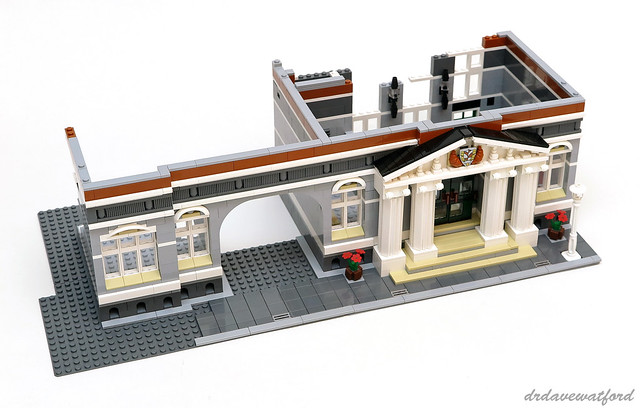
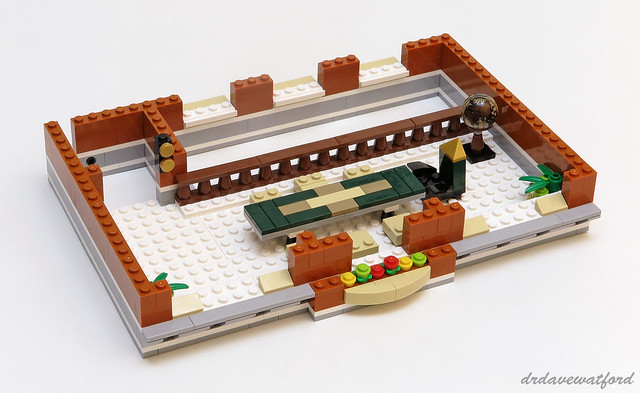
You can see the ground floor modifications above (click to enlarge). First of all I swapped out the Town Hall's tan baseplate for a dark bluish grey one; I anticipate that a small section of the side edge of the baseplate will be visible in the final build and I knew that I'd get irritated by the sight of a thin sliver of tan where there shouldn't be any. I then demolished the front left corner of the ground floor so I could attach the arch, after which it was basically a case of following my LDD sketch. My intention was as much as possible to incorporate architectural features and visual cues from the original Town Hall in the hope that my modifications didn't jar too much and the building ended up looking like a coherent whole rather than a Town Hall with a bunch of random stuff tacked on to it. Consistent with the original Town Hall design each floor of the building is topped off with tiles so that it can be readily detached from the floors above and below; this obviously provides access to the interior as well as making the model a bit more portable which will be welcome in the event that I ever manage to finish the layout and need to transport it. With the front of the ground floor extension complete I moved on to the first floor extension (below).


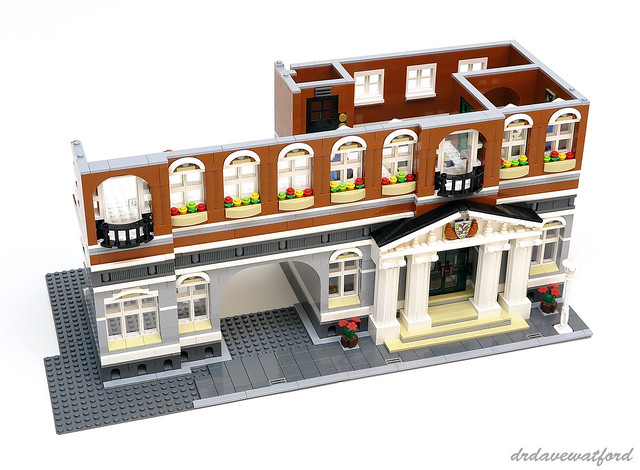
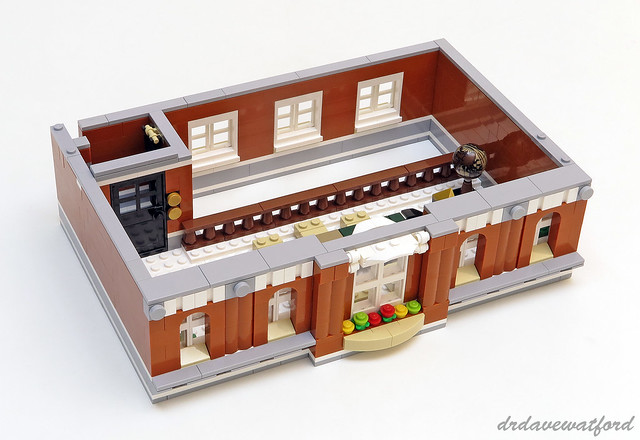
The first floor extension incorporates three additional windows which are pretty much identical to those found in the Town Hall's first floor, right down to the window boxes and the use of white car mudguards for the cornicing. I also constructed a variation on the Town Hall's central first floor doorway and balcony on the front left corner of the extension which required a bit of modification to get it to fit neatly on top of the corresponding section of the ground floor. As mentioned in my review of the Town Hall some of the elements found in the set such as the dark orange 1 x 8 x 2 arch, which you can see above the balcony, are fairly uncommon although thankfully they aren't very expensive on Bricklink; the dark orange modified 1 x 2 log bricks that you can see between the windows are also fairly uncommon, appearing in just 13 sets in total, but again they're thankfully inexpensive and also surprisingly adundant on Bricklink which is a relief given how quickly I burned through them while building this floor.


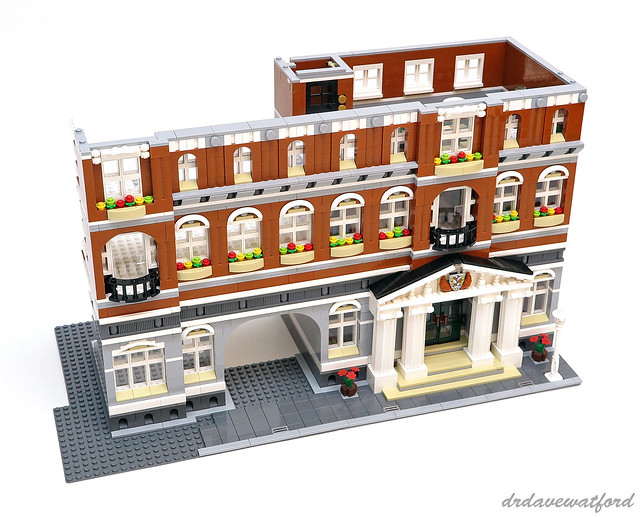
My strategy for the second floor extension (above) was basically the same as that for the first floor - build some additional windows similar in design to those in the Town Hall and then reproduce the central second floor feature, in this case a larger window with ornate cornicing and a windowbox, and modify it slightly to fit on top of the corresponding section below. I also continued out the characteristic cornicing pattern, consisting predominantly of white modified 1 x 2 bricks with groove, and the light bluish grey detailing beneath the windows, into the extension. The dark orange 1 x 4 arches, which you can see above the smaller windows, were probably the hardest elements to source for this part of the build; they've only appeared in two sets to date including the Town Hall and aren't stocked by many Bricklink sellers.


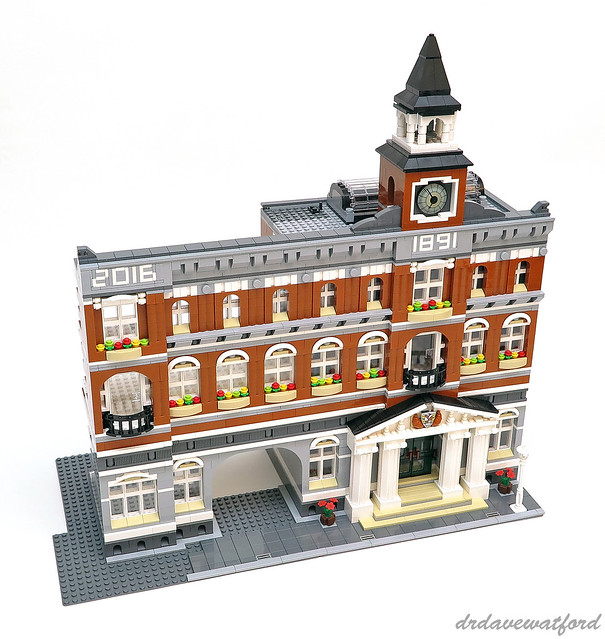
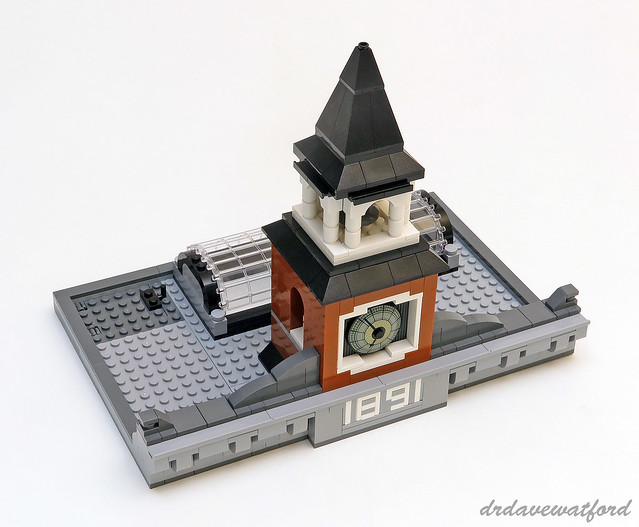
And so finally on to the roof (above). I did initially consider including a smaller version of the central clock tower on the front left corner of the roof, and I even had a play with a few designs, but the idea was eventually abandoned as everything I tried looked too fussy and it became evident that it wasn't really necessary. I did however retain the design of the balustrade running along the front of the roof, and I also decided to mark the construction of my Town Hall extension with the date that I started work on it; creating the '2016' numbering in the same style as the Town Hall's original '1891' provided an interesting challenge and I was glad that I had my Town Hall instruction booklets to hand.

With the extension on the left side of the Town Hall completed to my satisfaction the process of mirroring the design on the other side of the building should be considerably more straightforward, although I strongly suspect that I've underestimated how many bricks I'll need so another Bricklink order will likely be required. I also have to substantially modify the rear of the Town Hall to incorporate a station platform and a canopy to overhang it. I'll post an update when I've made further progress.

Wednesday, 8 June 2016

Hall or Nothing

Having built and reviewed the wonderful Set 10243 Parisian Restaurant a few weeks back (you can check out the review here if you missed it) my quest to get caught up on the Modular Buildings was off to a good start and I was keen to take on another one. Set 10224 Town Hall, released in 2012, was next on my list.


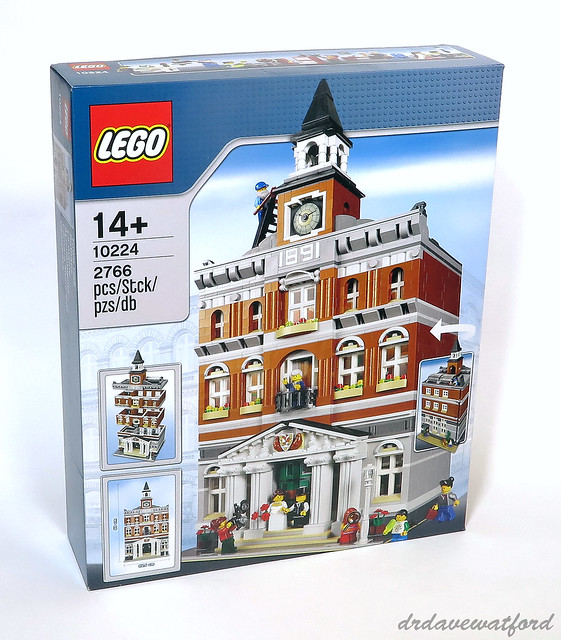
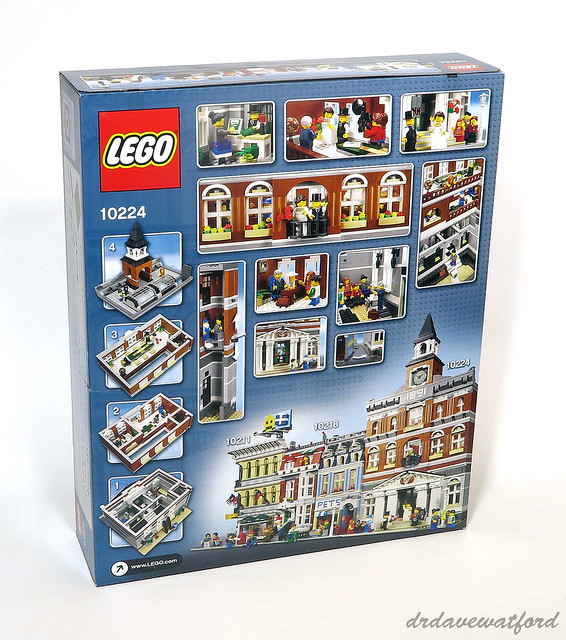
The front of the box (above) lacks the Creator Expert branding carried by the more recent Modular Buildings. Unusually, the box needs to be stood on end in order to view the box art in the correct orientation, and I think this is the only Modular for which that's the case. An image of the completed build occupies the full height of the box, and in addition to the main image the front of the box also features a trio of inset panels showing an exploded view of the Town Hall's four distinct sections, the dimensions of the completed model, and a rear view of the build. The back of the box (below) features a number of wedding-related vignettes set in and around the building as well as once again highlighting the model's four sections and showcasing a few of the set's play features. There's also a picture of the Town Hall displayed alongside a couple of older Modular Buildings, specifically 10211 Grand Emporium and 10218 Pet Shop.


The contents of the box are accessed by cutting a couple of tape seals. Inside the box are three instruction booklets which are sealed inside a cardboard-backed transparent bag. There are also 30 sealed bags of LEGO elements in total, all but one of which is printed with a '1', a '2' or a '3' corresponding to the stage of the build that the elements within are needed for. Finally, there's a tan 32 x 32 baseplate loose within the box; this has appeared in a total of 8 sets including this one. The set doesn't include a sticker sheet.
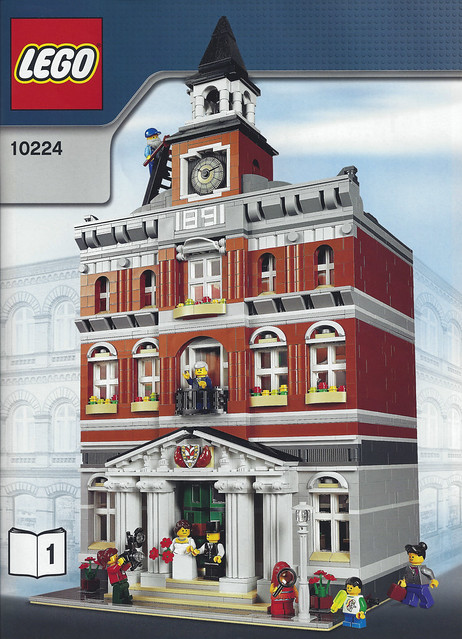

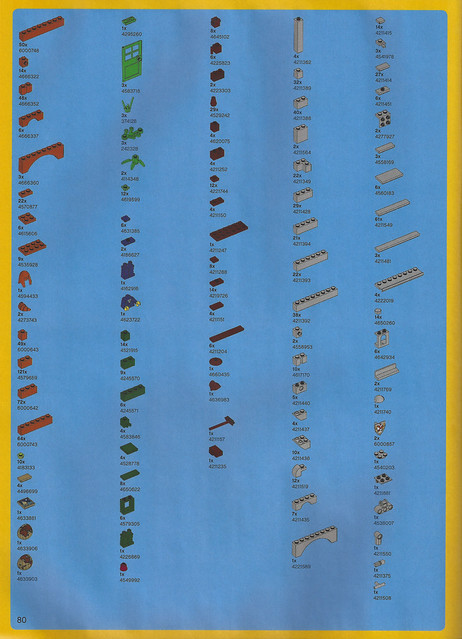
The three instruction booklets have identical covers (above) apart from the booklet number printed in the bottom left corner. The first booklet has 76 pages and consists exclusively of building instructions apart from the back cover which, like the back of the box, advertises the three Modular Buildings available at the time of the Town Hall's release; only the Pet Shop is still available at retail as I write this, and I suspect it won't be around for much longer. The second instruction booklet is much slimmer than the others at only 40 pages; in addition to building instructions it contains advertising for Set 10222 Winter Village Post Office, Set 10220 Volkswagen T1 Camper Van and a couple of the 2011 Creator offerings. At 84 pages, the third booklet is the lengthiest of the three and in addition to buiding instructions it contains a 4-page inventory of elements (sample page below - click to enlarge) and advertising for the LEGO Club, the VIP Programme and an obligatory product survey.


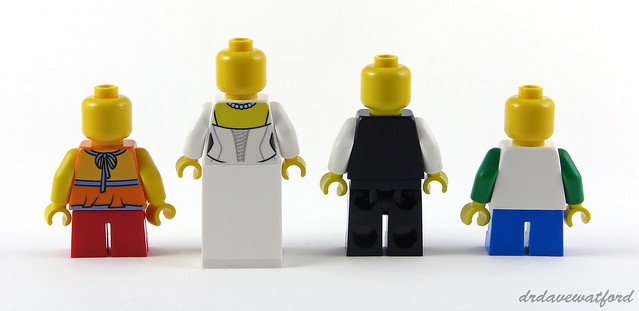
The set contains a total of eight minifigures. All of them are surprisingly unique to the set, although most of their constituent elements have appeared as a part of other minifigures. All eight minifigures have a classic yellow smiley head print and standard, unprinted legs. The Bride (below) has an attractive wedding dress torso print which extends to the back of her torso and is exclusive to this minifigure, although her long dark brown braided hair can be readily found elsewhere as can her 'legs' which consist of an unprinted white 65 degree 2 x 2 x 2 slope representing her long skirt. The Groom has a torso print featuring a waistcoat and tie. This torso has thus far appeared as a part of 19 different minifigures and in no less than five Modular Buildings to date, most recently 10243 Parisian Restaurant. The imaginatively-named Girl has fetching long dark orange hair which has only previously been available in this colour as a part of four minifigures including a couple of Ginny Weasley variants from the Harry Potter theme. Her orange torso, with its cute back-printed halter top pattern, has appeared as a part of 11 minifigures to date. Despite being exclusive to the set the Boy is made up of commonly-available parts, with the exception of his white torso printed with a Classic Space floating minifigure design; I was surprised to discover that this torso has only appeared in 13 minifigures to date as I seem to have seen it a number of times recently.


You can see the Bride, Groom, Girl and Boy from behind in the picture below with their hair and hats removed. Only the Bride and the Girl have back-printed torsos, and none of the minifigures have alternate expressions.


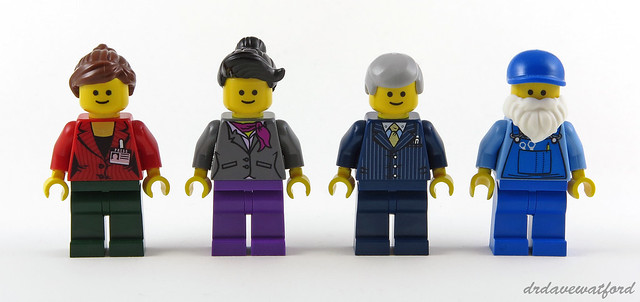
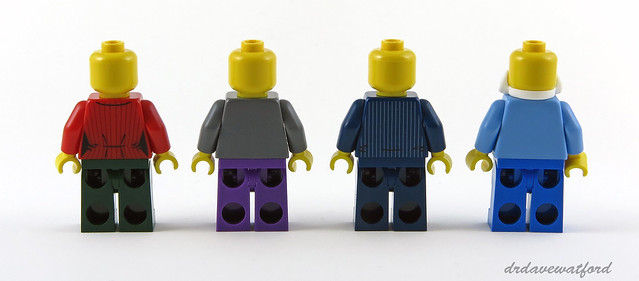
The other four minifigures in the set can be seen in the picture below. The Secretary has a nice torso print featuring a dark bluish grey suit jacket, pink shirt and magenta scarf; her unprinted dark purple legs nicely complement the pink and magenta of her torso. Her black hair, which is styled with a top knot bun and a forelock, has only made an appearance in five minifigures including this one. The Mayor is dressed in dark blue. His torso, which is printed with a pinstriped jacket and gold tie pattern, has only been included in a total of eight minifigures to date. He's otherwise made up of elements which have appeared on many other occasions, which is also the case for the Janitor, whose face is all but obscured by his bushy white beard and blue baseball cap. His torso print features blue overalls with a couple of tools peeking out of the central pocket. Finally we have the Photographer. For some reason the normally-reliable Bricklink doesn't appear to acknowledge her existence within the set, but thankfully Brick Owl isn't so cavalier. Her torso print, which consists of a red low-cut pin-striped jacket and a press pass, has been restricted to just a handful of minifigures, most recently making an appearance in promotional set 40221 Fountain.


As you can see from the picture below, only the Mayor and the Photograher have backprinted torsos. Once again none of the minifigures have an alternate expression.


A total of 14 of the sealed bags of elements are required for Stage 1 of the build, instructions for which are found in the first instruction booklet. In time-honoured Modular fashion, the build commences with some tiling, in this case construction of a narrow, tiled pavement/sidewalk area along one edge of the baseplate. The pavement incorporates an obligatory pair of metallic silver modified 1 x 2 tiles with grille representing drains which have been a part of every Modular build that I've ever attempted. Next the floor plan of the Town Hall is mapped out, predominantly with dark bley and black bricks, and a staircase leading up from the pavement to the front entrance is constructed and topped off with tan tiles. As usual, four 1 x 2 Technic bricks are strategically positioned at ground level at the sides of the baseplate to enable the Town Hall to be attached to other Modular Buidings via a couple of Technic pins, and dark bluish grey 1 x 3 arches, which provide some detailing at the base of the front of the building, are dropped into place; these have only ever appeared in 7 sets including this one. A false floor is constructed at the level of the top of the staircase, although a couple of areas towards the rear of the ground floor remain at baseplate level; a podium complete with a lectern is placed in the larger of these two areas, which will become an auditorium. The lectern is embellished with a printed shield which is unique to the set. The smaller of the two areas is the bottom of a lift/elevator shaft. This will later accommodate a simple manually operated lift.


Just inside the front entrance there's a plinth formed from a couple of round 2 x 2 bricks with grille. On top of this is a white, unprinted minifigure head on a jumper plate; it's not entirely clear what this is, but I'm guessing it's supposed to be a marble bust. A tan table is placed against the wall nearby, while a smaller table bearing a lamp with a dark red fez lampshade, a hundred dollar bill and a desktop computer with printed tiles representing the screen and keyboard is assembled and positioned in what will become a small office on the other side of the ground floor. Meanwhile, the outer walls are built up with layers of dark bluish grey, white and light bluish grey bricks, and a few dark green bricks make an appearance in some of the internal walls. Round the back a door is installed, while green foliage creeps up the back wall of the building and a lamp which incorporates a trans-clear 1 x 1 brick is hung next to the back door.


Windows are then installed front and back, with white mud guards providing detailing over the windows at the front, after which a substantial, brick-built front door is constructed. The front door incorporates a number of dark green 1 x 2 x 2 windows which have only ever appeared in three sets in this colour. The doors attach to a brick-built door frame by way of dark green modified 1 x 1 bricks with clip which are similarly uncommon in this colour. The four columns at the front of the building are next to be assembled. Each one has a core of SNOT bricks including reddish brown modified 1 x 1 bricks with studs on two sides which have appeared in seven sets including this one; modified 1 x 8 plates with door rail cover the central core, and white 1 x 8 tiles provide a tidy, studless appearance. The top, or capital, of each column incorporates a modified 1 x 1 plate with clip light which confers a scroll-like appearance not dissiminar to the volutes found at the head of Ionic columns. The columns form part of a portico; the roof, or pediment, of the portico, has a triangular area below it called a tympanum which is typically carved and decorated in real life. In the case of the Town Hall it has a central feature consisting of the same shield which we were introduced to earlier flanked by a couple of dark orange croissants, with a pair of white skeleton legs on either side of it; it sounds faintly ridiculous, but it actually looks pretty good!
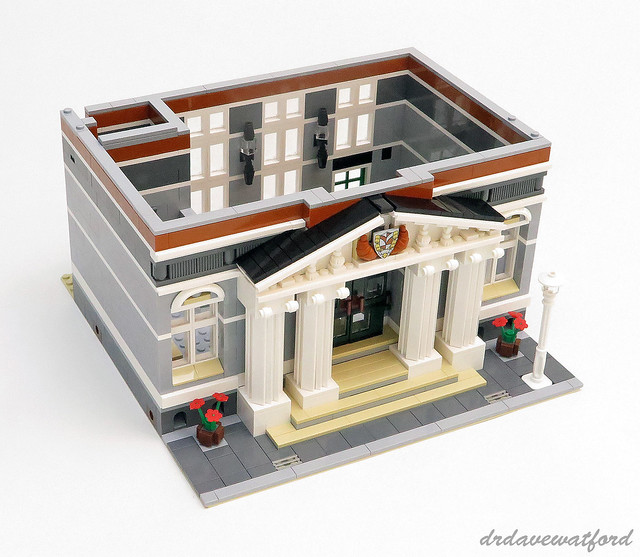

The outer walls continue to be built up, predominantly with layers of light and dark bluish grey bricks. This culminates in the placement of a layer of dark orange bricks which is topped off with light bluish grey tiles. A lamp post and a couple of flower pots are then installed on the pavement outside the front of the building, at which point the ground floor is finished. All that's left to do is to build a camera complete with long lens and flash for the press photographer, at which point Stage 1 of the build is complete.
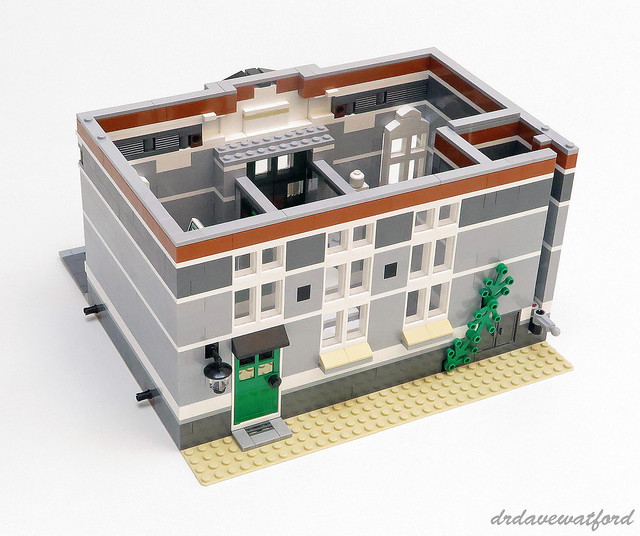

Only five sealed bags of elements are needed for Stage 2 of the build which comprises the second floor of the Town Hall. Some of the plates contained in the unmarked bag are also required, including a couple of white 6 x 24 plates which make up a large part of the floor area and which have only ever appeared in six sets including this one. After building the floor it's time to start on the walls. Some of the dark orange bricks used in the construction of the walls have featured in relatively few sets to date, for instance just eight sets in the case of dark orange 1 x 3 and 1 x 8 bricks. An area of the floor centrally is covered with a small mosaic featuring tan, dark blue and dark green tiles, and a reddish brown ballustrade is constructed to fence off an open section towards the rear; when the second floor is eventually stacked on top of the ground floor this open section will be positioned directly above the auditorium on the ground floor so that proceedings can be observed from the higher floors of the building. Next some rudimentary furniture - a few chairs, plus a desk and a table compete with ornaments including a dark bluish grey frog - are built and put into place.


Four window boxes are then constructed at the front of the building on either side of a rather hazardous balcony with a glaring gap between the curved railings and the balcony floor, and stacks of dark orange modified 1 x 2 log bricks are used to fill the gaps between windows; while log bricks in this colour have appeared in a number of other sets, there are a total of 48 of them in this set which is significantly more than in all the other sets put together. The internal walls incorporate a dark orange 1 x 8 x 2 arch; this can be found in a total of just four sets. The elevator shaft continues upwards into the second floor where it's guarded by a black door, while a green door closes off a small office to the right; the walls of the office are furnished with some token decoration in the form of a printed 2 x 2 dark tan tile. A trans-clear door at the front provides balcony access. Similar to the ground floor, white vehicle mud guards provide some detailing over the four front windows, while a dark orange 1 x 8 x 2 arch frames the balcony door. Finally, the walls are topped off with light bluish grey tiles and the second floor is done.
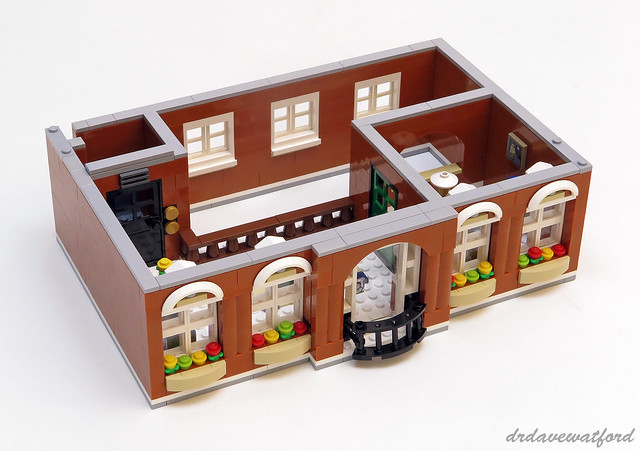

The last stage of the build, which involves construction of the top floor of the Town Hall plus the roof and clock tower, requires the ten remaining sealed bags of elements plus the outstanding contents of the unmarked bag. The build commences with construction of an identical floor to that of the level below, featuring the same open area towards the rear to provide a view down to the auditorium. The top floor accommodates a conference room which is dominated by a large table with a dark green, tan and dark tan-tiled tabletop and six tan chairs. A reddish brown ballustrade forms the rear boundary of the conference room overlooking the auditorium, and there's an entrance to the lift which is closed off by a black door as was the case for the floors below. The interior of the second floor is sparsely furnished, with a 2-piece dark tan printed globe only previously available in 70810 Metalbeard's Sea Cow and 4191 The Captain's Cabin, providing the only decoration apart from the conference table and chairs. Some simple light bluish grey cornicing is added at the front of the second floor where it meets the floor below.


The rear wall is constructed in exactly the same way as was the case for the floor below, including the installation of three 1 x 4 x 3 windows with opening panes. The windows at the front are different from those installed in the floor below, however, featuring 1 x 2 x 2 windows arranged in a 2 x 2 pattern which are overlapped at their outer margins by the external walls and partially obscured at the top by 1 x 4 brick arches; it's an interesting idea, but in practice too much of the window area ends up being filled by the window frames in my opinion so I don't think it's entirely successful. The area above the central window is decorated by detailing which once again features white vehicle mud guards, albeit of a different variety to those used in the lower floors, and light bluish grey tiles once again sit atop the walls in preparation for the placement of the section above, namely the roof.


The roof section is dominated by a clock tower and an excellently-realised curved skylight made up of trans-clear garage roller door sections. In fact, clever building tricks abound during this stage of the build, not least the ingenious technique used in constructing the elegant cornicing at the front of the roof. Basically, modified 1 x 2 x 1 1/3 bricks with curved top are attached upside down to modified 3 x 2 plates with hole and then threaded through 1 x 2 x 2 castle windows - very neat. Another clever building trick on show is the use of a myriad of SNOT techniques to spell out the year '1891' at the base of the clock tower, a feature borrowed from 10197 Fire Brigade which uses similar techniques to incorporate '1932' into its roof section. The Town Hall clock tower includes a clock face printed on a black 4 x 4 inverted dish; this printed element has only ever appeared in one set apart from this one, namely 10245 Santa's Workshop. A bell sits within the roof space of the tower above the clock, although it's unfortunately dark bluish grey rather than pearl gold like the bell in the Fire Brigade set.


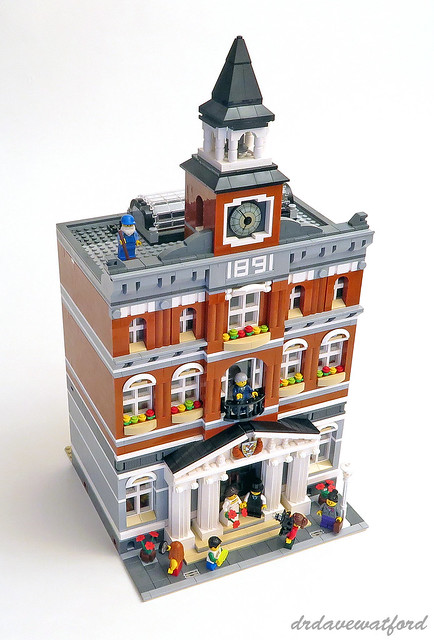
With the roof now complete it's time to stack the sections and check out the finished Town Hall. The completed build is pretty imposing, and at fully half a metre in height I suspect it's the tallest of all the Modular Buildings to date, and quite possibly the heaviest as well.


Having recently raved about the Parisian Restaurant, I'm afraid that I can't be as effusive about the Town Hall. I certainly enjoyed the build overall, and it incorporates some nice features such as the portico, the skylight and a lift which can be manually raised and lowered via a handle which protrudes through the rear wall of the building. There's also a good selection of minifigures, and as previously mentioned there are some really neat build techniques utilised in the model, particularly in the roof section. It's also worth mentioning that if it wasn't for this set it'd be almost impossible to lay your hands on dark orange bricks in any quantity in the aftermarket, which would have meant that my Ghostbusters HQ MOC amongst other things would never have seen the light of day. All that having been said, however, I can't get away from the feeling that the finished build looks a bit boxy and crude; it's hard to explain, but it just seems to lack the elegance and subtlety of its peers such as the Parisian Restaurant, or even older Modulars such as 10185 Green Grocer. Other criticisms include the sparsely furnished and uninspiring interior, plus the unattractive appearance of the back of the building at ground floor level. All of these complaints are relative, however - while the Town Hall does admittedly fall short in comparison to the other Modular buildings, it's still a good set. It's just not a great one.
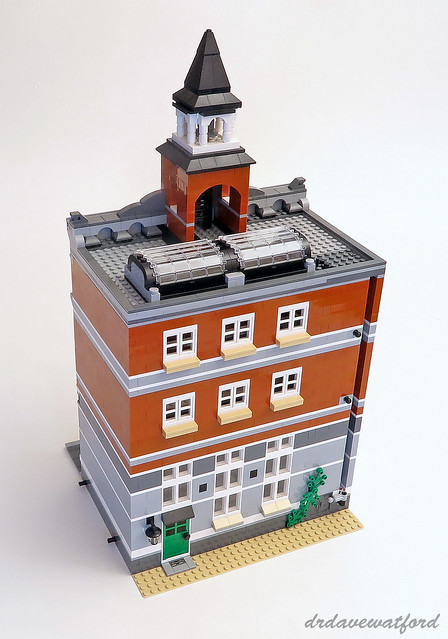

Set 10224 Town Hall contains 2,766 elements, which makes it by some margin the biggest Modular Building to date on the basis of the parts count. The set was available from March 2012 until October 2014 and retailed for £149.99 / US$199.99. For reasons that will soon become clear I've been trying to pick up a couple more copies of the set for parts, but predictably enough the aftermarket price has steadily increased since retirement, so much so that I'm going to need a Plan B.... You'll struggle to find a used, boxed example of the set for much less than £300 / US$400 these days, and a mint, sealed copy will now set you back upwards of £350 / US$500. Despite that, even at £350 I think it's worth seeking out if you're a fan of the Modular Buildings, with the added bonus that you'll probably get back what you pay (at the very least) if you decide to sell it later.