Monday, 2 September 2013

Galaxy Squad - Like a Prayer

Well, it appears that my attendance at LEGO's recent Galaxy Squad launch event had the desired effect - not only did I write about the event itself (report here) and give the theme the thumbs up, but on returning home I was even more motivated to dive into the sets and get building than I had been beforehand. The only question was which Galaxy Squad set I should crack open first, and the decision was taken out of my hands when I was presented with Set 70703 Star Slicer by my long-suffering wife as a holiday gift. She said, however, that I could only have it on condition that I open and build it there and then, rather than hoard it away in my LEGO mancave and look lovingly at the sealed box like a pitiful AFOL version of Gollum; I've learned not to argue with she who must be obeyed, so open and build it I did. If you'd have preferred me to build and review a different Galaxy Squad set then you can therefore take it up with her....


The front of the box (above - click to enlarge) features an excellent action shot of the sinister Star Slicer battling against our Galaxy Squad Blue Team heroes on the surface of an unknown moon. The Star Slicer is piloted by an Alien Buggoid; you can also see him trying to escape from the upper right hand corner of the box - a nice humorous touch - while Blue Team pose resolutely in the lower right hand corner. If you enlarge the picture above and look closely at the Galaxy Squad logo you'll see a white and grey ship in the middle which appears to split in two; this has a significance beyond mere decoration as we'll see below.


As is customary, the back of the box (above - click to enlarge) highlights play features of the set, not least Galaxy Squad's much-vaunted split function, whereby vehicles split into separate, self-contained models to enhance the play experience. In this case it's the Blue Team vehicle which splits, into an Attack Flyer and an Armoured Car. Highlighted features of the Star Slicer include the detachable trans-purple cocoon which is designed to trap and imprison members of Blue Team, a Zamor sphere-firing mechanism, and moveable front limbs.

LEGO presumably considers the box too small to justify being closed up with a tape seal so it's thumb tabs instead I'm afraid. As usual, I used a sharp craft knife to carefully slice open the flaps on the left side of the box in order to release the contents. The box contained three large bags of parts numbered 1 to 3, each of which contained at least one smaller unmarked bag of parts, an instruction booklet, and a DSS.


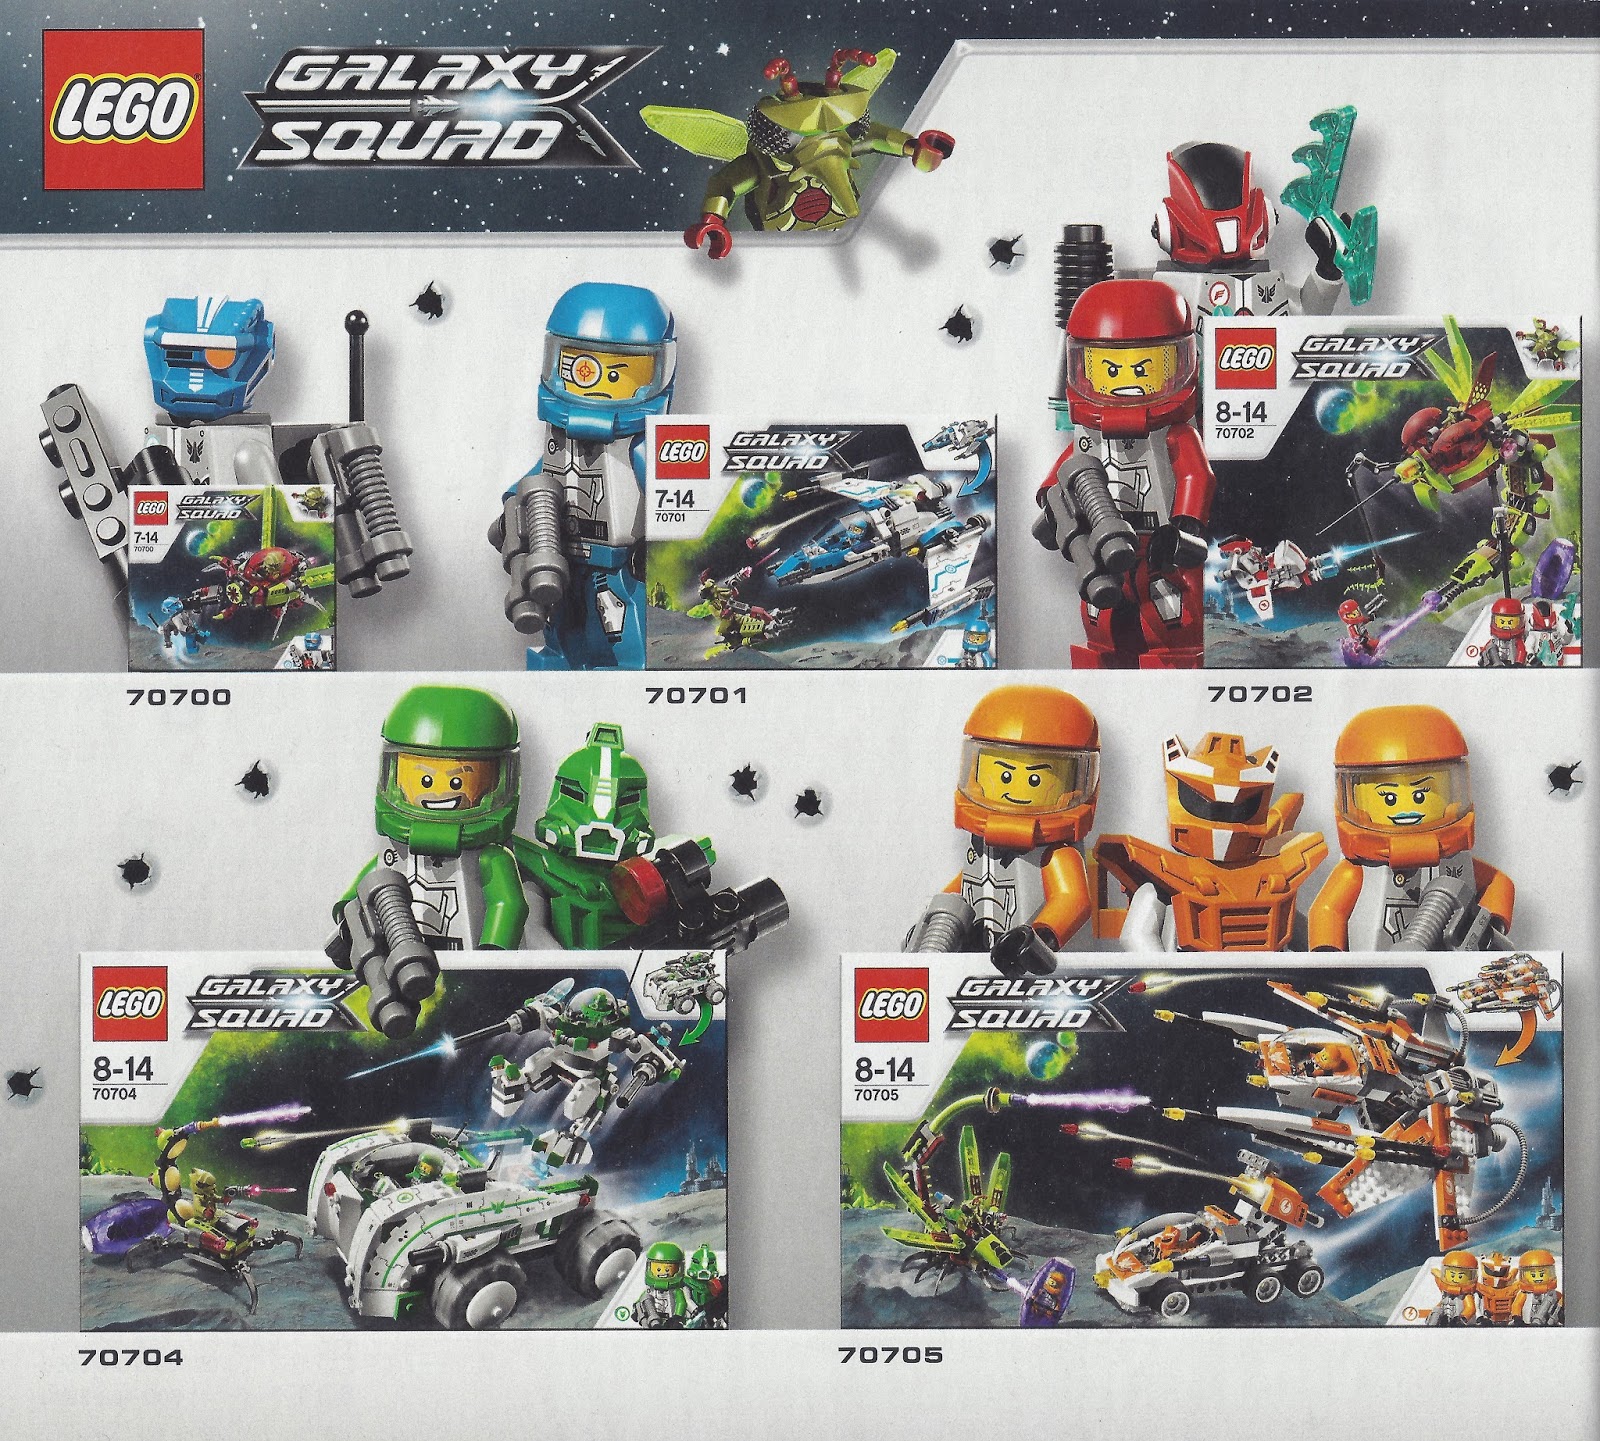
The instruction booklet (front cover above - click to enlarge) is 80 pages from cover to cover; in addition to the 73 pages of building instructions you also get a 2-page inventory of parts and a bunch of advertising including the page below featuring the other first wave Galaxy Squad sets (click to enlarge).


The sticker sheet (below - click to enlarge) is compact but disappointingly extensive, featuring a total of 18 separate stickers. There's obviously always the option just not to apply them, and I know a few builders who don't bother, but for me a model isn't complete without them. They are at least printed on a transparent backing so should last reasonably well.


The set contains a total of 311 parts, and a selection of the more unusual and/or interesting parts can be seen below (click to enlarge). There aren't any completely unique elements but there are a number which have to date only appeared in this set and one other; these include the dark azure blue vehicle mudguard, the dark red 4 x 2 slope, the 10 x 3 lime left and right wedges (only right-hand wedge shown below), the sand green 1 x 2 - 1 x 4 bracket and the trans-purple Zamor sphere. The printed dark bley 2 x 2 tile in the top right of the picture is exclusive to the Galaxy Squad theme (so far at least) as is the trans-purple alien pod/container. A few of the parts, such as the trans-bright green blade with curved tip and the pearl dark grey zamor sphere launcher, haven't previously appeared outside of the Hero Factory theme.


The set contains 3 minifigures. First up is the dark red Alien Buggoid (below - click pics to enlarge) which is unique to this set. The excellent headpiece, with its compound eyes and rear protruberance which overhangs the back of the torso, slips directly on to the top of the torso rather than fitting over a minifigure head. The printing on the torso both front and back does an excellent job of imitating an insect's carapace, and the pattern extends downwards onto the front of the legs.


Blue Team are the Alien Buggoid's adversaries and consist of Solomon Blaze and his Robot Sidekick. Solomon Blaze (pictures below - click to enlarge) appears in a total of three sets including this one; his head features what Bricklink describes as a "Cyborg Eyepiece", and there's alternate printing on the back of the head featuring some kind of breathing apparatus. His dark azure helmet and trans clear visor are pretty standard LEGO Space fare, having previously adorned the ADU soldiers in 2011's Alien Conquest theme. The printing on the torso gives it a suitably armoured appearance front and back, and the legs are also printed, including what look like armoured knee-pads.


Solomon Blaze's Robot Sidekick is unique to this set, although an alternate version which is identical save for a jet pack appears in two other Galaxy Squad sets. The head is a new mould and packs in a lot of interesting detail, both from the perspective of the actual moulding itself and also the printing. There's also interesting detail on the torso and legs, including what looks like some kind of radioactive backpack on the rear of the torso.


Bag 1 contains parts for Solomon Blaze and his Robot Sidekick plus their vehicle (pictures below - click to enlarge), which as previously stated splits into an Attack Flyer and Armoured Car. The build is short, sweet and straightforward, occupying only 16 pages of the instruction booklet.


The Attack Flyer (below - click to enlarge) is essentially a heavily-armoured, weaponised jet pack for the Robot Sidekick. The armour consists of a pair of stickered vehicle mudguards, and in addition to the sizeable twin forward-facing cannons there are exposed studs on the back to attach the Robot Sidekick's weapon. The Attack Flyer attaches to the Armoured car by way of the light bley modified 1 x 2 brick with vertical clip which you can see in the pictures below.


The Armoured Car (below - click to enlarge) is pretty rudimentary; it's armoured in name only, in reality offering Solomon Blaze little protection. It also lacks the firepower of the Attack Flyer, with only a couple of extended pistols to call upon. It features a couple of control sticks in the cockpit but no control console, and Solomon needs to lean backwards in order for the canopy to close.


Bags 2 and 3 contain the parts for the Alien Buggoid and the Star Slicer. The 'torso' and 'abdomen' of the Star Slicer are first to be built (below - click to enlarge); the build is fairly simple, but does require some moderately challenging sticker placement. That being said, the stickers look pretty cool IMHO.


Next up are the limbs and head of the beast. There are 6 limbs, consisting of 4 hind legs and 2 arm-like fore-legs. The hind legs are fixed in position; made up of Hero Factory angled blades, they're joined to the junction of abdomen and torso via technic axles and connectors and look pretty good, although they'd look even better if the connectors were the same colour as the legs. The abdomen actually rests on the ground, meaning that the legs don't have to support any weight and are therefore just for show. The fore-legs are hinged in two places and can be posed to a degree; each one features a trans-bright green blade with a curved tip.


The finished model (above - click to enlarge) clearly takes inspiration from the praying mantis; the designers have borrowed heavily from the basic body morphology and lime green colour scheme of the real thing, not to mention imitating the characteristic fore-legs and large eyes. The LEGO interpretation does however add a few features most definitely not found in nature, not least the the trans-purple alien pod which attaches via a Technic axle pin immediately above the abdomen, and the pair of pearl dark grey Zamor sphere launchers protruding from the front of the head which when squeezed fire the sphere with quite some considerable force; there's even a spare sphere provided should you lose one of them.


You can see the Star Slicer, Blue Team vehicle and all the minifigures below (click picture to enlarge). I've got to say I that really don't fancy Blue team's chances much - probably time for them to call in some reinforcements I reckon....


Overall, it's a decent set. Better than that, it's a good set. OK, so Blue Team's vehicle is a bit underwhelming, although the split function works well and the Attack Flyer is quite neat, but the Star Slicer itself is excellent - a genuinely interesting design IMHO which is fun to build, and suitably creepy and insect-like. As usual I'm compelled to complain about the stickers - 18 of them in this set - but there's no doubt that they enhance the appearance of the models and the Slicer in particular, and despite my all complaining they were in the end still worth the effort it took to neatly apply them.

Set 70703 Star Slicer has an RRP of £34.99 / US$39.99, hardly a bargain for 311 parts, although I suppose that there are a number of larger-than-average elements in the mix. It's surprisingly hard to find the set at retail, in the UK at least - Argos don't carry it, and seemingly neither do John Lewis, TRU, The Entertainer or Boots - and even LEGO's own Galaxy Squad microsite fails to mention the set. The dearth of retail stockists suggests that it's presumably a Retailer Exclusive, although I'm struggling to figure out which retailer it's exclusive to.... My copy was apparently sourced from a LEGO brand store, and the set is also available online from LEGO S@H which is probably your best bet if you want to buy a copy; failing that it's available via Amazon, albeit from a third party seller rather than Amazon itself - click here to buy in the UK.

Monday, 19 August 2013

Spoiled for Choice

It seems to me that one consequence of LEGO's stellar market performance over the past few years has been an explosion of new books addressing pretty much every LEGO-related niche you can imagine. Sure, for as long as I can remember there's been a steady trickle of rudimentary fluff aimed at LEGO's target demographic of 5 to 9 year-old boys, but my perception is that as LEGO has grown in popularity there's definitely been more for the older LEGO fan to get their teeth into. As an example, I'm currently reading Brick by Brick which is unashamedly for grown-ups and chronicles the rise, fall and rise of the LEGO company - review to follow on Gimme LEGO in due course - and I previously read and reviewed Sariel's Technic Builder's Guide which was excellent (although certainly not for the faint-hearted). No Starch Press, who published the Technic book, have a number of other LEGO-related releases in the pipeline over the next few months, all of which seem to be AFOL-friendly to at least some extent. The first of these, Amazing Vehicles, dropped into my letter box a week or two back.


Amazing Vehicles is the work of Nathanael Kuipers, formerly a product developer for the LEGO company and the designer of a number of Technic Sets including 8261 Rally Truck and 8292 Cherry Picker, and Mattia Zamboni, a 3D computer graphic artist. The book features ten sets of building instructions for a variety of vehicles, graded according to building difficulty, and all buildable from a common parts palette. Conveniently, all the parts needed to build the models can be found in one relatively inexpensive set - Set 5867 Super Speedster (below) - although the downside is that the set is retired and hasn't been available at retail for some time now.


When I was a boy, I can remember owning a number of books which were filled to bursting with building instructions; they were a source of constant wonderment and I used them so much that they literally disintegrated over time. Wonderful though they were, however, I don't remember the quality of the designs being quite up to the high standard of those filling the pages of Amazing Vehicles - as you can see from the summary of designs below (click to enlarge) they're really rather good.... So good, in fact, that I was moved to try and build some of them.


Unfortunately, my best laid plans were seemingly thwarted, or at least postponed, by the realisation that my copy of the Super Speedster set was buried at the bottom of a cupboard and thus temporarily inaccessible. My young son was not so easily discouraged, however; having taken a keen interest in the book from the moment it arrived, he was adamant that he was going to build model number 6 Historic Racer using parts from his own sets, and I was to be his parts monkey. It was soon evident that my boy didn't have the necessary parts to build the model in the 'correct' colours, however, so we were looking at a BOLOCs scenario. My models haven't been BOLOCs since I was knee high to a grasshopper, but needs must, so I dutifully started to dig out the necessary parts from a large pile of semi-deconstructed sets including Set 6860 The Batcavea couple of Dino sets and Set 9473 The Mines of Moria, amongst others.

Once I'd located the pieces that were needed, construction proceeded at a reasonable pace; the building instructions are nicely realised, clearly printed and generally easy to follow, although because the build utilises some advanced building techniques (including extensive use of SNOT), I had to step in and help out on a few occasions. Eventually we were done, and you can see the finished result below (click pictures to enlarge).


Although I'm not sure that the riot of random colours does the model any favours, it was an interesting build, and as you can hopefully see, the actual design is pretty decent. It's a tad fragile and won't stand up to extended robust play, but I suppose that when it falls apart we'll then have the perfect excuse to attempt some of the other models....

If I'm being honest, of all the LEGO-related books slated for release over the upcoming months, this was one that I wasn't particularly excited about. Turns out that I was pleasantly surprised, however. The book is nicely printed and feels like a quality product, the models showcased are of a uniformly good standard, the building instructions are generally easy to follow, and the premise of basing a book of building instructions on the parts available from just one small, fairly inexpensive set is I think an excellent one. If there's a downside it's that the set concerned is no longer available at retail, but unless this book creates a massive buzz and drives aftermarket prices of the Super Speedster up to ridiculous levels, it should still be possible to pick up the set from a reseller at a pretty low cost; as things currently stand you can pick up the set for as little as £15 plus shipping in Europe and $35 in the USA via Bricklink, and you'll probably be able to find it for less on eBay if you're patient. Failing that, if you already have some of the necessary parts then you can pick up the rest via Bricklink (the Super Speedster parts inventory can be found here).


In summary, if you like the look of the models featured within the book then I reckon it's well worth picking up a copy of Amazing Vehicles, particularly if you already have the super Speedsters set. The book has an MRSP of £13.99 / $19.95 which seems a tad expensive to me, although it'll no doubt be available at a discount from Amazon et al before long (links are provided below if you wish to order). I note that there's also a second volume of the book available featuring 10 more designs, all of which can again be built from the Super Speedster parts palette; having enjoyed the first book it's pretty likely that I'll check that one out too.

Thanks to No Starch Press for sending me a copy of Amazing Vehicles to review.

;

Monday, 5 August 2013

Ready for Launch

When a call went out on the Brickish Association forum a few months back asking if there were any AFOL bloggers interested in attending the official LEGO Galaxy Squad launch I replied like a shot. The Galaxy Squad theme is the latest in a long and often illustrious line of LEGO Space themes, most of which I've eagerly embraced; given this, plus my enthusiasm for the launch venue - the UK's National Space Centre (NSC) in Leicester - it was a total no brainer. It did briefly occur to me to wonder why LEGO was hosting a launch event well over 6 months after the first wave of Galaxy Squad sets had first appeared at retail, but I wasn't complaining....


A formal invitation (above) and itinerary duly arrived, and so it was that last Saturday I saddled up for the trek to the East Midlands with my reluctant wife and excited son in tow. I was already pretty familiar with the NSC (below) - the Brickish Association have exhibited there for the past few years (see for example here and here) and it's a friendly and interesting venue where I've always felt at home.


On arrival, attendees were ushered into the spacious Shuttle Suite and treated to tea, coffee and pastries. The attendees were I assume journalists and bloggers, accompanied by assorted family members; I didn't recognise anybody there apart from Richard Hayes, fellow AFOL and the webmaster over at Brick Fanatics. As you can see from the picture below (click to enlarge), the Shuttle Suite was set up with a number of circular tables, a couple of large projection screens and a smattering of LEGO banners to brand the event; each table featured a different Galaxy Squad set which someone had already had the pleasure of building.


Elyssa from Norton, LEGO's PR Agency, formally kicked things off at around 10.30 a.m.. She welcomed attendees and told us what was planned for the day prior to showing a brief introductory Galaxy Squad video and then letting us loose on the demo sets. The kids (and a few of the adults) had a great time playing with the sets; I was already pretty familiar with most of the Galaxy Squad sets, but one thing that hadn't really sunk in prior to my extensive play test was how many of the models are designed to be split into a couple of separate and self-contained play elements, generally a flying machine of some description and a land-based vehicle or structure. This alone confers substantial play value, and that's before you consider the variety of other play features built into the sets, be it the excellent motion-induced movement of the legs on Set 70708 Hive Crawler (shown below with Set 70707 CLS-89 Eradicator Mech - click to enlarge), the grasping pincers at the front of Set 70706 Crater Creeper, and the almost ubiquitous opening cockpits, flick-fire missiles and spring-loaded catapult-type weapons. While we were demoing the models a series of brief Galaxy Squad-themed videos were playing in the background on a loop on the projection screens; I subsequently discovered that these videos are all available on the Galaxy Squad micro-site, and you can see them here if you're interested.


On arrival the kids had been given a well-stuffed goody bag containing a couple of Galaxy Squad polys, an NSC-branded soft toy and other bits and pieces. I was pleased to see my youngster immediately dive into the polys and build them unaided, starting with Set 30230 Mini Mech shown below.


Once attendees had had their fill of the demo sets they were free to roam the NSC. In addition to the usual space-related attractions at the venue, a number of Galaxy Squad-related activities had been laid on for NSC visitors, enabling the general public to join in the fun. An area was set aside for free-building with loose elements from Galaxy Squad sets, and some of the best creations were on show. Visitors could also participate in the construction of a Galaxy Squad-related mosaic (below), and DJ's from local radio station GEM 106 were broadcasting live from the venue and ran a "guess the build" competition for kids with Galaxy Squad polys for the winners.

Galaxy Squad Mosaic - Work in Progress....
Galaxy Squad launch invitees retired to the Shuttle Suite at 1 pm for lunch; unfortunately, on the way to the buffet, my boy spotted some laptops running a Galaxy Squad online game and we spent the next half an hour or more trying to extricate him.... Once we'd prised him away from the laptop and fed ourselves it was time to listen to Duncan Titmarsh, the UK's only Certified LEGO Professional, give a talk about what it's like to build LEGO models for a living. Duncan, the founding director of Bright Bricks, a fellow member of the Brickish Association and a renowned builder, talked about some of the projects he's undertaken, including his stupendous 35-foot high Christmas tree at London's St. Pancras Station and a half scale working model of a Rolls Royce aircraft engine. After Duncan's talk the audience spent around 15 minutes firing questions at him, such as what he'd love to be asked to build ("a full-sized London bus"), what are his favourite LEGO themes ("Creator because they contain lots of parts, and Galaxy Squad and Friends because of all the interesting colours"), and whether building models for a living diminishes the pleasure he gets from LEGO ("No - it's still fun").


After Duncan's talk, my family and I briefly popped into the NSC shop to grab a few souvenirs (they have some seriously neat holographic postcards in there....), said our goodbyes and then headed off back down South.

My NSC holographic postcard, except you'll just have to imagine the 3D effect....
In truth, the 'unveiling' of the Galaxy Squad sets was a bit of an anticlimax for me since they've been on the market for months already and I already own some of them. Certainly the timing of the event seemed a bit odd, although I suppose the much-later-than-average launch of the Galaxy Squad theme in the UK might have something to do with it, and I also suspect that the majority of attendees weren't AFOLs and thus may not have been previously aware of the theme. Regardless of all that, it was really good to be able to see the whole range of sets at close quarters and give them a thorough hands-on playtest with the help of my youngster. I was already a fan of the theme before the event, and now my son's a fan of it too....

I've not previously attended many of these press events so it was an interesting experience; thanks to Elyssa for the invitation to attend, and thanks also to NSC for being great hosts as usual.

Monday, 22 July 2013

Designer Robot

For me, the Creator theme is one of the great unsung LEGO heroes. LEGO have been pumping out Creator sets since 2001 - 297 sets at last count, the vast majority of which have been unheralded and unhyped, at least until the advent of the Creator Expert line this year. Admittedly, Creator sets can be a bit of a mixed bag, but there's invariably at least one or two every year that catch my eye. Creator sets are usually cheaper than average, not least because of the lack of expensive licensing fees, and they generally contain fewer specialised parts, making them better parts packs for general building. With the exception of the Creator Expert sets, they also characteristically include building instructions for more than one model.

Over the years, a number of Creator sub-themes have come and gone, for instance the short-lived Creator Inventor line consisting of 4 sets released in 2003, and the Creator Designer subtheme which hung around for 3 years from 2003 until 2005 and brought with it an impressive array of 54 sets, although a lot of those were polybags. Buried within those 54 sets are a few genuinely interesting offerings which could easily slip under the radar, and for that reason I'm bringing you a review of one of them today - Set 4508 Titan XP.


The box has a sizeable footprint - it's 15 inches (38 cm) square. The front of the box (above - click to enlarge) features an action shot of the Titan XP robot against a backdrop of blurry CGI brick and plate outlines; this backdrop is part of the Creator Designer branding, appearing on the packaging of other 2004 Creator Designer sets as well. On the bottom right of the box are a couple of small inset pictures highlighting play features of the set, and on the bottom left is really the only clue so far that the set contains parts and instructions for more than just the Titan XP model. The back of the box (below - click to enlarge) shows the Titan XP robot from behind, plus pictures of the supplementary models for which instructions are provided.


The front of the box lifts up to reveal the contents - a generous 784 parts plus an instruction booklet, although there's no DSS and no minifigures. The presence of just one instruction booklet is somewhat surprising given the substantial parts count and all the alternate builds, but it's pretty hefty - A4 sized and 104 pages from cover to cover. The front cover (below) is almost identical to the front of the box.


There's a summary of the models for which instructions are provided inside the front cover (below). The different builds are graded by difficulty level; the 'Quick' build consists of a couple of small robots, while the intermediate, or "Experienced' build, is a larger two-legged robot which morphs into a flying machine, and Titan XP is obviously the 'Advanced' model.


The overwhelming majority of the instruction booklet is of course taken up with building instructions for the various models; the only advertising to be found is on the back cover (below) which highlights the other 2004 Creator Designer sets. Note the typo beneath the shark - that's actually Set 4506 Deep Sea Predators rather than Set 4507 which can be seen immediately below. See what I mean about some of these sets slipping beneath the radar ? There's some good stuff there....


The instruction booklet also contains a full inventory of the parts contained within the set, and we'll get on to the spectacular parts palette momentarily. My copy of the set is a used example which I sourced from eBay, and as you can see from the picture below it looks like the previous owner wasn't quite as obsessive about the condition of his/her instruction booklets as I am...


Regular readers of this blog will know that I like to highlight a few parts of interest when I'm reviewing a set. I have to say however that I really had my work cut out with this set - parts-wise it's a veritable treasure trove, and sorting through all the unusual and/or rare elements took me ages. For starters, I don't think I've ever seen a set containing quite such a large selection of sand blue parts; this rare colour has recently made a bit of a comeback in Set 10218 Pet Shop but other than that it must be close to a decade since the appearance of sand blue parts in sets. And not only does the Titan XP set contain a huge variety of different sand blue parts (you can see a selection of them in the picture below - click to enlarge), but a number of them have only ever appeared in this set. Unique parts include the sand blue 2 x 2 corner brick and corner plate, the modified 1 x 1 plate with tooth, the 1 x 6 x 2 arch with curved top, a number of different 45 degree slope bricks of various types, the left and right 6 x 2 inverted wedges and the 1 x 2 stepped vehicle fairing with two pins which you can see near the middle of the picture. Other sand blue parts in the set including the left and right 3 x 2 and 4 x 2 wedge plates have only ever appeared in a couple of sets, and none of them have appeared in more than 7 sets.


And it doesn't stop there - in addition to all the sand blue elements there are a host of elements in other colours which are worthy of mention. A number of the orange parts in the picture below are unique to this set, including the modified 2 x 2 brick with the rotation ball joint, the modified 1 x 2 tile with handle and the left and right 4 x 2 wedge plates, as is the chrome silver 1 x 1 round plate. All other parts in the picture below have appeared in fewer than 10 sets, with the majority being restricted to just 1 or 2 sets in addition to the Titan XP. Note the dark bley minifigure legs with light bley hips; as previously stated, this set doesn't contain any actual minifigures, and you'll see later how those minifig legs are pressed into alternative service. While it's always nice to get your hands on a set overflowing with rare parts, the obvious downside if you're buying pre-owned is that you'll be unable to cannabalise parts from your other sets if there's anything missing, although there's always Bricklink....


And so on to the build.... The alternate models didn't really grab me, to be honest - I sometimes start off with the supplementary models when I tackle a Creator set, but not on this occasion - so I jumped straight to page 62 of the instruction booklet and the Titan XP build. First up were the robot's legs and feet. Almost immediately I found myself having some difficulties with colour discrimination in the building instructions; sand blue was surprisingly difficult to distinguish from the different greys in artificial light, although the instructions were otherwise pretty easy to follow. You can see one of the Titan's feet below (click to enlarge) - big, chunky and featuring a number of the rare sand blue parts I mentioned earlier. The legs attach to the feet via a Technic rotation joint - if you look closely you can just about see the black pin which will slot into the rotation joint socket at the bottom of the leg peeking out from the top of the foot.


The completed legs and feet can be seen in the picture below (click to enlarge). Including the 'hips' and 'ankles', each leg features no less than 4 different points of articulation, of which 3 utilise Technic rotation joints. In theory, all these points of articulation confer almost unlimited possibilities when it comes to posing the model, although in practice there's a major trade-off which I'll get to shortly....


The torso and head (below - click to enlarge) are rather quicker to assemble than the legs and feet. Once again sand blue and orange are prominent, with a few chrome silver round 1 x 1 plates adding some additional bling. The light bley columns protruding from the top of the head can be angled further outwards if desired and the black 'back pack' can detach, but rather surprisingly the head itself is fixed and can't be rotated without modification.


Once the torso and head are complete it's time to build and attach the arms, complete with monstrous 1980's-style shoulder pads. The upper body can be then be dropped onto the legs and we're done (picture below - click to enlarge); the upper body attaches by way of a single pin, allowing it to rotate a full 360 degrees. Note the ingenious use of minifigure legs as the Titan XP's fingers.


First impressions are that the proportions aren't quite right - to my eyes the upper body and head seem too small for the arms and legs. That having been said, at around 14 inches / 36 cm in height it's still a fairly imposing model, and taller I think than any other 'official' LEGO robot or mech that I've previously built. You can get a better look at how the legs and arms fit together via the side-on view below (click to enlarge). The construction of the legs brings to mind a crazy paving mosaic from this angle, but the effect isn't quite so jarring "in the flesh".


Many of the LEGO robots and mechs I've built in the past have had a decidedly unfinished look when viewed from behind. The Titan XP doesn't suffer the same fate, however, with the back having a significantly more polished appearance (below - click to enlarge) than many other sets I could mention. This view reveals the preponderance of sand blue in the legs, and you can also clearly see the rather cool sand blue pods projecting backwards and downwards from the lower part of the legs. 


As previously mentioned, the multiple articulation points allow for a substantial range of movement and mean that the Titan XP can be manipulated into a variety of neat poses like the one below (click to enlarge). The downside of this is that the sheer weight of the model seems to overwhelm the joints in the legs, making the model decidedly unstable and liable to collapse or overbalance. Having just recently completed one large and somewhat unstable mechanical beast with legs, it's really quite ironic that the next model I end up building should also turn out to be a large, somewhat unstable mechanical beast with legs.....


It seems a bit bonkers for LEGO to have incurred the costs associated with including so many unique elements in this relatively low profile set, but I'm pleased they did - what an awesome colour scheme ! The combination of sand blue and orange, and the stripes on the legs, bring to mind the livery of the iconic Gulf Porsche (below) from 1970 which only makes me like the Titan XP more.... OK, so the Porsche is more medium blue than sand blue but hopefully you get my drift...


To give you an idea of scale, I've posed the Titan XP alongside an Exo Force mech that I reviewed a while back - Set 7714 Golden Guardian from 2007 (picture below - click to enlarge). While the Golden Guardian is admittedly smaller and can't be posed as easily, it's a lot more stable.


Containing 784 pieces and released in 2004, Set 4508 Titan XP really is a hidden gem buried deep within the Creator back catalogue. It's by no means perfect - the proportions don't look quite right to me and it's horribly unstable - but aided and abetted by that wonderful colour scheme I think it looks spectacular, and then there's the unique parts palette.... If you're looking to pick one up then eBay is probably your cheapest bet if you're willing to wait for one to come up - I paid less than £20 plus shipping for my used copy about a year ago. Otherwise head over to Bricklink - at time of writing the cheapest used example with a box is around £45 plus shipping, and you can get a new, sealed copy for little more than £50. Given that the RRP back in 2004 was £34.99 that's a veritable bargain I reckon.

Monday, 8 July 2013

UCS AT-AT : They think it's all over...

When I last wrote, the various AT-AT sections had finally been completed, so it should simply have been a case of putting them all together and the AT-AT would be done. As I'm sure you've gathered by now, however, nothing about this project has been simple, and there were actually a couple of things I'd need to do before I could embark upon final assembly....

Firstly, as I've mentioned a number of times during this seemingly interminable journey, the LDD files I've been following were in very much 'first draft' status when I received them, and predictably enough a number of issues have been identified. Cavegod (Pete), the AT-AT's designer, has dutifully revised the LDD files along the way, but there was consequently always going to be a need for me to make a few tweaks to the various completed sections prior to final assembly of the model. Much of the last week or so has therefore been spent making these modifications, some of which necessitated a wait for a couple of Bricklink orders to arrive.


The biggest issue to remedy involved the internal skeleton of the body (above) which thanks to a mistake in the LDD file ended up one stud too long and therefore needed chopping down to size. This sounds potentially quite involved, but in practice it wasn't too big a deal, particularly as Pete has now revised the offending LDD file so I could closely study the necessary modifications and implement them. A further issue concerned the dark bley platforms which project out from the sides of the body, one on each side (you can see one of them in the picture above); these structures were unfinished and slightly out of position on the original LDD file. Once again the LDD file has now been corrected, and thankfully the necessary modifications were straightforward, although they did require a few additional parts.


Lastly, I decided to make a couple of tweaks to increase the stability of the legs as I was nervous about their ability to support the weight of the AT-AT's body. The joint between the foot and the lower part of the leg (above) isn't very strong, and as a consequence, when the leg pivots at the ankle and the weight of the body is applied there's a risk of the leg giving way. This is guaranteed to bring 6000+ pieces crashing down so is to be avoided if at all possible.... Following some discussion, Pete suggested a simple modification to help support the leg when it's in a flexed position, and in addition to this I made a couple of further tweaks to increase the strength of the ankle joint and offer additional support and stability. Only when these had been completed did I feel sufficiently confident to proceed with final assembly of the AT-AT.

So here we go, then.... Step 1 : Attach neck to body. A couple of Technic pins protruding forward from the front of the body act as a guide to ensure that the neck is in position, after which the neck can be firmly bolted on by threading a bley Technic axle down through a series of interlocking, overlapping Technic liftarms sticking out from the neck and body. You can see the results below - click the pictures to enlarge them.


Step 2 : Attach the legs. Before I even attempted this came the realisation that with the legs attached, the AT-AT would be too big for my rudimentary photographic layout.... So where to build and photograph it ? Well, I didn't want to assemble it on my floor on the basis that the carpet wouldn't provide a firm base for the AT-AT to stand on. That, and I really didn't fancy its chances of surviving for long on the floor in the middle of my study. A solution was found in the form of the tables which support my work-in-progress LEGO City layout; thanks to my glacial rate of progress (yes, yes - I know I promised to provide an update on that project about a year ago, but I've been busy....) there's still a huge empty space in the middle of it. A space big enough for a colossal AT-AT, in fact. The downside is that there's no nice plain backdrop there to photograph the AT-AT against, so apologies for that - you'll just have to live with the distracting background until I can find a way of properly photographing it....

OK, adequate space located, it was time to figure out how on earth to go about precariously perching the body on top of the legs. Having tried to lift the body with one hand a few months back with catastrophic results (my hand-hold came away from the body, which proceeded to plummet to the floor and distintegrate on hitting the floor....) I decided to call for help. Pete tells me he's built a handle for the body of his AT-AT to allow him to attach the legs single-handedly, but I've yet to do this, and so it was that my reluctant wife was called into action and asked to hold the body of the AT-AT at just the right height for me to attach the legs. Attaching the legs involved threading a single Technic axle through the top of each leg and into the lower part of the body; the outer end of each axle also holds in place the large printed dishes that you can see at the top of each leg. Once each leg was attached, there came a point when I had to tell my wife to carefully let go of the body to see whether the legs would support the weight without collapsing. I don't mind admitting that this was incredibly nerve-wracking - if I hadn't seen Pete's AT-AT in the flesh I would have doubted that the legs could hold the weight. We both held our breath, but thankfully the legs held firm, and with a huge sigh of relief I stepped back and recorded the moment for posterity below (click to enlarge).


Step 3 : Attach the sides of the body. Here the concern was less about actually attaching the sides to the body and more about the fear that all the pushing and pulling involved in getting the sides into the right position and bolting them to the Technic frame would destabilise the legs, causing them to give way and bring everything crashing down. The other potential problem I faced was the fragility of the sides themselves - as previously described they're not very robust and have a tendency to break apart at the slightest excuse. In the event, attaching the sides turned out to be reasonably straightforward and didn't even require the help of my glamorous assistant. The sides are suspended from the top of the body's Technic frame by a couple of Technic pins with stop bush, and they rest at the correct angle relative to the body as a result of being pushed outwards by the platforms projecting from the sides of the body. The only complication did in fact turn out to be the fragility of the sides themselves - they broke apart a couple of times while I was trying to manipulate them into the correct position for attachment, setting me back a few minutes on each occasion while I effected a repair. Eventually it was done, and you can see the AT-AT with one and then both sides attached below (click pictures to enlarge).


Step 4 : Attach the head. This somewhat unexpectedly turned out to be one of the trickiest jobs. As you can see in the pictures above, projecting forwards from the front of the neck is a black rectangular structure with a couple of bley tiles on top and a bley Technic pin sticking out of the front. This structure slides into a slot inside the AT-AT's head, and the pin anchors it when it's in the correct position. Sounds simple. Lining up the head, getting the structure into the slot and getting the pin to click into place took a number of attempts, though, and all the while I was sweating that all the pushing and pulling would make the whole thing collapse. The head is quite fragile, and with all the pressure I was applying I managed to break the windscreen and roof section off the head. This however turned out to be a blessing in disguise as it ended up being easier to slide the head on to the neck without the roof being attached as I could better see what I was doing. Once the head was locked into position I carefully replaced the roof and windscreen and took the picture below (click to enlarge); the gap between the side of the head and the roof is a little wider than it should be as a result of all the pushing and pulling but this should be easy enough to fix with a bit of careful manipulation...


Step 5 : Cover the body. The roof which covers the body of the AT-AT consists of 3 distinct sections which are dropped into place one at a time. Fitting the roof sections was pretty straightforward - all sit on top of the upper edges of the sides of the body - and the fit was mostly pretty good although a little final tweaking is still needed in a couple of places. Also, the rear section has a tendency to slide backwards, and I'm going to need to add a stop to the underside to prevent this. The completed AT-AT with the roof sections fitted can be seen below.


And the finishing touch ? Well, no Star Wars UCS model is complete without a display plaque to go with it, and fellow AT-AT builder Morten has designed a suitable display sticker (below) which I now have a copy of, so thanks, Morten !


And so more than 11 months after I published my first post about building a copy of Pete's AT-AT it's finally finished ! Although I've seen Pete's original on a number of occasions I have to admit that I was still taken aback by the sheer size of the thing when I'd finished building my own - it's absolutely huge ! The scale is somewhat hard to convey, but the rebel pilot minifigure that I've posed on the top of the AT-AT's body in the picture below (click to enlarge) should hopefully give you a sense of how massive it is....


Regarding the final piece count, it was around 6,220, give or take; I can't offer an exact figure as it's calculated from the first draft of the LDD files which contain a few errors as previously mentioned, plus I've made a few minor modifications along the way to improve stability. So let's say 6,250 for the sake of argument. And the cost ? Well, I had around a third of the pieces already, and I estimate that the rest cost me about £600 including shipping, although I'm certain I could have done it cheaper if I'd shopped around more; I believe that fellow AFOL Rocao recently managed to source the necessary parts for around $600 excluding shipping, and Pete reckons that the whole lot only cost him £250...(!)

And lastly, was it worth the effort and the cost ? Well, on the one hand I can safely say that it's been quite the most frustrating build I've ever experienced, by a country mile. Admittedly this was in part because I was to some extent a guinea pig. working with the first draft of Pete's LDD files, but mostly it's just because it's a mighty tricky build at times. It's also nerve-wracking to put all the sections together, wildy impractical to display, and can't be moved when constructed.... But despite all of that, just look at the thing ! As a huge Star Wars fan, and indeed someone for whom the AT-AT is perhaps my favourite vehicle from the Star Wars universe, it's definitely been worth all the expense and pain to see this monster standing proudly in my house. Massive kudos to Pete for designing the thing and putting together a set of LDD files for it, and if anyone wants to get hold of a copy of the most recent version of the LDD files and have a go at building one yourself then please get in touch and I'll forward your details to Pete.

So what now ? Well, plans are afoot to show the AT-AT later this year at a public event where it'll be part of a display featuring a number of big Star Wars MOCs - I'll share more details in due course. Until then I think I'll just stare at the finished model with a huge grin on my face while I decide what to build next....

 < -- Building the AT-AT : Part 10