Monday, 18 February 2013

UCS AT-AT : Beside Myself...

Given my track record I'd be willing to bet that you weren't expecting another UCS AT-AT posting so soon; hell, it's barely 3 weeks since I posted the last update. Having moved things along nicely last time out by wrapping up the AT-AT's head, however, I had the bit between my teeth and decided to press on.

I've now built all four legs, the body, the head and the neck, so all that's left to construct is the outer shell which covers the body. This consists of left and right sides plus a roof to top it off. On the surface it sounds like I'm on the home straight, but when you consider that each side consists of over 700 pieces, I've still got the best part of 2,000 pieces to put together so I guess I shouldn't start counting my chickens quite yet.


You can see a screenshot of the LDD file for the left side of the body above; LDD has a useful feature which outlines all the bricks in a virtual build, but this capability unfortunately hasn't been available to me since I 'upgraded' to the latest version of Apple's Mac operating system - Mountain Lion (OS X 10.8.2). The left side of the AT-AT thus appears as a largely homogenous, ugly and uninformative grey wall across my screen when viewed in LDD. The lack of brick outlines also extends to the building guide generated by LDD which makes it harder to see how the different pieces fit together on the building guide - not good.

LDD's building guide generator took a good few minutes to generate the instructions, ultimately spitting out more than 200 building steps after cogitating for what seemed like ages. Same old same old, however - similar to previous sections, just a few steps into the build I found myself staring at multiple sub-assemblies and loose parts floating in mid air (below). This is fine if you're building in zero G, but not so convenient if like me you're subject to the usual laws of Earthly gravity.


Thankfully it's pretty obvious where all the floating bits and pieces eventually fit when the time comes to attach them, and after 64 steps I'd finished the rear-most section of the AT-AT's left side (picture below - click to enlarge) which has a typically nice greebled look to it. It was at times a challenge to prevent it from falling apart during the build, but it all came together OK in the end. This fragility would come back to haunt me later, however, as you'll discover in due course....


Steps 65 to 95 deal with the construction of the front-most section of the left side (below - click to enlarge). It's largely an exercise in stacking plates and topping them off with tiles, in marked contrast to the completed rear-most section which is predominantly brick-built. It's a fairly quick, straightforward build and thankfully pretty stable


Next up was the structure which under-hangs the large central section; this is rapidly dispatched in just 18 building steps, and then it's on to the central section itself. With a width of 24 studs and a height of more than 19 bricks, this is a somewhat time-consuming build but not particularly difficult. The LDD-generated building guide rather blots its copybook at times with a bizarre sequencing of building steps, such that if you were to follow them to the letter you'd frequently have to back-track and remove pieces you'd already placed in order to proceed with the build. Thankfully, however, it's pretty obvious how everything fits together and hard to go too far wrong.

Once the central section is completed, the lower, under-hanging portion attaches to the bottom via nine 1 x 2 hinges; these hold it firmly in place while allowing it to be positioned at the appropriate angle relative to the body, and you can see the results below (click pictures to enlarge).


Having completed the three different sections making up the left side of the body shell, and with only the job of joining them together remaining, I figured I was moments away from finishing this bit of the job. How wrong I was.... The first inkling I had that things wouldn't be quite so straightforward was while building the two structures below (click to enlarge). These are part of the central section, and it's to these 'linking structures' that the front and rear sections attach, thus knitting everything together. They're pretty simple, basically just consisting of a bunch of 3 x 2 slopes mounted on a couple of plates, and topped off with a load of hinge bases.


Anyway, for reasons I couldn't quite fathom, placing the slopes on the plates caused them to warp, so much so that the linking structures bore more than a passing resemblance to a couple of light bluish grey bananas. Even aside from any aesthetic concerns, this meant that I couldn't get them to attach securely on either side of the central section, which in turn meant that they were unable to support the weight of the front and rear sections. The problem was compounded by the connections between the central section and these linking structures being quite weak anyway, and this was particularly and infuriatingly evident when trying to attach the fragile rear section. Cue about an hour of cursing and frustration, characterised by the following cycle : (1) carefully and painstakingly attach the fragile rear section to the central section via the relevant linking structure, (2) fragile rear section immediately falls off and smashes, (3) rebuild fragile rear section, (4) apply pressure in order to try and re-attach rear section to central section more securely than before, (5) application of pressure causes fragile rear section to break apart in my hands, (6) rebuild fragile rear section again, (7) jump back to step (1) and repeat ad infinitum..... Gradually I was forced into making a few modifications which somewhat reduced the warping of the rear linking structure at least and also increased the clutch between the central section and the linking structures.

Eventually, and with a massive sigh of relief, I successfully attached the front and rear sections to the central section, and they stayed put. I was even able to move the whole completed build across the room and on to a black sheet so I could photograph it (picture below - click to enlarge). You don't have to look particularly hard to see that the join between the front section and central section in particular is not as tight as it should be, but I didn't dare apply any more pressure for fear of triggering the above cycle again, albeit at the front rather than the back....


So that's left side finished, and thank God for that. I'll obviously be able to apply what I've learned when I build the right side, so that should be polished off a lot quicker, and then the only section I'll have left to build is the roof. At this stage I don't even dare to think about what it'll be like trying to join all the sections together into the final completed AT-AT, but I know it's possible - I've seen the completed model "in the flesh" - and it's that which sustains me through all the trials and tribulations. Well, that, and also the knowledge that having spent hundreds and hundreds of pounds on this project, not to mention countless hours, if I fail you'll all give me tons of grief and wind me up mercilessly. That's also pretty motivating...

For the record, that's another 720 pieces down, meaning that I've now used up 5,149 of the pieces. Which means I have only a little over a thousand pieces left to go.

Before I go, just a reminder that if anyone wants a copy of the LDD files for this beast, please get in touch and I'll forward your details on to the AT-AT's designer Pete (cavegod).

< -- Building the AT-AT : Part 7                                    Building the AT-AT : Part 9 -- >

Thursday, 7 February 2013

The Real Classic Space ?

As regular readers of this blog will know, I'm a massive fan of LEGO's so-called Classic Space sets. For the uninitiated, 'Classic Space' isn't an official LEGO title or theme, but the name given to a group of space-related sets produced by LEGO during the late 1970's and early to mid-1980's.


It's pretty easy to pinpoint the start of the Classic Space era, which was kick-started in 1978 by the North American release of four sets which were to become truly iconic and highly prized. I'm no LEGO historian, but I've always considered these sets, and those which followed close behind, to be truly ground-breaking on a number of levels. While their superb forward-thinking designs and wonderfully evocative branding and packaging weren't necessarily without precedent, there was also clear design DNA running through the sets as evidenced by the consistent colour schemes and parts they utilised. I can remember being wowed at the time by the first appearance of transparent parts in various colours, particularly yellow, green and red, not to mention a host of exotic new parts, both printed and unprinted. The early Classic Space sets were also the first LEGO space sets to feature the iconic LEGO minifigure. Like I said - groundbreaking on many levels. The end of the Classic Space era is perhaps a little tricker to pinpoint, simply because there was no break in the production of space sets, but most including the likes of Wikipedia cite 1987 as the cut-off. It was at this point that 'generic' LEGO space started to morph into sub-themes such as Futuron and Blacktron, with a shift away from the Classic Space design DNA as a consequence.


With all the hoo-ha about Classic Space, however, it's easy to forget that LEGO had already made their first forays into space many years earlier. As far back as 1964 LEGO released a 112-piece space set, imaginatively titled Space Rocket, and then in 1973 we were treated to Set 358 Rocket Base, which remains one of my favourite sets to this day and was the first LEGO space set that I ever owned. Two years later in 1975, Set 367 Space Module with Astronauts appeared, known in North America as Set 565 Moon Landing. That one unfortunately passed me by at the time, however, and it would be a few more years before I received my next taste of LEGO space in the form of the absolutely wonderful Set 928 Space Cruiser with Moon Base. As living proof of the old adage that "Good things come to those that wait", however, I recently managed to get hold of a boxed example of Set 367 Space Module with Astronauts almost 40 years after its release, and I thought I'd share it with you here.

The packaging consists of an inner box which contains the parts and instructions, and a decorated outer sleeve which slides over it . My copy of the set is a little worse for wear, particularly at the ends, but it's still largely intact. You can see the front of the outer sleeve below (click to enlarge) - wonderfully atmospheric and minimalist in contrast to the heavily branded and sometimes rather fussy box art we tend to get these days. That having been said, it's hard to shake the suspicion that the sun is in fact just an out of focus table lamp pointing at the camera through a sheet or similar....


The rear of the outer sleeve gives us something sadly long gone from most current LEGO sets - pictures of alternate builds. I can't speak for the rest of the oldies out there, but when I was a kid these alternate build ideas were a great source of inspiration for my own creations, and I miss them. A couple of the suggestions - the helicopter and the TV camera - are rather good.


Sliding off the outer sleeve reveals the parts and instructions sitting in a plain cardboard tray; when the set was new you'd also have found a sticker sheet in there, but those stickers that remain in my used copy of the set have already been applied. The instructions are in the form of a double-sided sheet akin to a poster rather than a booklet; folded up they occupy a modest area (front cover below) but fully unfurled they're huge !


The building instructions themselves occupy a little over three quarters of the available space. There are no part call-outs, and some of the building steps are quite hard to follow, although an attempt is made to try and help the builder by printing a thick magenta line around the newly-added parts in some of the building steps. The instructions culminate in the image below which shows the completed build.


Some of the pictures of alternate models featured on the outer sleeve are repeated on the instruction sheet (below) although you don't get building instructions for these, so if you want to reproduce them then you're on your own.


Buying a set this old is often something of a lottery - even if you've seen photographs of the packaging before you buy you're never quite sure what horrors will await you inside the box.... I was lucky, though - all parts were present and correct, and they furthermore lacked the dust and grime that's often an unexpected 'bonus' when you buy a used set.

The set contains 3 maxifigures; if anyone is unfamiliar with these precursors to the modern minifigure and wants to know more about them, I've previously posted here on the subject so you can get up to speed. Unusually, but appropriately given the subject matter, the set calls for brick-built helmets rather than the typical maxifigure heads. You can see one of the maxifigure astronauts below. It's pretty impressive that after 40 years the sticker is still attached; OK, so it could have been applied a bit more neatly, but after all this time I'm just grateful that any of the stickers have survived at all.... 


While helmets as above are obviously the order of the day given the lunar setting, the set also includes three maxifigure heads and hairpieces so that the astronauts can let their hair down at the end of a hard day's space walking; it's a nice touch which enhances the play possibilities of the set.


Having completed the figures, it was on to the moon buggy next, and you can see the finished article below (click to enlarge). The building instructions zoom through this in just 8 steps; it'd probably be more like 80 steps today ! Interesting parts include the fully intact milky white antenna which is typically found with less than its full complement of 8 spokes, the multiple white 1 x 1 round bricks with a solid stud on top, and the front engine grille which is etched into the side of a blue 1 x 6 brick as opposed to just being printed on the surface. The 'control stick', which is made up of two red 1 x 2 plates, is wedged vertically between two studs on the floor of the moon buggy; this would be considered an "illegal" building technique by LEGO nowadays and thus wouldn't make it into an official set.


Finally it's on to the lunar module itself. The upper section (below), known as the ascent stage, was an at times tricky build as you're required to place pieces on the rear aspect which can't actually be seen on the instructions; in the absence of part call outs this requires some educated guesswork.... The light grey engine pieces first appeared in a couple of sets released in 1974, one of which (Set 657 Executive Jet) I've reviewed previously. The iffy technique of vertically wedging a 1 x 2 plate between two studs crops up again in this part of the build, on this occasion providing support for the yellow radar 'dishes'


The lower section of the lunar module (below), known as the descent stage, consists of four identical legs attached to a boxy central section. It was very quick and easy to assemble. The non-retractable ladder, which attaches to the central section via a vintage 2 x 5 hinge plate, doesn't reach the ground which does beg the question of how our intrepid astronauts are supposed to get back on board. Oh well - in low G they can just jump, I guess....


The ascent stage fits snugly into a 2 x 5 stud-sized slot at the top of the descent stage and the lunar module is complete (below). The ascent stage is held in place by a couple of studs on either side. All that's missing is the sticker of the Stars and Stripes which is supposed to adorn the side of the lunar module but which sadly didn't survive the ravages of time. Given that the sticker would have covered multiple bricks, it's absence is unsurprising; if I'd owned the set as a kid I would have wanted to reuse the bricks so the sticker wouldn't have lasted 5 minutes....


You can see all the various components of the set laid out below (click to enlarge). As well as the lunar module, moon buggy and 3 astronauts you're also provided with some additional equipment. The flag is stickered on both sides with the Stars and Stripes and sits on a 2 x 2 plate, and you also get a white radar 'dish' and some sort of rotating, floor-mounted device - bonus points for anyone who has a clue what that's supposed to be.... Mystery devices notwithstanding, it's a nice set with lots of play possibilities, and I would have been literally over the moon to get this when I was a youngster.


Set 367 Space Module with Astronauts was released in 1975. It contains 364 pieces, and according to Brickset it cost £3.95 back in the day. Having decided that I wanted the set, tracking down a boxed example on eBay predictably turned out to be a challenge due to the set's age and rarity, although they are occasionally listed there. I didn't initially check Bricklink as I assumed that the price of a boxed example on there would be more than I'd be willing to pay, but when I eventually got round to looking there I found exactly what I was looking for, located in the UK, and at a price which was below what I would have had to pay for any of the eBay auctions I'd been following. One of the reasons that Bricklink prices can be higher is that in marked contrast to eBay, sellers on Bricklink tend to be genuine LEGO enthusiasts who know how to clean, check and securely package their LEGO, and in general spend the necessary time and effort doing so; it was therefore no surprise that the set turned up well packaged, complete and clean. At the time of writing there are only eight copies of the set on Bricklink, plus a further four copies of sister set 565 Moon Landing; unboxed they're priced between £25 and £77 depending on location and condition, while a boxed example will set you back £86 and up.

There's no doubt that this set has charm, and as a child I would have absolutely loved it. Even so, it's easy to see why the appearance of LEGO's next generation of space sets just 3 years later - the start of the Classic Space era - caused such a stir. When you compare the images of Set 367 above with, for example, Set 928 Space Cruiser and Moon Base (below - click to enlarge) from 1979, the progression in terms of parts, colours and sophistication is just massive - truly a giant leap for mankind....


Monday, 28 January 2013

UCS AT-AT : Heady Days

Can it really be two months since I last posted about the UCS AT-AT ? Amazing how times flies. Anyway, having been distracted by a bunch of stuff, not least the small matter of Christmas, it was time to dust off the AT-AT and dive back in.

Those who've been following along will hopefully recall that last time I posted an update (here) I was already well into the build. I'd finished building the legs, body and neck of the beast, and had embarked upon the head, which I'd rather rashly assumed would be pretty straightforward. The head is made up of a number of sub-assemblies (LDD screen grab below - click to enlarge) which are knitted together at the end.


I'd got as far as completing the left side of the head prior to taking my vacation from the Kuat Drive Yards, and I was soon back into the swing of things, quickly polishing off the right side of the head, complete with lateral cannon. Externally, the left and right sides of the head are mirror images of each other (picture below - click to enlarge), but there are some differences on their inner surfaces; I initially assumed that the differences were deliberate, but having checked with AT-AT designer Pete it appears that there are a few pieces missed off the LDD rendition of the left side of the head. Furthermore, it turns out that some of the omissions are more than just cosmetic - their absence causes problems when it's time to join up all the sections to complete the head - so if you're building your own AT-AT (and I know that a few of you are) then you'll need to bear this in mind. It's thankfully pretty obvious which parts you need, but if you're having trouble figuring it out then get in touch and I'll provide the details.


Once the sides of the head were complete it was time to build the floor section (picture below). The sides of the head attach to this structure via a pair of heavy-duty brick-built brackets which pivot by way of a combination of axles and hinges in order to produce the correct angles. In addition, the two main forward-facing guns and a bunch of interesting greebled sections (more of which later) are slung underneath; the front and roof also attach to this section, as eventually will the AT-AT's previously-completed neck section, so this really is a key part of the build.


The last piece of the jigsaw is the front and roof section (below - click to enlarge). The front is deceptively complex and quite fragile; the AT-AT's windscreen is comprised of seven trans red cheese slopes mounted on hinges and sandwiched above and below by tiled sections which are themselves also mounted on hinges. Quite a bit of tweaking is required to get all the angles right, and God forbid you press too hard on the structures while adjusting them or else the whole windscreen section has a tendency to collapse on you and it's back to the start....


Combining the various sub-assemblies to create the AT-AT's head was a lot more challenging than I had expected, and it required some texts to Pete plus a bunch of coaxing, tweaking and adjusting to get it right. At the most basic level, all you have to do is attach the left and right sides to the brick-built brackets, adjust the brackets so that the sides are angled correctly to recreate the AT-AT head's geometry, drop in the front and roof section, and finally join the sides together inside the head by way of an elastic band which helps to ensure that the sides don't sag outwards under their own weight. It sounds fairly straightforward, but the job of positioning the sides, front and roof correctly to avoid leaving gaping gaps between the sections while simultaneously trying not to dislodge or destroy anything had me cursing in frustration. All that having been said, you can see the final result below (click to enlarge) and I reckon it was well worth the effort....


You can take a peek inside the AT-AT's head below; of note, you can see the attachment of the elastic band mentioned previously which runs inside the head from one side to the other and firmly holds the sides at the correct angle. It's not an official LEGO elastic band, but should I have an attack of guilt at some point and feel an irresistible urge to use only 100% official LEGO parts in the model I believe that there's a suitable LEGO-manufactured alternative available...


The underside of the head (below) is definitely worth a closer look. I think it's almost insectile in appearance with its multitude of striations, projections and structures, and I love the way that parts are used in unusual ways to create the desired effects; the main guns, for instance, are made up of a mish-mash of Technic gears and connectors, cones, barrels and the like. It's testament to Pete's attention to detail that what you can see in the picture below is in fact almost hidden from view in the finished AT-AT unless you're willing to lie on your back, shimmy underneath the model and stare upwards....


You can see the head from above in the picture below. The front and roof section attaches to the rest of the head via just four studs right at the front which means it needs careful handling once installed or else it can become detached quite easily; the roof simply rests on the upper surfaces of the sides of the head. One of the most impressive aspects is how snugly the different sections fit together, leaving minimal gaps between them.


So that's the head done, then, meaning that I'm now a total of 4,429 pieces into the build and have less than 1,800 to go. All I've got left to do now is put some skin over the bare bones of the AT-AT's body, so the end is definitely in sight. I'll crack on with the final sections and post an update when I've made further progress.

< -- Building the AT-AT : Part 6                                       Building the AT-AT : Part 8 -->

Wednesday, 16 January 2013

Technic Temptation....

Since I started this blog, no posting has brought me more grief than the 'Technic Torture' piece I wrote back in 2010. There are clearly lots of LEGO Technic fans out there, and some of them evidently didn't appreciate my less-than-complimentary comments about their passion....

Since posting that article, it's only fair for me to confess that a few Technic sets old and new have caught my eye and have been added to my collection. These include the huge Set 8674 Ferrari F1 Racer 1:8 from 2006, which I picked up from eBay a few months back, and a couple of more recent examples, namely Set 8070 Super Car and Set 8110 Mercedes-Benz Unimog U 400. All are undoubtedly Technic, but they look sufficiently un-Technic-like to satisfy my aesthetic sensibilities. None had made it to the front of my build queue, however, and all thus remained unbuilt.

Set 8674 Ferrari F1 Racer 1:8

A little while back, Pawel Kmiec, a renowned LEGO Technic builder better known by his online name of Sariel, was kind enough to send me a copy of his latest book "The Unofficial LEGO Technic Builder's Guide". I have to admit that given my at times 'difficult' relationship with LEGO Technic I approached the book with a degree of trepidation, and it wasn't just the Technic angle that I was wary of - many LEGO-related books that I've read over the years have been written with a much younger reader in mind, making them pretty uninspiring for the average AFOL.


First up, I have to congratulate Sariel on an extremely impressive effort; his book weighs in at a substantial 334 pages, and it's very nicely presented - robustly bound, and containing lots of clear colour pictures and photographs. Furthermore, any pre-conceived notions I might have had about being spoken down to were very quickly dispelled - this is no lightweight piece of LEGO fluff, people, it's a veritable textbook of Technic and no mistake....

The book is broken into five parts. It kicks off with the basics - four potentially dull but in fact extremely useful chapters which define critical and often misunderstood concepts and terms such as torque, power, backlash and efficiency before going on to describe the common Technic elements and then contrast the geometry, pros and cons of studless vs. studded building techniques. Once the basics are covered the book moves on to deal with mechanics, albeit with a distinctive LEGO flavour - gears, levers, chains and pulleys, plus mechanical solutions such as differentials, and also LEGO's pneumatic system. Next the focus is on motors, including an inventory of LEGO motors past and present and a detailed review and discussion of LEGO's current Power Functions system. Then follows a section on advanced mechanics which outlines various types of steering, suspension (picture below - click to enlarge) and transmission systems, even including step by step instructions on how to build your own versions. The book wraps up with a discussion of some of the key design considerations for different types of Technic models including cars, trucks, tracked vehicles and aircraft, including but not limited to scaling and controlling your models remotely.


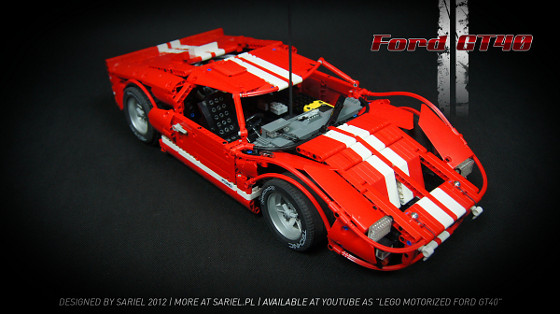
I'm pleased to report that the book is well written and seems very comprehensive; some sections are pretty dense and the going gets a little heavy at times, but it's hard to see how this could have been avoided without losing important details; furthermore, every effort is made to help the reader by way of copious colour diagrams and step-by-step building instructions. And Sariel isn't just an expert on the theory, either - the book is full of worked examples of the different concepts and systems, not to mention a liberal sprinkling of pictures some of his superb Technic MOCs (including the excellent GT40 below) which bring the theory to life and show what's possible once you have a decent grasp of the Technic building system.

Picture and model (c) Sariel
The Unofficial LEGO Technic Builder's Guide is published by No Starch Press and available from Amazon (UK/US - click to browse and buy) and elsewhere. If you're a fan of Technic then I can see it being a very useful reference work, and given Sariel's credentials I sincerely doubt that there are too many more knowledgeable Technic builders out there to learn from. If you need more convincing then check out his site here - there are some seriously impressive creations on there. Sariel's book might also be worth a look if, like me, you're somewhat on the fence so far as Technic's concerned. I say that because after reading the first hundred-or-so pages I felt sufficiently educated and inspired to crack open one of my thus-far unbuilt Technic sets.....


I did initially consider going all-in and building the biggest Technic Set that I own - the Unimog - but eventually decided to go for Set 8070 Super Car instead. It's less intimidating, frankly, and also smaller and hence easier to display than the monster that is the Unimog, but it still contains some Power Functions so there'd be some motorised mechanisms to impress my son with (!). The front of the box (above - click to enlarge) features a large picture of the finished model plus a pictorial summary of the various different motorised functions; the back of the box (below) shows an alternative build that can be assembled using the same parts. LEGO describe the alternative build as a Roadster; you need to download the instructions from www.Technic.LEGO.com, but at least they're free. The Roadster, which like the primary model features a bunch of motorised functions, looks pretty good IMHO, but I haven't tried to build it yet.


After cutting the seals I realised with some dismay that it's one of those stupid boxes where the top half is actually glued to the bottom half along the back and you're supposed to cut the the top of the box on either side near the rear 'hinge' to open it. Such vandalism is against my principles, so I was instead obliged to spend the next ten minutes carefully lifting up the front of the lid and squeezing out numerous bags of parts, instruction booklets, loose elements (wheels and tyres) etc. through the narrow gap between the top and bottom halves of the box one by one while trying not to tear the cardboard....

My set unfortunately pre-dates LEGO's recent welcome policy of bagging up the instruction booklets and sticker sheet with some cardboard to keep them flat. My instruction booklets were therefore less than pristine, and my sticker sheet was creased - irritating. There are 3 instruction booklets (below) which look identical save for the different booklet numbers; they're close to A4 size and have the same image of the primary model on the front cover as is printed on the front of the box. Booklets one and two are a mammoth 84 pages long; booklet 3 is only 56 pages long, and contains advertising for other Technic sets and various LEGO websites as well as the final building steps.


Having started to build the set while I was away from home I wasn't able to photograph or scan the sticker sheet, but if you're so inclined you can see a picture of it here. I'm sorry to report that it's a monster - lots of stickers, some of them huge - and just to make matters worse mine was as previously stated creased and a couple of the stickers were starting to peel off the backing. Thankfully the stickers themselves seem to be pretty robust - applying them neatly was challenging, and despite needing to peel off and reapply a couple of them they seemingly survived this without losing their adhesiveness or incurring any damage.

The bags of parts weren't numbered so I poured out all 1281 parts and sorted them into a couple of containers. The set contains almost no studded parts at all, instead featuring a preponderance of studless beams, axles, gears and panels in the build, not to mention an obscene number of pins and connectors of various types - you can find a full parts inventory here if you're curious.

The build itself took me a number of hours, mainly split over 3 leisurely days between Christmas and New Year's Eve. You start out by building the chassis, function select mechanism, rear axle and suspension, and installing a motor, at which point instruction booklet 1 is done. Instruction booklet 2 then walks you through construction of the front axle, suspension and steering rack, the engine block and pistons, and the car's interior. By the end of booklet 2 you've also built much of the retractable rear spoiler and bonnet, of which more later. Booklet 3 is largely concerned with the construction of a pair of scissor doors, wrapping a skin of sorts over the bare bones, tidying up and finishing off.


One of the reasons I've been slow to embrace Technic is that many of the completed models are just mechanisms wrapped in a framework of beams - often technically impressive, but purely functional and very ugly to my eyes. What initially attracted me to Set 8070 Super Car was that at least some effort had been made to pretty it up a bit. While the publicity shots looked good, I think it looks even better "in the flesh". First off it's bigger and more imposing than I expected; harder to display, therefore, but definitely more eye-catching too. The front (pictures above and below - click to enlarge) looks superb, and the long, sleek bonnet brings to mind a Dodge Viper; overall the lines are very pleasing - curvy thanks to the judicious use of panels and flexible hoses, but also stocky and low to the ground as a Super Car should be.


It's not all good, though - the rear of the vehicle (below) is spoiled by the presence of the battery box sticking out like a sore thumb aesthetically and indeed literally. It's a shame as there are some nice details to behold at the back of the vehicle - the rear lighting cluster, intakes and exhausts are nicely done, but the monstrous battery box dominates the view. More could and should have been done to hide it I think.


It's when you look under the skin that Technic models really come into their own, though, and the Super Car is no exception. While only one motor is included in the set, at any one time its power can be channelled through to any one of four functions; the bonnet opens and closes, each of the scissor doors independently opens and closes, and the spoiler is retractable. You can see all these features in the pictures below. The various mechanisms work well - I found them to be smooth and reliable. Honestly, between me and my son we've already worn out a full set of six batteries playing around with these motorised features and they've continued to work without a problem. The motor is switched on, and the selected mechanism activated, by flicking the orange switch on the battery box to the right or to the left depending on whether you want to open or close the bonnet, door etc.; when the orange switch is in the central position the motor is turned off.

Incidentally, if any fellow Technic novices out there are wondering what happens when one of the mechanisms reaches the maximum range of movement in one direction or the other, e.g. when the bonnet is fully open or closed, the answer can be found deep within the Super Car's innards where a special white gear lurks. This is actually a gear with a clutch; when a mechanism linked to this gear reaches its limits and resistance consequently increases, the clutch automatically starts to slip around the axle, thus disabling the mechanism and stopping it and indeed the motor from getting damaged. To a Technic noob like me that actually seems pretty clever !


As previously stated, there's only one motor; power must therefore channelled to the motorised function of choice via the switching mechanism which you can see in the picture below. The switch is located between the seats; simply click it into the desired position depending on which function you wish to select and power will be directed to that particular function while the others remain dormant. I have to admit that while I was building the switching mechanism I had real doubts that it'd be robust enough to survive a lot of switching back and forth. Like the functions themselves, however, it's worked faultlessly so far - rather impressive.


In addition to the mechanisms powered by the motor, there are also a few non-motorised functions. Under the bonnet you'll find a V8 engine, complete with yellow pistons (picture below); when the car is pushed forwards or backwards, the rotation of the back wheels is transmitted to the pistons which smoothly rise and fall within the engine block - neat ! Another feature involves the black gear sticking up from the rear of the car (picture below - click to enlarge) - rotating this gear steers the front wheels. Finally, all four wheels have independently-sprung suspension. Once again, all these mechanisms work beautifully and feel surprisingly robust.


OK, so here's the thing. I didn't enjoy the Super Car build as much as I've previously enjoyed building, say, a large modular building. I definitely derive more satisfaction, relaxation and enjoyment from building with standard LEGO bricks than I do meshing Technic gears and putting together complex mechanisms - it doesn't provide the same tactile pleasures, nor is it as relaxing. That having been said, gradually combining that cacophony of gears, axles, connectors and levers into a system of interconnected, working mechanisms was genuinely interesting and challenging, and there was a significant feeling of accomplishment when the model was finally finished and everything was working beautifully. Also, and importantly from my perspective, LEGO have made some significant strides with their Technic set designs from an aesthetic perspective - as well as being a cool and clever model, I actually think the Super Car looks good as well. Sure, it's far from perfect - there are still way too many gaping holes in the bodywork for my liking. I think, however, that I could probably remedy that quite easily; certainly it'd be pretty straightforward to mod the model so that the engine was largely enclosed. Same goes for giving the car a proper roof, and indeed covering over the back.

So overall the Super Car gets a big thumbs up from me, so much so that I've now got a bit of a taste for these big Technic sports cars - anyone got a boxed Technic Enzo (below) or Ferrari 599 GTB Fiorano going cheap, by any chance....?!


Set 8070 Super Car was released in 2010 and is I'm afraid no longer available direct from LEGO, although in the UK and elsewhere in Europe it can nevertheless still be found at retail, e.g. Amazon.co.uk currently has the set available, and it's surprisingly still priced well below the £99.99 RRP as I type this - click here to buy. If you're U.S.-based then your best bet might be Bricklink, although if you're willing to pay for trans-Atlantic shipping then Amazon.co.uk will I think ship it to you in the U.S. - good luck ! 

Tuesday, 8 January 2013

"And the Gimme LEGO Readers' Choice Award for Best Set of 2012 goes to...."

......Monster Fighters Set 10228 Haunted House !


Not exactly a landslide victory, perhaps, but in contrast to the previous year's poll when Set 10217 Diagon Alley took the title by a single vote, it was certainly pretty comfortable. The battle of the twelve sets became a two-horse race early on, with the Haunted House and its main challenger, Set 79003 An Unexpected Gathering, opening up an early lead over the other contenders. Bilbo and co. fought valiantly, but the Haunted House eventually opened up a healthy lead which it maintained until New Years Eve when the poll closed, finishing up with a little under a third of the vote, and pushing Bag End into second place with just under 20% of the votes.


You can see the final rankings in their entirety below (click to enlarge). Set 9474 The Battle of Helm's Deep performed creditably, finishing in third place and reinforcing how generally well-received the Lord of the Rings theme has been. The relatively unheralded but nonetheless lovely Set 10226 Sopwith Camel also put in a gratifyingly strong showing to finish in fourth place. "None of the above" finished in seventh place, exactly where it did last year, but with a slightly reduced share of the vote this time round; perhaps surprisingly, Ninjago Set 9443 Rattlecopter was the set most frequently mentioned as a reader favourite outside of the twelve that I chose to include in the poll. 
A total of 617 people voted, which is around 10% more than the previous year. Between the 19th and the 31st December, which was the window of opportunity for placing a vote, there were 5,991 unique visitors to the Gimme LEGO blog; those visitors racked up a total of 15,063 page views, and 10.3% of those visitors registered a vote, down on the 12.2% who voted the previous year.


Set 10228 Haunted House is a worthy winner in my opinion, and it walks away with two 2012 awards - the Readers' Choice, and my own award for best non-licensed set. You can remind yourselves of the official LEGO video reveal for the set below, which is presented by set designer Adam Grabowski. Congratulations and thanks to Munsters-fan Adam for designing the winning set - we eagerly await your next creation....!


So that about wraps it up for 2012, then.... I think it's fair to say that 2013 will really have to go some to maintain the level of quality of design evident over the last couple of years, although the likes of Set 10937 Batman : Arkham Asylum Breakout and Set 10233 Horizon Express have certainly kicked the year off in style. I for one can't wait to see what LEGO come up with next !

Friday, 4 January 2013

Moonlighting

As some of you know, in addition to writing this blog I'm also an Admin over at Brickset. Kim at LEGO recently sent Brickset a number of new sets to review, and having got my grubby mitts on a couple of them, namely Legends of Chima Set 70102 CHI Waterfall and Super Heroes Set 10937 Batman : Arkham Asylum Breakout, I've posted reviews of the sets over at Brickset.

I wanted to briefly mention the review of Arkham Asylum here as I think the set is superb and well worth checking out. My mouth was watering at the prospect of getting my hands on this particular set from the moment I saw the first publicity shots, and it certainly didn't disappoint. You can read my Brickset review by clicking hereand if you're hungry for more you can then check out some additional pictures that I took by visiting my Flickr stream.


I'll be reviewing a couple more new sets for Brickset over the next few weeks, and hopefully at intervals thereafter, and I'll update my Offsite Set Reviews page as I go. You can find a link to the page here, under the Gimme LEGO title banner on the right of the page, or else by clicking or touching the down arrow under the title banner if you're using a mobile device.