Thursday, 9 August 2012

Scalpers Rejoice !

LEGO-wise it's been a bit of a frustrating week so far, initially spent willing the last few AT-AT parts to arrive so I could start to build, then realising that I'm actually short of more parts than I first thought and therefore having to dive back into Bricklink. Still, they say that you have to suffer for your art, so maybe I'll appreciate the build all the more when it finally starts. Maybe.

While I've been waiting, I've consoled myself by perusing the various LEGO forums. One thing that's caught my eye has been the number of people posting "Wanted" messages on the Brickset Forum seeking to buy or trade exclusive items given out by LEGO at events such as San Diego Comic Con (SDCC). Good luck with that, guys...


LEGO have been doling out small numbers of limited edition minifigures and exclusive sets at events for years now, although I only became aware of this practice a couple of years back when I read reports of attendees at Star Wars Celebration V and SDCC picking up limited edition Star Wars Cube Dude sets (above - click to enlarge). Since then, LEGO giveaways at such events seem to have become an increasingly prominent part of the LEGO calendar, to the extent that speculation about what will be given away starts weeks beforehand, and the subsequent bragging by the lucky few then goes on for literally months afterwards....


Some of the most recent LEGO giveaways include four exclusive Super Heroes minifigures at SDCC 2012 - Phoenix (above), Bizarro, Shazam and Venom - and a trio of unique Green Lantern, Batman and Superman minifigures at SDCC and New York Comic Con (NYCC) last year. In previous years other themes such as Star Wars (below) and Indiana Jones have featured.

(c) Bricklink.com
On the surface, you might be inclined to give LEGO a big great pat on the back for their generosity and wonder what there is to complain about. LEGO are producing neat stuff to give away free, gratis and for nothing to LEGO collectors. The problem is that the route by which most of the passionate LEGO collectors eventually secure these items isn't via an obliging LEGO employee at a show, it's via eBay, or maybe Bricklink. And as you can probably gather, by the time most collectors get a look in, the nature of the transaction has gone from gift to gouging....


Let's look at some of the recent giveaways for evidence of this, starting with the Super Heroes Shazam minifigure (above) given away at SDCC earlier this year. Cost to recipient : nothing. Cheapest current Bricklink price : $165.00. Or you can try eBay, but once you've eliminated the custom minifigures you're looking at a $100 starting bid. Alternatively, I see that some eBay sellers are offering all four of the exclusive SDCC 2012 minifigures for the 'bargain' Buy It Now price of $749.98 - way to go ! Then there's the exclusive Batman minifigure from SDCC 2011 (below). Cost to recipient : zero, zilch, zip. Cheapest current Bricklink price : $254.99. Or you can Buy It Now on eBay for $180. I could go on, but I'm sure you get the gist - these items are expensive. I don't necessarily blame the sellers for trying to get what they can for the items; the current shoddy state of affairs is at least as much down to LEGO for putting the conditions in place for such a situation to predictably develop.


So what is the LEGO company hoping to achieve with these desirable giveaways ? My suspicion is that they're trying to attract new customers by targeting the freebies at events such as SDCC rather than, for instance, LEGO shows attended by genuine LEGO fans, and if they antagonise a few existing fans in the process then so be it. After all, those LEGO fans are already hooked. The company do need to be careful, though - with increasing numbers of people buying LEGO sets just for the minifigures these days, there's a chance that some will stop doing so if you take away their ability to "collect 'em all" by releasing exclusive minifigures which are out of their reach.

Honestly, while I have managed to track down a few of these exclusives, I'd actually prefer that LEGO just didn't bother with these giveaways at all. Tantalising sections of your audience in this way just seems cruel and potentially counterproductive to me, the joy of the few outweighed by the frustration of the many, with the only real winners being those opportunists seeking to make a financial killing out of the whole thing....

Wednesday, 1 August 2012

Building the Perfect Beast - the UCS AT-AT

My love of cavegod's massive UCS All Terrain Armoured Transport (AT-AT) MOC (below) is well documented, so much so that regular readers of this blog must be sick of me going on about it by now. It's hardly surprising, though - the AT-AT is perhaps my favourite ever vehicle from the Star Wars universe, and as a huge Star Wars fan and an equally huge LEGO fan I guess it was pretty much inevitable that if anyone was to build a huge and detailed version of the AT-AT then I would be all over it like a rash.

I've got to know cavegod, also known as Pete, pretty well over the past couple of years, and I've tried to persuade him to sell his AT-AT to me, but he always just laughs and says "build your own !". Thing is, having exhibited at LEGO displays with Pete a few times and seen the thing close up and personal, it'd be pointless to try to design my own. The guy has a serious knack of nailing the design of LEGO-built Star Wars vehicles time and time again - Sandcrawler, Republic Attack Shuttle and Speeder Bike to name but three - and his AT-AT is I think the best of the lot. Realistically, nothing I could build would come close - it'd just be a futile exercise.

Pete's AT-AT, NSC 2011
Anyway, to cut a long story short, at some point last year I think Pete finally got sick of me trying to buy his AT-AT and moaning about how empty my life was without one, and he offered to help me build one. I was sceptical, until that is the LDD files started to arrive in my inbox and I realised he was serious. Six files in all, covering the legs, head, neck, internal skeleton, sides and roof of the beast.

I've blogged about LDD a couple of times before (here and here). It's a piece of software that allows you to build 'virtually' with LEGO on a PC or Mac, with an almost unlimited palette of pretty much every part that LEGO have ever produced, in any colour, and in any quantity. You can see an LDD screen grab of one of Pete's AT-AT files below (click to enlarge).


The thing about LDD is that once you have a design, you can ask the software to produce a set of building instructions. Having reviewed the LDD files that Pete sent, it became clear that I basically had all the necessary blueprints to build a replica of his AT-AT.

Given the size of the thing, however, collecting together the necessary parts was obviously going to be a significant challenge. I have a relatively modest collection of loose LEGO, and cannabalising my collection of sets wasn't going to be an option for me, so it was immediately evident that I was going to have to source a hell of a lot of parts. In the old days, you could upload your LDD designs to the LEGO company and for a fee they'd send you the parts you needed to make your virtual masterpiece a reality. This service was unfortunately stopped last year, however, so another source of loose LEGO was going to be required. 

First things first, however : LDD unfortunately won't provide you with a listing of all the parts making up your digital design, but there's thankfully a third-party application called LDD Manager which apparently does the job. It was written by Eurobricks staff-member Superkalle, and what he doesn't know about LDD is probably not worth knowing; you can find out more about the software and download it here. There's another software package called "Wanted Bricks" which will, I'm told, also generate parts listings from LDD files. Please note that I've not used either of these applications myself - Pete sent me parts listings that'd he'd already generated from his LDD files - but both were applications that he recommended, so both should hopefully do the job.

Once I had parts listings for the six AT-AT LDD files, the next job was to painstakingly merge the six listings into one master spreadsheet. There's no doubt an automated way of doing this, but if there is then I don't know what it is, meaning that I had to resort to doing it by hand.... This involved some seriously tedious data entry. Anyway, it got done eventually, and for the record, the AT-AT is made up of around 6,200 parts, which gives it a bigger part count than any official set that LEGO has ever released, including Set 10179 Millennium Falcon (5,195 parts) and Set 10189 Taj Mahal (the current daddy of official sets at 5,922 parts)

Once I had the master parts listing, it was time to start collecting together the necessary parts. Luckily, I've been pretty diligent over the past few years about keeping track of my loose LEGO. I use a website called Peeron for this purpose; you tell it which parts you have, in which colour and in which quantities, and it will keep track of your stash of loose LEGO for you. Then, it's just a case of searching by part and by colour at a later date and Peeron will tell you how many parts of that colour you have (although it unfortunately won't tell you where the hell you've put them...). So for example, the AT-AT requires thirty three 2 x 3 bricks in light bluish grey. My Peeron listing (below - click to enlarge) tells me that I have 103 loose 2 x 3 bricks in medium stone (another name for light bluish grey) so I'm sorted for those parts at least....


All told, I had somewhere in the region of 2,000 of the parts I'd need for the AT-AT in my collection of loose LEGO, so it was then time to figure out where I could get hold of the remaining 4,200-odd parts. The answer to that question is Bricklink, the indispensible and inevitable destination for anyone looking for loose LEGO, and I quickly set about putting together the mother of all Bricklink Wanted Lists. Part by part you tell Bricklink what you need (see screengrabs below - click to enlarge) in what colour and in what quantity and when your wanted list is eventually complete, Bricklink will tell you which of the thousands of Bricklink sellers across the globe have the parts you're looking for. At least that's the theory; in reality, with a project this large, it's almost certain that nobody will have all the parts you need, and it'll invariably be necessary to use multiple sellers in multiple countries, piecing together the full complement of parts like a complex, expensive jigsaw puzzle. 

Building a Bricklink Wanted List (1)

Building a Bricklink Wanted List (2) 
Even with the tools available on Bricklink, the process of sourcing all the parts was time-consuming and challenging. I ended up placing orders with multiple different stores, located in countries on both sides of the Atlantic including the U.S., the Netherlands, Slovenia, Canada, Germany, the U.K. and elsewhere. The largest order was for more than 2,600 parts (from AFOL Supply in the Netherlands - cheers, guys !), and the smallest was for just 4 parts. Every store sets its own price for each individual part; some stores charge additional fees depending on the number of different parts you order from them; some stores add a specific charge for packaging; some stores pass on the PayPal fees to the buyer; postal charges obviously vary according to the size of the order and where the parts are being shipped from, and there's even the potential for import duty to be levied by Her Majesty's Revenue and Customs depending on the value of the package and the country of origin. As you can imagine, it can be extremely complex to juggle all these variables in order to get all the parts you need from as few sellers as possible while minimising the total cost. I spent hours on this task, but I'm nevertheless pretty sure that I could have sourced the parts more cheaply than I did. And the total cost ? No comment - my wife might read this....

And then the packages start to arrive, from small envelopes to big, heavy boxes. The first job is to carefully check that you've received what you ordered as mistakes do happen. Sometimes wrong parts are sent, and sometimes parts are just missing. There have been issues with a fair few of my orders so far, but every single one of the sellers concerned has been quick to apologise and send out the correct parts. Once the orders have been checked and feedback has been left for the sellers, it's time to cross those newly-received parts off the master parts listing, which gradually chips away at the "parts left to source" count at the bottom of my humungous Excel spreadsheet....

Pete with his AT-AT
At time of writing, all the parts have been ordered, and most are now in hand. I'm waiting on just 54 more pieces and then my mammoth parts grab will be complete. I'll post an update when I'm finally in possession of all the parts and building is underway. Huge thanks to Pete for putting together the LDD files for me, but he did warn me in passing that they might contain some mistakes, so the build will be a whole different challenge I think...

If you're interested in building your own AT-AT and want to get hold of the LDD files, scroll up to the top and send me a message via the 'contact' link on the right side of the screen; I'll pass your details on to Pete.

STEAM 2011
               
                                                                                  Building the AT-AT : Part 2 -->

Wednesday, 25 July 2012

Hell's Bells

I've found it increasingly difficult to get excited about LEGO's Architecture theme. I admit I was pretty eager at first, picking up the first wave of sets on a visit to the LEGO Brand Store on Chicago's Magnificent Mile and then keeping my fingers tightly crossed on the flight home that the boxes wouldn't get crushed to oblivion in my luggage. Since then, however, my enthusiasm has gradually waned to the point where most of the releases barely seem to register now.

Set 21012 Sydney Opera House : ghastly
To me, there's a distinct feeling of style over substance with this theme. The packaging is extremely slick - elegant, stylish boxes open neatly without the need for minor surgery, and the beautifully put together information booklets further whet the appetite. The models themselves are generally found wanting, however - simplistic and in some cases plain ugly (yes, Set 21012 Sydney Opera House - I'm looking at you...). And even when I can see some aesthetic merit in the sets, such as Set 21005 Fallingwater or Set 21010 Robie House, the thought of the build, and more specifically stacking hundreds of tiny plates or tiles for hours on end, puts me off. And then there's the price - some of these sets have a reputation for being eye-wateringly poor value for money.


All that having been said, I was interested to hear that LEGO were planning to add a version of Big Ben to the Architecture theme, and given that it's a (fairly) local landmark and wasn't too expensive, I decided to pick up a copy when the set appeared at retail.

As usual, the packaging doesn't disappoint. The set sports the trademark swish black box (pictures above and below) and just about my only complaint is how easily the front of the box gets marked - every little scuff and fingerprint shows up on the surface. But if it's OK for Apple then I guess I'll let LEGO off on that one.


Access to the box contents is via a flap on the right side of the box - cut the seals, pull the flap and the front of the box lifts up exposing the contents. A million miles away from the horror of thumb tabs, which is what you normally have to contend with with a set this size. The box contains four sealed bags of parts, two loose black 6 x 10 plates, and a thick, heavy booklet. The booklet, which is I think is best described as 'lush', is sixty pages long and doubles as an information resource and the building instructions. The first few pages consist of photographs interspersed with informative text outlining the history and construction of the Clock Tower of the Palace of Westminster ('Big Ben' is actually the name of the bell within the tower rather than the tower itself). Appropriately enough for the Architecture theme, a couple of pages are dedicated to two of the architects responsible for the design of the building.


Other notable content includes a page discussing the history of LEGO Architecture sets (they actually go back as far as the 1960's, apparently), scale diagrams of other sets in the theme, and even some thoughts from Rok Kobe, the designer of the set (below), who gives a high-level description of the design process for this model.

The building instructions themselves don't begin until page 14 of the booklet, by which time you're absolutely itching to start building ! A note about the building instructions : one enduring issue for as long as I can remember has been how difficult it can sometimes be to discriminate between the different colours in the building instructions. LEGO has been listening to our complaints, however, and has started to print a thin white outline around all the black pieces. I can confirm that this well and truly nails colour discrimination issues, at least so far as black pieces are concerned, so thank you LEGO ! Another cool thing about the building instructions is the way that little snippets of information are placed between some of the building steps. I never knew, for instance, that the Ayrton Light which sits atop the clock tower was named after A. S. Ayrton, Member of Parliament, and is only lit when Parliament is sitting....


I was intending to take a photograph of some of the more interesting or unusual pieces in this set, but truth be told once I'd looked through the parts listing I decided not to bother as there really aren't that many.... The black 1 x 8 tile with "Big Ben" printed on it that sits on the base of the model is obviously unique to this set, and the dark bluish grey 2 x 2 x 2 quadruple conxex slope which forms the top of the clock tower is only found in one set other than this one. Otherwise it's more a case of quantity over rarity - 57 tan 1 x 1 round bricks, 38 tan 1 x 2 plates, 34 tan 1 x 1 tiles and 32 tan modified 1 x 2 tiles with grille just for starters help to explain why such a small set has such a surprisingly high total parts count of 346. It also means that you know where to look if you're in the market for a tan greebles parts pack....


You can see the finished build above and below. Words that come to mind when I try to describe the building experience are as follows : compact, neat, repetitive, clever, fiddly. Lots of small parts to stack, and those of you as particular as me - you know who you are - will hate having to fight the compulsion to line up every 1 x 1 brick, plate and tile so that it's exactly straight... On the other hand, some genuinely neat building techniques are employed to achieve the final result, and I have to say that the finished model doesn't look half bad. In fact my only real complaint about the design is the way that the clock faces jut out, which doesn't look quite right to me. Otherwise it's an unexpectedly good rendition.


Aside from some distinctly duious designs, a criticism of many sets in the Architecture theme has been value for money; some of the sets have a truly terrible price per piece ratio. That isn't the case for Big Ben, however - 346 pieces for a U.K. RRP of £24.99 isn't too bad, even if the vast majority of those 346 pieces are small. Predictably enough, it's better value in the U.S., where the U.S. RRP of $29.99 equates to less than £19 at current exchange rates.


You can buy this set from LEGO Brand Stores, LEGO Shop@Home and Toys R Us in the U.K.;  in the U.S., you can also buy direct from Amazon. Just the thing to celebrate the 2012 London Olympics - Go Team GB !

Wednesday, 18 July 2012

Ancient Treasures

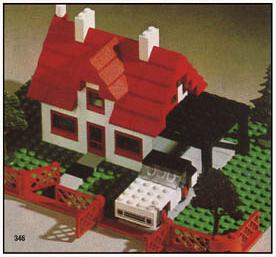
Having focused on a couple of newer sets over the past few weeks, I thought I'd plunder the archives for something older this week. Set 346 House with Car is almost as old as I am, having been released in 1969. I suspect that for most of you that makes it positively ancient....

Set 346 House with Car (picture from Bricklink)
I spotted this set on eBay during a recent episode of eBrowsing and immediately fell in love with it. This is what LEGO buildings looked like when I was a kid - none of your fancy Modulars in those days. I've bid on similar sets in the past and often missed out, but I was delighted to win the auction for a change, and even more delighted when the set arrived in pretty much immaculate condition a few days later.


Just check out the box (above - click to enlarge) - it's more than 40 years old and yet still almost mint. Wonderful ! I don't actually recall seeing this type of box before - a flap opens at the top so that the baseplate can slide inside the full length of the packaging, and the rest of the pieces fit into the removable inner box in the lower half of the packaging. The back of the box (below) features a motley collage of photographs and stylised images; let's just say that LEGO have come a long way since 1969 so far as box art is concerned....


The instruction booklet (below) is so minimalist its almost non-existent; certainly it's just about as far away as you can get from the weighty tomes we have to wade through these days. It's basically just a piece of paper containing six printed panels which folds down into a square, and it manages to condense the construction of the house into just 9 steps, with a further 5 steps for the car. That's 14 building steps for a 177 piece set; you'd probably get that many building steps for a minifigure these days. Well, maybe not, but you hopefully take my point....


This set obviously doesn't contain minifigures, pre-dating as it does even the earliest rudimentary minifigures by a number of years, but it does feature some special pieces which are well worth highlighting. Of particular note are the three trees that you get with the set - a pine tree and two identical oak trees (or fruit trees, if you'd prefer to go with Bricklink rather than Peeron). These are beautiful and intricate - check out the fine detail in the pictures below - and a world away from the crude, stylised tree designs that LEGO started to employ from the early 1970's onwards. They're also painfully fragile, however, and I'm therefore incredibly fortunate that all three trees in the set that I bought are immaculate.


Another piece of note is an Antenna with Side Spokes, not least because most of those in circulation seem to be lacking at least one of the side spokes so it's unusual to see an intact example... Again I was lucky enough to receive an undamaged one, so managed to avoid having to shell out a few quid on a replacement which is what usually happens. Then there's the old-fashioned classic windows, the unique baseplate with rounded corners and printing to indicate where you should start building, and the old-style 'macaroni' 2 x 2 round corner bricks, all of which risk inducing waves of nostalgia among LEGO fans of a certain vintage...

No hand-holding here...
Despite the relative simplicity of the set, the build wasn't as quick and straightforward as I expected, for a couple of reasons. Firstly, the instructions; while some of us old-timers might sneer at the amount of hand-holding you get from modern instructions, at least they're generally easy to follow. This is in marked contrast to the instructions above - I twice built the roof of the house incorrectly before finally nailing it at the third attempt because I couldn't actually see which pieces I was supposed to be using. Secondly, the bricks - they're 43 years old, and despite looking in surprisingly good shape for their age they were somewhat temperamental at times; the clutch is significantly diminished with some of the pieces and increased with others, making for an unpredictable building experience. It's not until you build with older pieces like this that you start to realise how much we take the consistent building experience that we get with more modern LEGO bricks for granted.


Minor niggles aside, the finished house and surrounds are a joy -  a perfect example of a simple, classic LEGO build of the late 1960's and early 1970's. I'm sure that much of my enjoyment stems from the undoubted nostalgia factor, but there's also pleasure in the clean lines, the elegantly simple design, and the sheer fact that despite being 43 years old the set looks almost brand new - I wish I was so lucky....


Once the house and garden are finished, all that's left is the car. I'm presuming that LEGO were aiming for a sleek, sporty look when they designed the car in this set, on the basis that the windscreen sits low down directly atop the back wheel.


Almost all of the LEGO cars of my youth looked like this, and as such it can do no wrong in my eyes. Anyone brought up on a diet of modern LEGO vehicles could however be forgiven for thinking that it looks a bit....basic. There's a nice embossed engine grille at the front, though, and it's unusual to find a transparent 2x4 slope in such good condition after 40+ years - most of them become horribly yellowed after even half as long.


As you've no doubt guessed by now, I adore this set. There are unfortunately no examples of this set currently listed on eBay in the U.K. or the U.S. as far as I can see, and I don't even recall ever having seen one prior to spotting the listing for the one above. There are however a few of these sets available on Bricklink, of which a couple have boxes and can be had for as little as 40 Euros. So not outrageously expensive, then, and a delicious slice of classic LEGO if you're so inclined.

Just a brief post-script; having won the eBay auction for the set above, I thought I'd check and see if the seller had any more LEGO for sale. To my delight, he had listed another great-looking set, and by some fluke I managed to win that auction too. The set arrived a couple of days ago (picture below - click to enlarge) and once again it's pretty much immaculate. While I haven't built it yet, the imaginatively-titled Set 345 House with Car (or House with Mini Wheel Car on Bricklink, if you prefer) appears in many respects to be remarkably similar to Set 346, from the style of box to the instructions, not to mention aspects of the model itself including the car which is absolutely identical. Only the style of the house itself differs significantly, seemingly being an early 1970's vision of a 'future' house rather than the more traditional design seen in Set 346, and I'm looking forward to adding it to my vintage street !


Wednesday, 11 July 2012

I Want My Mummy !

Here's another posting which falls into the "Better late than never" category.... When I first saw pictures of the Pharaoh's Quest line up many moons ago, Set 7307 Flying Mummy Attack was the early stand-out for me. The plane looked great, the Flying Mummy minifigures looked great, the obelisk looked neat, and I was really looking forward to getting my hands on it.


So I picked up a copy of the set as soon as I was able to get one at a decent discount (old habits generally die hard, however badly I want the set), but in time-honoured tradition I ended up getting stuck into other LEGO-related projects and the set never got built. Until now. Recent heavy discounting of the Pharaoh's Quest theme reminded me that I should really dust it off and get it built before the theme disappears forever (or until the next reboot at least). Admittedly a year late, then, but better late than never....


I do like the Pharaoh's Quest branding, which features a very agreeable colour palette. The front of the box for Set 7307 (above - click to enlarge) focuses on the biplane, which is predominantly a delicious dark red colour. The back of the box gives more prominence to other elements of the set, notably the hieroglyph-laden obelisk and the three minifigures.

Opening the box reveals three bags of parts, a sticker sheet and the instruction booklet. The front of the instruction booklet carries the same image as the front of the box. In addition to the building instructions, the 52-page booket contains an inventory of parts, a nice panoramic view of all the Pharoah's Quest retail sets covering two pages (pics below - click to enlarge) and advertising for the Pharaoh's Quest micro-site. Despite the sets themselves no longer being on sale direct from LEGO, the site is still up at time of writing and provides some back-story to the theme along with games, quizzes, character bios, wallpaper and unlockables, not to mention details about the sets themselves.


My sticker sheet (below) was curled up on itself in time-honoured fashion, although I've tried to flatten it out for the picture as best I could. It's bad enough having to apply stickers in the first place without the stickers themselves seemingly being set to self-destruct mode on top of everything else.... I'm sorry to go on about it, but I think back to some of my old Adventurers sets such as Set 5978 Sphinx Secret Surprise where the hieroglyphs are printed on the pieces and it's a real shame to see how LEGO are now taking short cuts with this kind of thing. Similarly, the roundels on the aircraft's wings would have been printed onto tiles not too long ago rather than stickered.


The complaints pretty much stop on opening the bags however thanks to all the interesting parts in delicious colours....dark red, dark blue, dark orange, tan and dark tan, plus some pearl gold. You can see a selection below (click to enlarge). The dark red 1 x 2 x 1 panel is unique to this set, while the dark red tail and 4 x 3 wedge  without studs only appear in one other set in addition to this one. A number of others such as the dark blue 2 x 2 tile with one stud in the centre, the dark tan 75 degree 2 x 2 x 3 slope and the dark red 4 x 4 corner plate only appear in a handful of other sets. Overall, therefore, a big thumbs-up for the parts.


The set contains three minifigures. Aviator Jake Raines (below) is pretty standard Adventurers fare. His torso features a flying jacket, back-printed with an appropriate logo and the initials 'SMH' which I suspect are probably the initials of the person who designed the set. He has a suitably stubbly, grizzled face which, I was surprised to note, isn't reversible. Jack doesn't appear in any other retail sets, but did make an appearance in the Desert Glider promo polybag (Set 30090) which was given away free with the now-defunct News of the World newspaper last year.


Jack has to face off against two Flying Mummies. These minifigures are intricately detailed and frankly superb in my opinion, featuring printed legs, gold-detailed back-printed torsos, reversible heads, decorated helmets and of course magnificent sculpted wings. The Flying Mummy minifigure is included in three of the Pharaoh's Quest sets including this one, and so impressed was I on seeing it for the first time last year that it was one of my nominations for the "Best Minifigure of 2011" award, although it eventually lost out to Captain Jack Sparrow.


It can't have escaped your notice than LEGO have been quite active on Mummy front over the years, producing a number of variants. You can see three of their most recent efforts below. On the left of the picture we have the Mummy from the third series of Collectible Minifigures and on the right is the Mummy from the 2012 Monster Fighters Set 9462 The Mummy. I love them all - you really can't have too many Mummies - but the spectacularly-decorated Flying Mummy surely represents the high point. The Daddy, if you will. :-)

The Three Amigos...
Once the minifigures are assembled, the next task is to construct the obelisk. The use of dark blue, light and dark tan, dark orange, and pearl gold pieces, together with the hieroglyphs, gives the structure a very exotic and almost authentic feel. You can certainly see this structure fitting very nicely into a Pharaoh's Quest diorama alongside other themed sets.


Obelisk completed, it's time to build Jake's biplane, presumably named "Spirit of Luis" as an homage to Charles Lindbergh's "Spirit of St. Louis" which completed the first solo New York to Paris run in 1927. OK, so that was a monoplane, but it's the thought that counts... It was the biplane which initially attracted me to this set and it doesn't disappoint.


Even aside from the lovely dark red colour scheme (can you tell that I love dark red LEGO ?!) the design of the biplane hits the spot for me - compact, chunky and eminently swooshable. I also like the engine and twin machine guns; my only gripe is really the need to apply six stickers in order to add the finishing touch, and if that's the worst I can say about it then you know it must be pretty good.... You can see how all the different elements of the set come together in the picture below.


There's even a rudimentary 'play feature' built in to the set - the biplane features a grab arm on the underside which can be swivelled downwards in flight. This allows Jake to swoop down over the obelisk and grab the precious gem as illustrated below in the instruction manual (click to enlarge).


The overall verdict ? Put simply, it's an excellent set. It was the standout set for me when I saw first pictures of the Pharaoh's Quest theme, and it's robustly lived up to all my expectations.

Sad to say the Pharaoh's Quest theme is now on the way out. No longer available at S@H, on clearance or gone from LEGO Brand Stores and being purged from other stores, its days are numbered. At time of writing, Amazon in the UK and the US still carry some of the sets, and you can check them out here and here respectively. You may even find the Pharaoh's Quest sets at a clearance discount if you look around, although I'd wholeheartedly recommended this particular set even at the original £14.99 / $19.99 MRSP, such is its allure...