Showing posts with label LEGOLAND. Show all posts

Monday, 13 April 2020

Taxi!

Given everything that's going on in the world right now, I've felt in desperate need of some light relief to lift the spirits. One thing that works for me is to take solace in an old LEGO set and wallow in some much-needed nostalgia. My latest trip down memory lane was 368 Taxi Garage, released in 1976. I spotted my copy of the set perched atop of a bunch of other sets on a bookcase and I thought it would fit the bill nicely.


The front of the box is dominated by a simple image of the set contents assembled and ready to be played with, together with a 6+ age recommendation. The back of the box features a number of panels containing images of alternate builds including a small taxi stand, a vintage taxi and two quite respectable reimagined versions of the taxi garage. The alternate builds don't stop there, either - there's also a horse-drawn taxi carriage on one of the side panels of the box.


To open the box you just slide off the outer sleeve. This reveals a white inner tray containing the parts and an instruction sheet.


The building instructions are printed on a large double-sided sheet more than half a metre long and 27 cm wide. This folds down into a square measuring around 13.5 cm x 13.5 cm, and once folded the image above appears on the front 'cover', while the back 'cover' (below) showcases a selection of the alternate builds which adorn the box.


The set includes a pair of what LEGO have termed "stage extra" figures (below) which are I assume supposed to be a taxi driver and his female passenger. Figures like these were the precursors of modern minifigures and started to appear in sets in 1975. Unlike their modern counterparts they don't have moveable arms and legs, and there isn't any printing on their heads or torsos, although they did occasionally feature stickered torsos as you can see here. They were superseded by modern minifigures in 1978 so weren't produced for long, but they remain an interesting and important evolutionary step in the development of the minifigure. While the individual elements making up these particular figures could be found in numerous sets, this is the only set which included the taxi driver figure, while the female passenger only ever appeared in two sets in addition to this one.


According to Brickset 368 Taxi Garage contains 156 elements, although Bricklink reckons the part count is 144 plus an additional 8 elements for the figures. The garage itself is constructed on a green 16 x 32 baseplate with rounded corners which only ever appeared in two sets including this one. The set also includes a number of printed elements. The 1 x 4 yellow brick with black 'TAXI' print is unique to this set, as are a pair of black 2 x 3 bricks with white sans-serif 'TAXI' print; of note, a black 2 x 3 brick with white serif 'TAXI' print was produced in 1971 and can also only be found in one set, 605 Taxi. Other notable printed elements include a black 1 x 4 brick embossed with a chrome car grille print and a white 1 x 2 brick printed with the Shell logo.


I built the taxi first. In most respects it's identical to the vehicle in the 605 Taxi set but there are a couple of differences. Firstly, as mentioned above a different font is used for the 'TAXI' print on the side. More notably, however, the rear end has been redesigned; the older standalone taxi is just two studs long behind the rear wheels, but the newer taxi has been inexplicably lengthened by a stud and the rear looks dreadful. A yellow 1 x 2 tile is wedged between studs on the roof of the vehicle, indicating that the taxi is available for hire; this building technique wasn't uncommon back in the day but was later deemed "illegal" by LEGO as it places undue stress on the elements concerned.


By 1976 LEGO had stopped printing a dot pattern on baseplates (like you can see here, for instance) to guide placement of elements so the 16 x 32 baseplate supplied with this set is consequently unprinted. Construction of the taxi garage is predictably quick and straightforward, requiring only 12 steps on the instruction leaflet. As previously stated the yellow 1 x 4 brick with 'TAXI' print on the garage roof is exclusive to this set, while the pair of 1 x 4 x 6 yellow doors which enclose the garage appeared for the first time ever in this set before going on to appear in a further 9 sets between 1976 and 1990.


With the notable exception of the modular buildings, most buildings which appear in modern sets tend to be open at the back, ostensibly to facilitate play, but also to minimise the parts count and hence the cost. Here, while the rear of the building is undoubtedly simpler than the front, it is at least enclosed, and efforts have been made to embellish the appearance of side and rear walls via the use of red 1 x 4 brick arches which only started to appear in sets the year this set was released.


With the building finished all that was left to do was to construct the Shell-branded petrol pump and attach it to the baseplate along with a 4 x 4 x 6 2/3 large pine tree and the figures. Lovely! While I have no doubt that the warm fuzzy feeling I experienced while inspecting the completed build was largely driven by nostalgia, it's undoubtedly an attractive set and still looks almost brand new; I picked it up from eBay almost 10 years ago as part of a job lot of older sets and can't believe how pristine most of the elements are.

368 Taxi Garage contains 156 elements and was released in 1976. At time of writing, complete boxed examples can be had for less than £30 plus shipping on Bricklink, and if you're willing to forego the box then you'll potentially pay less than £20. Bargain!

Friday, 1 September 2017

Retro Space Revisited

I always enjoy building and writing about vintage space sets, and judging by the number of views that my Space Police post got last time out plus the comments on the Gimme Lego Facebook page it seems that I'm not the only one who enjoys wallowing in LEGO Space nostalgia. I've therefore decided to focus on another long-retired LEGO space set today, this time from the M-Tron subtheme.


The M-Tron subtheme of LEGO space consists of a total of eight sets released in 1990 and 1991. In addition to these eight sets, LEGO released instructions for an additional M-Tron model - 6862 Secret Space Voyager - which could be built by combining parts from three of the retail M-Tron sets. All of the M-Tron sets featured a vehicle of some description, and the majority of the sets utilized magnets, a first for LEGO Space I believe. In this review I'll be focusing on 6896 Celestial Forager, a mid-size M-Tron set released in 1990.


Unlike 6897 Rebel Hunter which I reviewed a few weeks back 6896 Celestial Forager is too small to merit a cardboard tray inside the box. As was the case for 6897 a laser grid forms the backdrop to an image of the completed build on the front of the box (above) although this time the grid is purple rather than green. Again similar to 6897 the vehicle is traversing a sandy planet surface, albeit at ground level this time. A price tag from departed UK retailer Woolworths is stuck over the LEGO logo on both the front and back of the box and indicates that the set retailed for £10.49 back in 1990. The back of the box (below) is split into a number of panels featuring alternate builds, and the inclusion of magnets is also highlighted.


The instruction booklet is in fact a thrice-folded A3-sized sheet which is printed on both sides. Although the cover panel (below) predictably shows an image of the completed build, here the vehicle is photographed from behind in contrast to the side-on view to be found on the front of the box. The instructions break the build into 14 principal steps, not including assembly of the minifigure.


The set contains a single minifigure, named by Bricklink as M-Tron with Airtanks. This minifigure has appeared in a total of ten sets, unsurprisingly all from the M-Tron subtheme given the prominent M-Tron logo printed in the middle of the red torso.... In addition to gracing this minifigure, the torso can also be found as a part of two other minifigures. All other components of the minifigure, namely the white legs with black hips, the yellow head printed with a standard grin pattern, the black helmet and airtanks, and the trans-neon green visor, have been widely distributed in many sets.


Below you can see the minifigure from the rear with the helmet removed. There's no printing on the back of the head or the torso.


With the set's single minifigure assembled it's time to build the vehicle. The Celestial Forager consists of front and rear sections joined to each other by a pair of black 2 x 4 hinge plates with male and female articulated joints. There's also an upper bridge joining the front and rear sections, on top of which is a black inverted webbed 6 x 6 dish. The upper bridge features a faintly Heath Robinson-esque mechanism utilising a pair of 2 x 2 turntable plates together with a 1 x 2 Technic brick, a modified 2 x 2 plate with pinholes and 4L Technic axle to ensure that the two sections of the vehicle can still articulate at the hinge with the bridge in place. The front section of the vehicle includes a cockpit which incorporates a red cockpit space nose with printed M-Tron logo; this element has only appeared in a total of three sets including this one. A pair of chainsaw bodies are attached to the nose at an angle, one on either side; each sports a different 1 x 1 tile printed with a button design and a computer display design respectively. Both tiles have appeared in fewer than 10 sets in total. The vehicle's four black hard plastic 35mm x 31mm wheels attach to the chassis via red modified 2 x 2 bricks with pin.


The rear section of the vehicle is basically a trailer upon which a crane is constructed. A pair of black cylindrical magnets anchor the crane at its base. One of my most memorable brushes with LEGO cylindrical magnets was when I built 10030 Imperial Star Destroyer, and since then whenever I encounter them I recall that epic build. One of the magnets clicks into a 2 x 2 magnet holder which comes in a number of varieties; the 'short arm' variety found within this set can only be found in one other set, and the other varieties are only marginally more common. The crane's boom is formed from a 2 x 4 x 5 inclined support stanchion. A further cylindrical magnet is attached at the top of the boom, this time via a red 2 x 3 magnet holder. Cargo is provided in the form of a red 2 x 2 x 2 container; the variant supplied in this set has solid studs and has only ever appeared in five sets in this colour. The container has a printed light grey door which can only be found in seven sets, and inside the container are a pair of trans-neon green 1 x 1 round plates.


The main play feature of the set is the crane. As shown in the picture below, the boom can be lowered by disengaging the pair of magnets at the base of the crane, and the cargo container can be detached by disengaging the magnets at the end of the boom. As previously mentioned, the vehicle can bend in the middle thanks to the inclusion of a hinge.


Although I'd have to say that 6896 Celestial Forager falls some way short of being a "must-have" set, it's nevertheless an interesting step along the road from the earliest LEGO Space sets to present day offerings and it's well worth the £10 plus shipping that I paid for my boxed, complete copy a few years back. While that's admittedly inexpensive by current standards, the set can still be acquired for a relatively modest sum now - at time of writing complete boxed examples are available on Bricklink for as little as £15 plus shipping, which is less than what the set, originally priced at £10.49 back in 1990, would cost now if adjusted for inflation.

Thursday, 9 March 2017

Red Five Standing By

Like many AFOLs I seem to spend an inordinate amount of my time sorting and resorting my LEGO collection, and it was during a recent sortfest that I stumbled across the little fellow below. It reminded me that I'd long intended to share the rambling tale of how he came into my possession, and in so doing say a public "thank you" to the US-based AFOL and all-round good guy who has tracked down all manner of US-exclusive LEGO-related items for me over the years including Yoda.


Back in May 2013 there was a disturbance in the force, with the unveiling in New York's Times Square of what was at the time claimed to be the world's largest ever LEGO model - a 1:1 replica of an X-wing Starfighter - to celebrate the impending premiere of The Yoda Chronicles animated series. Based on Set 9493 X-wing-Starfighter, this huge build was 42 times the size of the retail set and apparently took 32 builders at LEGO's Kladno Model Shop in the Czech Republic over 3 months to build from 5.3 million bricks. As you can see from the picture below (courtesy of starwars.com) it caused quite a stir....


To further promote the Yoda Chronicles series, the nearby Times Square branch of Toys R Us ran a promotion from May 23rd to 25th 2013 whereby purchasers of specially-marked copies of Set 9493 would receive a limited edition "NY I Love" Yoda minifigure. Apparently 1,000 of these minifigs were made and handed out during the 3-day promotion, and as a big Star Wars fan and LEGO collector I was obviously really keen to get hold of one. Thankfully, help was at hand in the form of US-based Brickset admin Roland a.k.a. Rocao, and to cut a very long story short he was able to secure a limited edition Yoda minifigure for me. The plan was initially for Roland to package Yoda up with a bunch of other items that he had collected together for me and for other folks and ship the whole lot over to the UK for me to distribute. For various reasons, however, Yoda didn't make it into the consignment and was left stranded in the US.


Jumping forward a couple of years to August 2015, a delegation of Brickset Forum members headed by Brickset head honcho Huw and myself journeyed to the LEGO mothership in Billund, Denmark. Thirty three of us in total travelled over at the invitation of LEGO's Community, Events and Engagement Team for a one-day visit which included a tour of the fabled vault housing copies of pretty much every LEGO retail set every released, the LEGO factory at Kornmarken, and the site of the work-in-progress LEGO House and visitor centre (above). There was also a visit to the LEGO employee store for a spot of shopping, and a presentation by LEGO designer Mike Psiaki who's the man behind 10248 Ferrari F40 amongst other sets. As good fortune would have it, one of the 33 Bricksetters to make the trip to Billund was Roland, who travelled over to Denmark from California. Aside from the fact that it was absolutely brilliant to finally get to meet him in person and hang out after literally years of chatting online, Roland had stashed the promised Yoda minifig in his luggage and so I was finally able to take delivery.


Neither Yoda's printed sand green head, which has a tuft of white hair at the rear, nor his short tan legs, are exclusive to this minifigure, although the head has only appeared in two other sets, 75002 AT-RT and a Yoda Clone Wars Watch Set. The torso, which doesn't have a back print, isn't exclusive to this minifigure either, having also appeared as a part of a 2013 New York Toy Fair giveaway. The minifig came sealed in a 7.5 cm x 13.5 cm soft plastic bag which also contained the printed white card that you can see in the picture above.


In addition to Yoda, Roland had also brought me the special cardboard sleeve which was placed around the otherwise standard copies of 9493 X-wing Starfighter to mark them out as being promotional items. The front of the sleeve (above) is focused on advertising the Yoda Chronicles premiere and also gives notice of the free Yoda minifig available with purchases of the set, while the back of the sleeve (below) provides photographs of the life-sized LEGO X-wing together with technical drawings and some facts and figures.


Talking of the X-wing, following its brief Times Square residency it was transported to LEGOLAND California in June 2013 where it went on show. Then, in March 2015, the X-wing crossed the Atlantic to LEGOLAND Billund where it formed the centerpiece of a Star Wars display. And so it was that by a quirk of fate the X-wing was on display at LEGOLAND Billund when I visited, and my Yoda minifigure was therefore, in a manner of speaking, reunited with the X-wing more than 2 years after the Times Square reveal. All of my pictures of the X-wing unfortunately came out appallingly badly, so I'm indebted to another US-based Bricksetter who came on the Billund trip, JusJeff from Iowa, for giving me permission (albeit about 18 months ago....) to use his picture below.


So thanks again Roland for all your efforts to track down juicy US LEGO exclusives for me and others on this side of the pond, and sorry it's taken so long to get this posted....

Monday, 12 October 2015

Build your own Tauntaun!

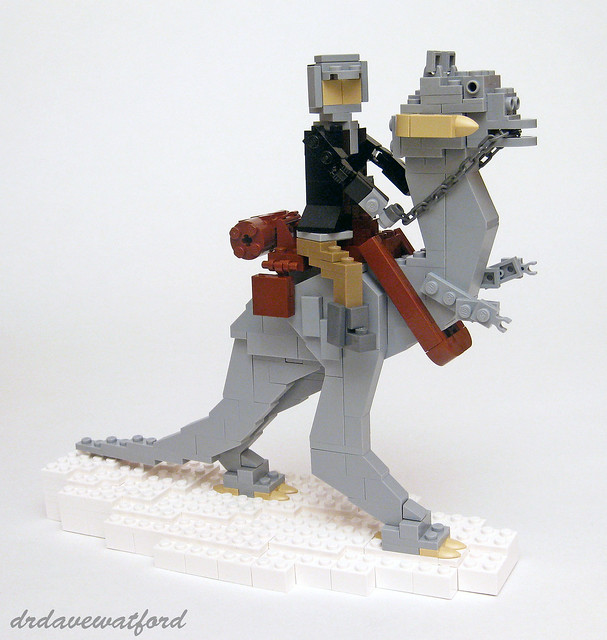
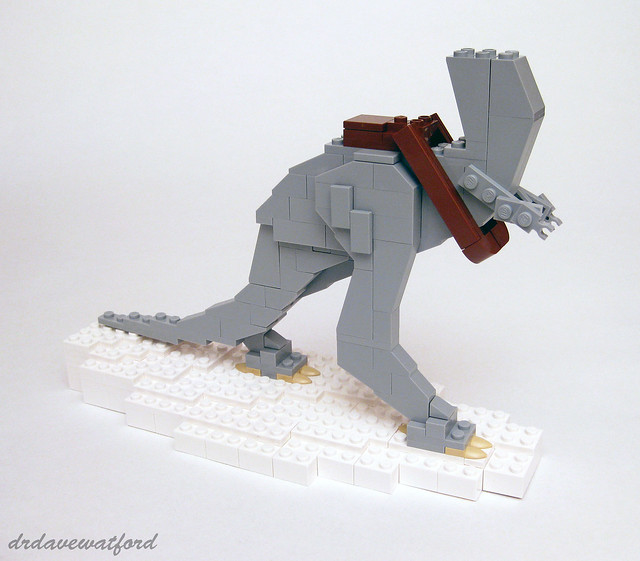
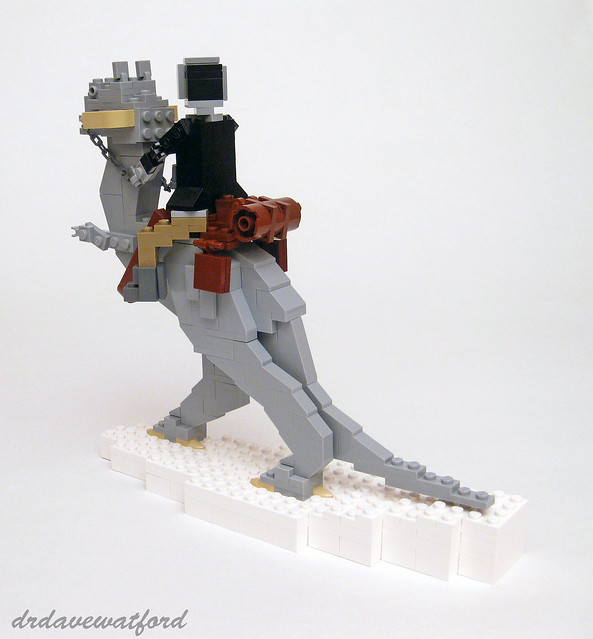
A few weeks ago I built and reviewed Set LLCA53 Han Solo On Tauntaun (below). Given the rarity of the set, I promised to share the instructions so that Gimme LEGO readers could have a crack at building it themselves.


I'm pleased to report that the instructions have now been scanned and uploaded to the Gimme LEGO Flickr stream and you can access them here. Apologies for the delay - I got tied up with a bunch of other stuff, not least preparations for the Great Western LEGO Show which I'll post about soon. LLCA53 is a promo item rather than a regular retail set, and as such the print quality of the instructions predictably isn't up to retail standards; even so, you should hopefully be able to follow them OK.


Good luck, and let me know how you get on! Don't forget to check my original LLCA53 posting for information about the build and a heads-up regarding some of the more uncommon elements that you'll need to track down.

Friday, 21 August 2015

"And I thought they smelled bad....on the outside!"

Being a LEGO Star Wars collector can be a pretty thankless task at times, particularly if you have completist tendencies. If it isn't the countless remakes, many of which seem little changed from the previous versions, it's all the blasted event exclusives and limited edition promos. These tantalising chase items, which are generally only available in small numbers, have been the subject of numerous Gimme LEGO rants over the years (for instance here and here), and I've long given up trying to collect them all. That having been said, I'm always delighted to pick up these curios when the opportunity arises, and I got lucky recently, managing to score the item below from a fellow member of the Brickset Forum.


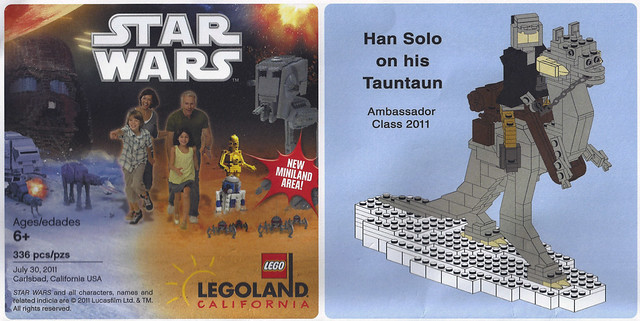
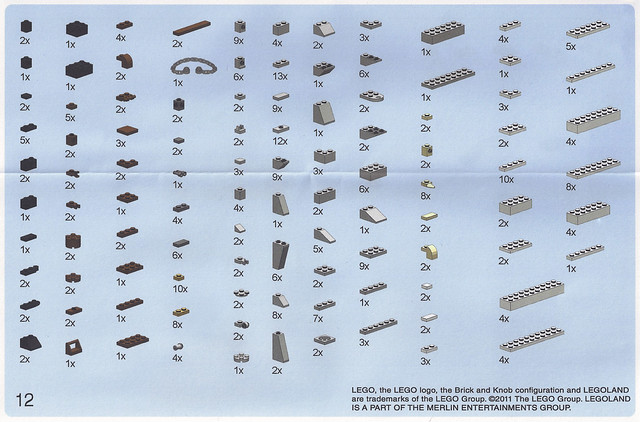
The set in question is designated LLCA53 Han Solo On Tauntaun in the Brickset database, and it's apparently owned by just 14 of Brickset's 117,000+ registered members. The previous owner was given the set by LEGOLAND California as a thank-you for contributing Lego Star Wars photographs to their Fan Gallery, although it appears that the sets were originally designed for Ambassador Pass holders attending the 2011 Master Model Builder Class. The set wasn't supplied boxed - the elements are divided between three numbered grip-seal bags which are themselves packed into an opaque LEGO Factory bag along with six folded and loosely stapled sheets containing the building instructions. The instruction sheets are colour printed on both sides; the artwork above can be found at the top of the first page while the inventory of parts below (click to enlarge) is printed on the back of the last page. The quality of the printing isn't up to retail standards from the perspective of either sharpness or colour representation, which isn't altogether surprising in a promo set such as this.


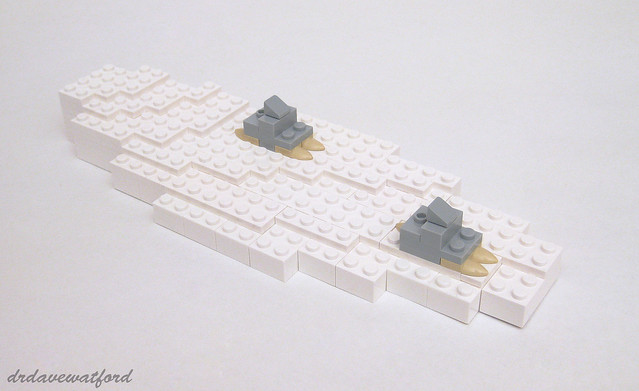
Bag 1 contains the parts needed to build the display stand, which is of course designed to look like snowy terrain, and the tauntaun's feet. This stage of the build utilises common elements - only the six tan modified 1 x 1 plates with tooth which form the claws on the tauntaun's feet could be described as remotely uncommon, and even these have appeared in 20 sets to date.


Bag 2 contains the parts needed to build most of the tauntaun plus its harness. Once again, the parts used appear to be unremarkable - predominantly light bley slopes of various types with a few common plates, small bricks and clips thrown in for good measure. Certainly I don't think sourcing them would be too much of an issue for would-be builders. A number of SNOT bricks, specifically 1 x 1 bricks with a stud on one side, are utilised to hold the harness in the correct alignment and provide an attachment point for the tauntaun's puny T-Rex-like upper limbs. The tail is suspended from beneath the body and doesn't actually touch the ground, with the consequence that it's relatively fragile and liable to fall off if not handled carefully.


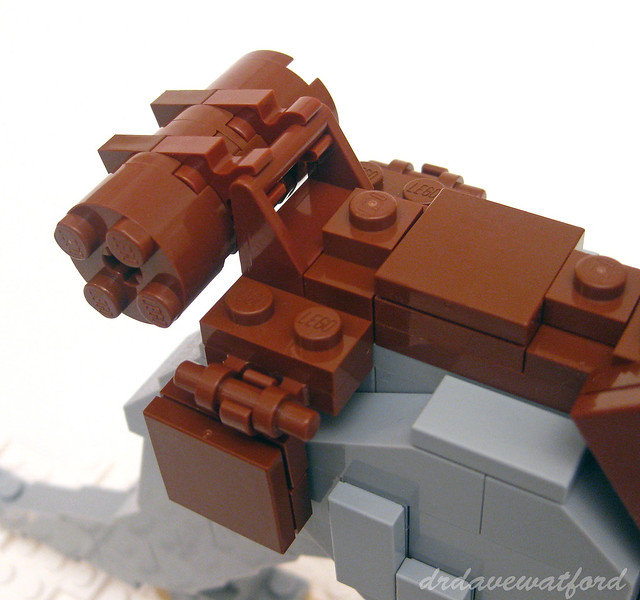
So far so good, but the magic really happens when the contents of Bag 3 come into play. First a brick-built reddish brown saddle with a couple of saddle bags is constructed (below) and it's here that sourcing the parts you'd need to exactly replicate the build starts to get a bit more challenging. The saddle incorporates a pair of reddish brown modified 1 x 2 plates with handle on side and free ends which have only ever appeared in eight retail sets. Worse still is the use of two reddish brown modified 1 x 1 plates with horizontal clip. These are used to attach the saddle bags to the saddle, and according to Bricklink they've never actually appeared in a retail set, so you might need to substitute these with equivalent elements in a different colour unless you have access to a LEGOLAND model shop.... I'm afraid that it's a similar story with the pair of reddish brown modified 1 x 1 plates with vertical clip used to attach Han's pack to the back of the saddle - these have also apparently never appeared in a retail set, although thankfully a close variant is available in reddish brown.


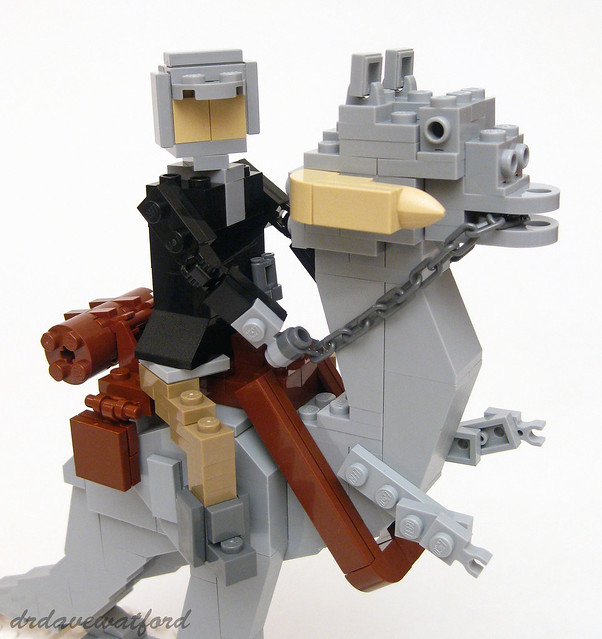
With the saddle complete it's time to build the tauntaun's head and carefully mount it on top of the neck. It's quite a job to wedge the pair of light bley 1 x 1 tiles into the clips on the top of the head to form the ears, and it places considerable stress on the clips which is why LEGO defines this as an 'illegal' building technique and doesn't normally permit its use in official sets. With the tauntaun now complete, all that's left to do is build the intrepid rider who is of course Han Solo. Han's dark tan legs are attached to his torso by way of a pair of 2 x 2 turntables; these allow the legs to be rotated outwards so as to adopt a more natural riding position. Once completed, Han can be carefully lowered into the saddle and handed the tauntaun's reins, at which point we're done!


You can see the completed build in the pictures above and below. Although the tauntaun is attached to the base, there is some scope for posing the model, albeit limited - the position of the tauntaun's upper limbs can be adjusted, and Han's head can be rotated and his arms bent. It wouldn't take much modification to enable the tauntaun to turn its head as well if desired


For all their rarity value and collectability, I've often felt that many of the LEGO Star Wars promo items aren't especially interesting in their own right, but that's certainly not the case for this model which is superb. I've always had huge admiration for builders who can transcend the crudeness which is inevitable at this scale and craft models which are elegant and immediately recognisable, and I'd say that this is a perfect example of that art. On the downside the build got a bit fiddly towards the end, and the completed model isn't as robust as a typical retail offering, but really these are trifling details; it's a lovely display piece and it'll take pride of place alongside some of my other LEGO Star Wars favourites.


I'd like to offer my thanks to fellow Bricksetter Mark a.k.a. smokebelch for selling the set to me for an amount which, while admittedly not exactly cheap, was still a long, long way short of the ridiculous sums being asked by sellers on Bricklink; in case you're wondering, at the time of writing there were only two of these sets listed for sale on Bricklink, and at $1,995 and $3,500 respectively they might remain unsold for a while yet.... Unless you're a lottery winner, your best best would be to just source the 336 parts needed to build the model yourself - the vast majority are fairly common and inexpensive, and those that aren't can be readily substituted by alternative parts; I'll aim to scan the instructions and upload them to the Gimme LEGO Flickr stream here over the next week or so which will make it easier for you to build your own copy if you wish.

Monday, 3 February 2014

Crosstown Traffic

Having spent the last couple of months writing about MOCs and handing out awards, not to mention reviewing a couple of the new LEGO Movie sets over at Brickset, I was itching to build something old, and I knew just the set....


About a year and a half ago I was idly eBrowsing and I stumbled across a used example of the set above, Set 355 Town Center Set with Roadways. It was being sold complete with box, instructions and even some left-over stickers, and I was very tempted. Fully expecting the item to sell for more than I was willing to pay I nevertheless placed a speculative bid, more in hope than expectation, and against the odds I won the auction. A few days later the set arrived.


The box, as you can see above (click picture to enlarge), is far from perfect but it's still very much intact. The front of the lift-up cover shows the contents of the set against a neutral background, and that's pretty much it, apart from the classic "Legoland" branding and the LEGO Logo of the time in the bottom right-hand corner. The back of the box (below) features a number of panels which highlight a few aspects of the set, as well as showing a couple of rather serious-looking kids building and playing with the models; the right side shows a portion of the cardboard base, which we'll get on to shortly.


Lifting the lid is a joy; within the box is a polystyrene/styrofoam inner tray which snugly houses three smaller removable cardboard boxes. The largest of these boxes contains the parts for the garage, the medium sized box contains the parts for the crane, chalet, flatbed truck and white sports car, and the smallest contains the parts for the digger and tipper truck. The two largest boxes have a plastic-lined window in the front so you can see the parts within. You can see the arrangement of boxes in the picture below; by this point I had removed the parts from each of the boxes in preparation for building.


All the models are designed to be accommodated on a cardboard baseplate around 50 cm square which you can see in the picture below. The base folds in half and slides inside the lid of the set box for storage - if you look closely you can see it peeking through the cut-away on the inside of the box lid on either side of the little boy's face in the picture above. Overall it's a beautifully packaged set, and I was delighted to find the inner packaging in such great shape.


The set is supplied with just one instruction booklet, and at just 16 pages long and less than 14 cm square the booklet offers a masterclass in brevity and efficiency; the largest model in the set, the garage, is disposed of in just 9 building steps split over 4 pages. At first glance the cover of the booklet looks a bit of a mess; it's only when you fully open out the booklet and view the front and back covers together (picture below) that you get the full picture.


You can see a sample page of the instruction booklet below showing all of the completed models in situ on the cardboard baseplate; obsessives may have spotted that some of the vehicles and road signs are in different positions in the picture below compared with their positions in the image on the front of the box. Life's probably too short to worry about such things, however, so you're probably better off not having noticed it....


The set comes supplied with two sticker sheets, and incredibly they were both present and almost mint in the copy of the set that I purchased. LEGO generously supplied stickers representing eleven different nations to stick on the flag pole, and if none of those was suitable then you had a more generic LEGO flag that you could use. Evidently the person that originally owned my copy of the set was a Brit and thus used the Union Jack stickers, but all the other stickers were left alone, and more than 40 years later they still look pristine and ready to use.


I would have built this set shortly after receiving it were it not for the fact that when I checked the contents against the online inventory at Bricklink I discovered that almost 30 out of the set's intended 332 parts were missing. Many of the missing parts were older variants of common parts, e.g. 2 x 4 bricks without cross-supports, 1 x 1 round bricks with solid studs (as opposed to hollow studs) and 2 x 2 tiles without grooves at the base. While these older variants are in many cases not functionally different to their modern counterparts, having chanced upon an antique set which was in many respects in decent condition, I figured that I should try and do it justice by sourcing the correct older variants of the missing parts rather than substituting them with modern equivalents. Interestingly, the older variants can often be sourced fairly easily via Bricklink, and they don't always command higher prices than their modern counterparts; I gradually sourced them over time, finally completing the job of replacing all the missing parts fairly recently.


Those elements that weren't missing were, I must say, in absolutely magnificent condition for their age - the trans clear parts weren't discoloured, printed parts weren't faded, and everything looked nearly new which is pretty astonishing after more than 40 years. You can see a photograph of some of the more interesting elements above. While not all of them are rare, many of them are long-retired and should trigger a pleasing trip down memory lane for some older readers ! The set contains two of the black 1 x 4 bricks with white Legoland logo pattern; these appeared in only 5 sets in total, the most recent of which was released in 1973. The set also contains red and yellow versions of the Legoland brick. The old-style 4 x 4 turntables (black variant shown above) were phased out in 1976, while the red 1 x 2 brick with SHELL logo only ever appeared in 4 sets, between 1966 and 1972. Trans clear 2 x 4 bricks haven't been available for years; the one in the picture above is an old-style 2 x 4 brick without cross supports, which was pretty common in the 70's. I had (and still have) quite a few of them, although they've all become discoloured to a lesser or greater extent over the years, unlike the example in the picture which is in really good condition. The antennae were notorious for losing their side spokes, so it's nice to see an intact example. The set also contains white, blue and red 1 x 4 bricks with a car grille pattern. The pattern is actually embossed rather than printed, and is embossed in silver on the blue and red bricks and in black on the white brick. This version of the white 1 x 8 brick with 'GARAGE' printed on it only ever appeared in 3 sets, while the yellow 2 x 2 brick printed with the old-style LEGO logo appeared in 4 sets. My one minor disappointment is that this set originally included either a large pine tree or a more interesting (and much rarer) granulated bush with 3 trunks, and my example unfortunately contains the large pine. Finally, you can see the 'missing' Union Jack flag from the sticker sheet neatly applied to the flag pole


A couple of the baseplates (pictures above) included in the set are also worth a mention. The larger of the two, which measures 24 x 32 studs, is predictably unique to the set. It features rounded corners and three studless, textured driveways each of which covers an area of 4 x 20 studs. Some of the studs have white printing on top to help the builder quickly identify where to place the first layer of elements. Given the general lack of hand-holding inherent in older sets compared with more modern builds, it seems strange that LEGO used to print baseplates in this way. The smaller baseplate shown above, which measures 14 x 20 studs, also features stud printing and is once again unique to this set. It lacks the exaggerated rounded corners shown in the instruction booklet and the images on the box, and according to Bricklink it's a known variant in this set.

The build itself was fairly straightforward, with the garage first up for construction. One thing I immediately noticed when I started to build was that the clutch on the bricks was significantly greater than I'm used to, making the elements harder to push together, and also harder to take apart; I'm pretty sure that this is just down to the age of the bricks. The red 1 x 2 bricks with SHELL logo mentioned earlier are utilised in the construction of a couple of petrol pumps, and you can see the large pine tree behind the petrol pumps looking ugly (did I mention that I would have preferred the granulated bush with 3 trunks instead....?!). The two blue doors at the front of the garage do open, but there's no interior detail within the building.


Next up is the crane, which utilises the black 1 x 4 Legoland-embossed bricks described earlier. This structure also incorporates the aforementioned 4 x 4 turntable plus an old-style winch with metal handle to provide some play features. The winch contains a reel, around which string is wound; a metal handle attached to the reel can be rotated to wind/unwind the string and thus lift/lower the load at the end of the string. This kind of winch arrangement was very common in the sets of my youth, and as a kid I spent countless hours trying to securely tie one end of the string to the reel while threading the other end (which was almost invariably frayed) through the tiny hole in the hook to attach it. Happy days....


The final structure is the chalet. This incorporates a number of old-style windows and doors, as well as the previously highlighted antenna with spokes. The red windows with shutters at the front of the house are rarer than I thought, having only ever appeared in 5 sets according to Bricklink. I never owned any of those 5 sets as a child, but I nevertheless have a bunch of red windows with shutters in my childhood LEGO collection, so it's a genuine mystery where they came from. The 33 degree slope bricks used for the roof are commonplace now but their first ever appearance in sets was in 1971 so they must have seemed deliciously new and exotic back in 1972 when this set was released.


The set comes with four vehicles, all of them elegant in their simplicity IMHO and a reminder of how straightforward LEGO vehicles were in my youth. The tipper truck (below) was assembled first, with its immaculate silver embossed engine grille and Legoland branding on the working tipper bed. You can see the lack of a groove at the base of the black 2 x 2 tiles as mentioned previously; given the increased clutch I'm not looking forward to trying to remove those tiles at a later date without damaging them....


The digger (below) features a few of the retired elements that I touched on earlier, including the black 1 x 1 round brick with a solid stud (the studs are hollow these days) and the yellow 2 x 2 brick printed with an old-style LEGO logo. There are a few other vintage elements used here as well - the bucket and bucket arm, the wheels and the wheel holders are all long-since retired.


The sports car is pretty unremarkable, although it's nice to see the white embossed 1 x 4 brick with engine grille in such spritely condition, and the same goes for the windscreen which you'd normally expect to have discoloured to some extent after all these years.


Lastly, there's a flatbed truck (below). Although the design is pretty basic, it does feature a couple of blue 45 degree 2 x 2 double concave slopes at the front which are fairly uncommon, not to mention a(nother) immaculate 1 x 4 brick with embossed engine grille. The six black round 1 x 1 bricks with solid stud on the back act as a guide to hold the cargo in place once it's been dropped in place by the crane.


With all the buildings and vehicles assembled, all that was left for me to do was to drop the buildings into their allocated spaces on the cardboard baseplate, place the vehicles into suitable positions, add the selection of roadsigns provided with the set, and we're done. I don't know about the rest of you oldies out there, but even my picture below (click to enlarge) of the completed set with everything in place gives me a warm, nostalgic feeling inside, let alone the actual model itself which is currently occupying my dining room table and which I can't bear to move. I suppose that by today's standards it could reasonably be argued that all the models are simplistic and lacking in detail, but if I'd owned this set as a kid I would have been ecstatic, and even now I think that it all comes together beautifully.


To coin a well worn cliche, they don't make 'em like they used to.... We've had a bunch of "Town Plan"-type sets over the years, most recently 2013's Set 60026 Town Square, but it's been a while since the often-substantial collection of buildings, vehicles and (more recently) minifigures which make up these sets has been pulled together into a cohesive whole by the use of one or more large baseplates; honestly, I think there are a number of recent sets that would substantially benefit from this treatment.


Set 355 Town Center Set with Roadways was released in 1972 and contains either 332 or 336 parts depending on whether you're more inclined to trust Bricklink or Brickset. As stated previously, I found my copy of the set on eBay, although that was the only time I've ever seen the set for sale there and there don't currently appear to be any copies for sale on either ebay.co.uk or ebay.com. If you're looking to buy, Bricklink is probably your best bet; at the time of writing there are 16 copies of the set on sale there in various states of repair and completeness. A new, sealed copy will set you back almost £300 plus shipping, while a used, boxed and complete example will cost about half as much, and if you're not fussed about the box then you're looking at considerably less.