Sunday, 12 June 2011

And the Mystery MOC is.....

OK, so enough already. It's literally months ago that I teased people with a sneak peek of the pieces from a LEGO Star Wars UCS MOC that I'd bought from eBay (you can read about it here if you missed it the first time). A surprisingly large number of people contacted me or left comments and tried to guess what the model was, but only Anio and Cavegod got it right - well done, guys ! I have to say I thought the bag of red pieces would be a bit of a dead giveaway, but clearly not......

Anyway, in case you're still wondering what I bought, it's high time I put you out of your misery - it's a Venator Class Star Destroyer. According to the seller, it's made up of over 2600 parts, and is around three-quarters of a metre long and a third of a metre wide. It certainly looked awesome in the eBay listing, so after some negotiations with the seller I shut my eyes, gritted my teeth and shelled out the cash....


First impressions were excellent - the parts arrived in a sturdy box with a picture of the model on the front (pic above; click to enlarge), and everything had been securely packaged for shipping so arrived in tip-top condition. All the parts were bagged up in pristine new self-seal bags. According to the seller, more than 95% of the parts were brand new, although due to sourcing difficulties a few had been previously used. Also in the box was a USB memory stick containing a PDF of the instructions and other documentation, and a sticker sheet, of which more later.


I quickly set about sorting all the parts into three clear crates in time-honoured fashion - small pieces 2x2 studs or less in one crate, plates bigger than 2x2 studs in another and everything else in the third - and got ready to build. Given that the instructions were 'home-made' they were pretty good, although certainly harder to follow than official LEGO instructions. Colour discrimination was tricky at times (particularly black and dark blue-grey), and some building steps involved large numbers of pieces, but progress was generally reasonably straightforward. The first stage of construction involved building a rigid frame out of Technic beams, with hinged plates to make the distinctive angles, and two sturdy stands were then bolted on to the frame (see below).


Next came the slightly tedious task of covering the outer surface of the frame with detailed greebles, and then the more interesting task of constructing the brick-built tail section and impressively detailed engines. Technic axles were employed to stop the sizeable engines from sagging, and I was pleasantly surprised how sturdy the engines turned out to be.


Once the frame and engine sections were complete, it was time to start putting some skin on the bare bones. Similar to Set 10030 Ultimate Collectors Series Imperial Star Destroyer (ISD), the upper and lower surfaces attach to the frame by way of magnets, although I'm pleased to report that the magnets on the Venator seem less prone to letting ago at the slightest provocation than those employed in the construction of the ISD. Another improvement over the ISD is the use of tiling on the upper and lower surfaces, adding a distinctly polished air to proceedings. I turned the model upside down in the picture below so you can see the lower surface with the distinctive red centre stripe and observe how the stand pylons pass through.


Once the lower surface was in place it was time to construct and attach the upper surface. You can see in the close-up below the magnets used to anchor the upper surface in place; these magnets and their holders attach to the frame via Technic pins.


Similar to the lower surface, the upper surface is tiled, even featuring a blocky, tiled representation of the red and tan Open Circle Fleet emblem. The upper and lower surfaces attached easily to the frame, being pulled into the correct position by the magnets and automatically bending at various hinged points to accomodate the underlying frame - nice !


The final major part of the build was the dorsal command structure, which includes the twin bridge sections. This structure slots neatly into place over the yellow guides visible in the picture above.


Once the dorsal command structure (above) is in place, the ship itself is done, and you can see pictures of the completed ship below (as ever, click to enlarge the pics).


The final task was to build the stand for the name plaque. The model came with a sticker sheet containing 2 different types of sticker to choose from. I plumped for the predominantly monochrome option which was designed to look like the plaque from an official UCS set, although the alternative colour version also looked excellent.


So, all done, and I'm delighted with it. As well as looking sleek and polished, I'm also extremely impressed with the stability of the finished model - it feels extremely well bolted together. It certainly wins out in terms of polish and stability in comparison with Set 10030 UCS Imperial Star Destroyer, although the ISD does admittedly take the plaudits from the perspective of sheer jaw-dropping size and impact.

Downsides ? Well, there's the cost of the set, which was considerable, although reasonable I think given the piece count and the effort required to source everything. The instructions were tricky to follow in places. There were also a few key pieces missing; some I could source from existing sets, but a couple I had to order from Bricklink which while not particularly expensive, did mean I had to put the building effort on hold for about a week. There was also a smattering of old grey parts in amongst all the blue-grey pieces. These old grey parts certainly stand out to my eye, and you can even see a couple in the pictures above. While it's always possible that the inclusion of these pieces was deliberate, and to me at least they really don't detract from the model, I'm pretty certain that's not the case. Still, all bar one of the old grey pieces are also available in blue-grey, and it'd be cheap and easy to replace those that are visible with blue-grey equivalents should I choose to do this, so a minor gripe, basically. Suffice to say that the downsides are far outweighed by the positives, so I definitely have no regrets.


A note about the designer; when I bought the model, I assumed that the seller had designed it himself, but it transpired that he'd actually bought the instructions from eBay and then sourced parts. I've been informed that the model was based on an original design by Primus. although if you know different then please let me know so the designer gets appropriate credit.

If you want to see this Venator "in the flesh", it'll be on display along with a large number of other Star Wars UCS models, both official and unofficial, at the UK's National Space Centre in Leicester on July 16th and 17th 2011, as part of a larger LEGO display being put on by the Brickish Association. Hope to see you there !

Edit - thanks to Anio, who identified the designer as Primus.

Sunday, 5 June 2011

First impressions....

.....are pretty favourable, to be honest. I'm talking about my first brush with sets from the new "Cars" theme.


Given the glut of excellent new sets during the second half of 2011, not least the superb Alien Conquest sets, PotC, Pet Shop and others, I had always intended to pass on the Cars sets. I assumed that they would be dumbed down for a younger audience, and that there'd be an emphasis on play features rather than an interesting building experience and models that would be fun to own and display. So not my cup of tea, basically.

I was forced to re-examine my preconceptions somewhat when the first set images started to appear, however. Yes, it certainly looked like some of the models were going to turn out to be a bit of a "build in your sleep" experience, but there was the promise of at least one new colour and a number of new parts appearing in the sets. Also, and more importantly, the likenesses of many of the prominent "characters" from the Cars movies - Lightning McQueen, Tow Mater, Luigi, Guido and Sally - looked to have been quite well captured, and the sets in general appeared to possess a vibrancy which was quite appealing to me.

Anyway, the Cars sets have started to appear at retail over the past couple of weeks, so I thought I'd dip my toe into the water and order the two cheapest sets - 8200 Lightning McQueen and 8201 Tow Mater - from Amazon. At £4.99 each and free delivery I figured I couldn't go far wrong. The sets arrived barely 48 hours later and I was ready to dive in, with Lightning first in line.


Some of my earlier fears about 'dumbing down' were justified on the basis of some larger custom parts (pic below), but on the plus side, I was impressed that key parts were printed, particularly given that this is such a small, inexpensive set. Compare and contrast with some of the new non-licensed Racers sets (such as this one) which have lots of fiddly stickers and no printed parts despite their identical RRP....
The build was predictably short and sweet - with only 35 pieces I really wasn't expecting anything more - and the final result is surprisingly pleasing. Admittedly this is in part due to the aforementioned custom parts, but even so Lightning looks great from the front and sides. The lovely new red wheels play their part, as do the printed red 2x4 tiles on the sides.


If I have a criticism, it's that the back's a bit messy :


Overall,  have to say I like this set a lot. More than I expected, and if I'm honest, more than I should - I'm somewhat conflicted as the agreeable appearance is partly down to a couple of custom parts which have little to no utility outside the set. Lightning is zoomable (the automotive equivalent of swooshable...), cute, and by recent LEGO standards, surprisingly cheap given that it's a licensed set with so many new and printed parts. A bargain, basically, if you have any interest in the subject material at all. There are quite a few sets at lower price points in this theme, in fact, a welcome development given the licensed nature of the theme, and something which speaks to the intention to target the youngsters with these sets, I guess. On the flipside, completists may wince at the fact that the first wave of sets alone features an amazing 14 sets, or 15 if you include an upcoming promo polybag....


So will I be getting any more of the Cars sets ? Well, in a word, yes - once I've built Tow  Mater I'm looking forward to getting hold of some more of the main characters which are available in the Flo's V8 Cafe and Tokyo Pit Stop sets, and beyond that we'll see.... And even if I hadn't liked the look of these sets much, there's an added complication, namely my young son who is a Cars fanatic and who has already fallen in love with my LEGO Lightning, so I'll find it even harder to resist.....

[Edit.... I just had to come back and add the picture below - enjoy !]

Sunday, 29 May 2011

Weird Science

I recently visited the Science Museum in London with my family. It was the first time in years that I'd been, and it was excellent - hundreds of interesting machines of all shapes and sizes to marvel at, a number of excellent science demonstrations for the kids (both young and old) including blowing stuff up by igniting hydrogen gas and making huge bubbles, and a huge room full of interactive science exhibits. Not to mention an enormous shop full of cool things to play with and maybe even buy. And lots of rockets - you can't go wrong with rockets. We ended up being literally herded out at closing time as there was so much to see and do and we didn't want to leave. Highly recommended.

Anyway, as concincidence would have it, barely a fortnight after my visit, the call went out to members of the UK Brickish Association (BA) for volunteers to assist the Science Museum with an event they were staging as part of their Science Museum Lates programme for adults. Initial details were pretty sketchy, but the gist of it seemed to be that the museum wanted us to build some models of important inventions out of LEGO. These models would provide inspiration to people attending the event to build their own LEGO creations. It sounded intriguiging, so I and 6 fellow BA members signed up.

On arrival we were ushered up to the Flight Gallery on the third floor of the museum, a large exhibition area chronicling the development of air travel from the very beginning to the present day. The plan was as follows : we were going to be given a small mountain of red 2x4 LEGO bricks, out of which we were going to build five inventions of historical significance - Sputnik 1, Black Arrow, Gipsy Moth, the Bell Telephone, and Jennings Patent Water Closet (i.e. an early toilet....). During a previous blog entry about the opening of the LEGO London Westfield store I wrote about the challenges of building with only 2x4 bricks, but that was all we had, so we got cracking. The museum staff provided us with two tables to build on, 5 photographs of the objects we had to build, and a bunch of crates full of LEGO, and left us to get on with it.

Science Museum : the Flight Gallery
So what to build ? Well, I have to confess to whispering a quiet prayer that I wouldn't be asked to build Sputnik 1. The prospect of building a sphere out of 2x4 bricks alone really didn't appeal much...... Ed and Annie dived into the Gipsy Moth, and for reasons that aren't really clear, I started to build the toilet. Poor Stuart got lumbered with Sputnik, although approached the challenge with considerably more cheer and optimism than I would have done, bless him. As darkness began to fall outside, the low levels of lighting in the exhibition hall started to become a factor, and it became harder to see what we were doing; it was particularly difficult to see the joins between bricks, but hey - it just added to the challenge....

After about an hour of building, event attendees started to arrive. It was all rather surreal - groups of twenty-somethings would arrive, many of them clutching beers. They were given a container of LEGO bricks as they entered, sat on the floor in groups, and started to build. I don't know whether they were supposed to be building anything  in particular, or whether it was just a big free-for-all. It was however excellent to see so many adults clearly rediscovering their love of LEGO, and some of them put together some pretty impressive creations. The floor space filled up pretty fast, and soon we were surrounded by literally hundreds of people.

We had to build at a fair pace; building didn't start until around 6.30 pm and we had to be done by 10 pm. The Gipsy Moth and Barney's Bell telephone were completed first, and as models were completed the builders pitched in to help those who were flagging behind or had more to do; apologies for the quality of the photos, but it was so dark in there, just be glad you can see anything at all....


As my toilet started to take shape I began to have some regrets about my choice of subject matter. Problem was that it was starting to resemble a rather a nice vase rather than a water closet, and I was having some trouble recreating the elegant curves of the subject material with 2x4 bricks. Still, there was no time to go back, so I had to crack on. Andrew got to work on the cistern, after which we faced the thorny problem of how to support the weight of a cistern made out of a couple of thousand bricks a few feet over the toilet bowl.... Teamwork was the key; Ed and Barney pitched in with Andrew and myself to build a large supporting structure out of a few thousand bricks, which we managed to build to a height of around 3 feet before time started to run out and we had to bring it all together.


Alec wrapped up his Black Arrow, and Stuart was last to finish, somehow managing to fashion a respectable sphere which was pretty much to a 1:1 scale with the real Sputnik. You can see all the models below lined up against one of the display cabinets.

There was a lot of interest in what we were doing from attendees, with the Gipsy Moth in particular getting loads of admiring comments, and lots of photographs being taken of the models. People repeatedly asked us how we had secured coveted jobs as professional LEGO builders, and we had to confess that we were merely enthusiastic amateurs rather than paid LEGO employees.

I'm not sure what the museum have planned for the models now; we were asked to provide piece counts for some of the models in preparation for a kid's competition, but beyond that I don't know how long they'll remain intact. Even so, it was a good crack, and definitely something I'd also have enjoyed participating in as a general attendee rather than as someone connected to the event, maybe even more so as us "contractors" were prohibited from indulging in a beer or two to oil the creative process....

Saturday, 21 May 2011

Too much of a good thing...?

I probably wasn't the only one to be amazed that LEGO managed to keep details of Set 10218 Pet Shop secret until literally days before launch. There were longstanding rumours that the next Modular might be a Pet Shop, but these whispers weren't backed up by anything concrete, let alone the almost obligatory leaked images or set numbers from LEGO's online cache.... And then the official announcement came, and barely before we could draw breath the set was available at retail. I bet LEGO are delighted that they managed to maintain the suspense for so long.

Set 10218 Pet Shop - another "must have" modular building
Thing is, was all the secrecy really necessary ? It certainly didn't help the customer much - at around £120, this lovely set will make a hefty dent in most people's LEGO budgets and therefore needs to be planned for. And on top of this, lest we forget, the brand new Pirates of the Caribbean theme has just appeared at retail, with another new theme - Alien Conquest - hot on its heels, not to mention the Summer wave of City and Creator sets. And in a couple of weeks the Cars 2 sets will arrive, closely followed by the Summer Star Wars sets, not to mention the Summer Harry Potter sets..... I think a judicious Pet Shop-related leak or two a couple of months or more in advance would have helped people to budget and better prepare for the financial onslaught....

Cars 2 sets - coming to a shop near you.....
Of course, LEGO might well argue that while a lot of these sets are indeed appearing at retail at the same time, they are targeting a variety of different age groups. And they'd have a point, to some extent - the target market for the Pet Shop is clearly rather different to that of the upcoming Cars 2 sets, for instance. Except that regardless of the intended target demographic, a number of these sets seem to transcend any nominal recommended age range and potentially appeal to people of all ages. Take, for example, the new Alien Conquest sets, allegedly aimed at kids aged 8 to 14. That didn't stop me spending a good 5-10 minutes staring longingly at them during a recent visit to Toys R Us before eventually leaving with the top of the range Earth Defence HQ set under my arm......

Set 7066 Earth Defence HQ - Irresistible....
At the end of the day, however, these are all minor gripes. After all - nobody is forcing me to buy all these wonderful sets, and when I think of the dearth of decent LEGO in the dark days of the 1990s, the glut of superb sets over the past few years is really a cause for celebration rather than complaint. I just wish it was a bit cheaper.....

Monday, 9 May 2011

Mini Me

As you'll probably have guessed from earlier blog postings, I have a real thing for the big Star Wars sets. In particular, I'm a sucker for the huge Ultimate Collector Series ships such as Set 10030 Imperial Star Destroyer. These rarely fail to provoke a reaction, regardless of whether the person is a LEGO fan or not.

It's become increasingly clear to me, however, that accomplished building at the other end of the scale may be in some ways equally as challenging as building huge ships. I'm talking about Mini scale models, which attempt to capture the essence of an iconic design using just a few pieces. Clearly, compromises have to be made on account of the scale and small piece count, and it's here that the designers' skill really shines through, coming up with ingenious ways of using common and not-so-common LEGO elements in order to overcome design challenges.

The LEGO company have produced a surprisingly large number of Mini scale Star Wars models over the years. According to Brickset, at least 35 different Mini scale Star Wars models have been produced by the LEGO company since 2003, with further models appearing as part of Dorling Kindersley's Brickmaster book series. Some of these models are, IMHO, superbly designed, others are pretty average, but all approximate the subject material fairly well. Reverse engineering some of these sets is a great way to learn some ingenious building techniques, and these small models tend to be splendidly swooshable to boot !

Some of my personal highlights ? Well, beauty is certainly in the eye of the beholder, and bizarrely, two of my favourites were seemingly never actually released..... For reasons best known to themselves, LEGO made instructions available online for Set 8029 Mini Snowspeeder and Set 6968 Mini Wookiee Attack without actually producing the sets. Having been made aware of the existence of the building instructions, and liking what I saw, I downloaded them, sourced the necessary parts and built the models (pics below; click to enlarge).

Set 8029 Mini Snowspeeder


Set 6968 Mini Wookiee Attack


I particularly like the Snowspeeder - chunky and irresistibly swooshable. Why it was never put into production beats me as it's a gem. The Wookiee Attack model (it's actually a Corporate Alliance Tank Droid I believe) is perhaps less faithful to the source material, but nevertheless appeals due to it's bug-eyed cuteness and neat colour scheme (it's the dark blue and sand blue that does it for me I guess - both relatively unusual colours, particularly the latter).

Other 'official' Minis that I'm quite partial to include Set 6967 ARC Fighter and Set 4489 Mini AT-AT. The Mini ARC-170 is I think a pretty good likeness given its size and it's another model which I can't resist swooshing about. You can read my review of the Mini AT-AT on Eurobricks; this one is admittedly some way short of being a faithful reproduction of the subject material, but it's another which scores by way of a cuteness factor I reckon.... I'm actually not entirely convinced that the new Mini AT-AT released at the end of last year improves on the 2003 original a great deal, although others will I'm sure disagree. I'd certainly be interested to know which Minis readers rate the highest - feel free to leave a comment and share your thoughts.

Set 6967 Mini ARC Fighter


Set 4489 Mini AT-AT


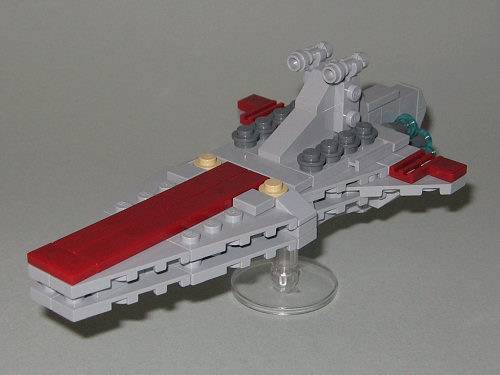
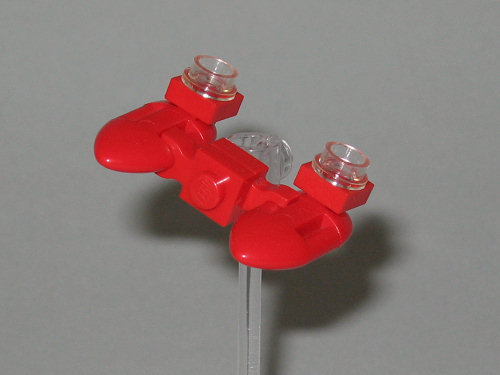
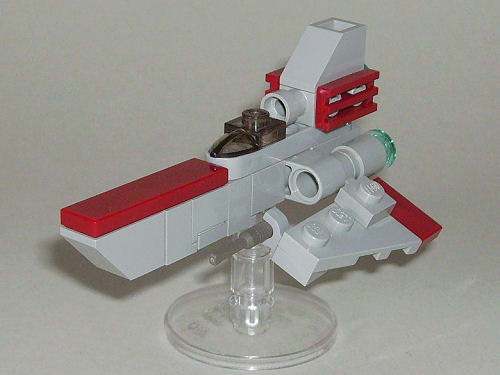
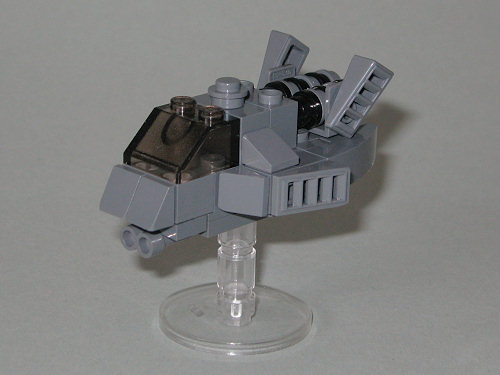
While I'm on the subject of Minis, I really must mention some of the superb Mini MOCs out there. There are a number of accomplished designers of original Mini creations online, with perhaps none more impressive than Chris Deck (AKA Legostein). This guy is prolific, churning out literally hundreds of cracking little models. I was drawn in by some of his superb LEGO Star Wars Minis, but he's also created some excellent non-Star Wars models including ships from universes such as Battlestar Galactica and Star Trek, and also some very clever architectural designs. You can see a selection of my favourites below (as ever, click to enlarge) :

Mini Venator (Legostein)


Mini Cloud Car (Legostein)


Colonial Viper MK II (Legostein)


Colonial Raptor (Legostein)


I think he has a real talent for capturing the essence of the source material, sometimes with literally just a few pieces (the Mini Cloud Car being a perfect example). To see more, visit Chris's website or check out his Flickr stream.

And a timely piece of news just to finish - I'm hearing that UK LEGO fans will get the chance to pick up Set 30051 Mini X-wing Fighter in an up-coming LEGO promotion being run by The Sun and the News of the World newspapers. The promotion apparently starts on Saturday 14th May 2011, so keep your eyes peeled.....

Monday, 2 May 2011

Favourite Sets #5 : Emerald Night

When I was a boy, LEGO trains were a simple affair, barely resembling 'real' trains at all other than for the fact that they (usually) came with flanged wheels and ran on rails. Not that I cared - my first LEGO train was Set 171 Train Set without Motor and I adored it, particularly when my parents subsequently bought me the accessories that I needed to motorise it. It's probably worth mentioning that my childhood was during a simpler age when the ability to propel a LEGO train around a circle of blue railway track using a battery-driven motor still carried with it a genuine 'wow' factor.....

My first LEGO train......
I emerged from my almost-obligatory LEGO Dark Ages a few years ago, and it quickly became clear that things had moved forward on the train front in terms of realism. Set 7989 Cargo Train Deluxe and Set 7897 Passenger Train were available at retail at that time. Both these sets made a better fist of looking like 'real' trains, and the Cargo Train in particular came with some interesting rolling stock, trackside vehicles and extra track including a set of points. Also, both came with motors and could be remote-controlled to move forwards or backwards at various speeds, in stark contast to the system of my youth when you had to flick a switch on the battery box to get the train moving and then run after the thing and flick the switch again to make it stop..... All that having been said, neither the Cargo Train nor Passenger Train had enough to entice me back into the train fold at that time. For me they lacked that all-important 'wow' factor, so my re-introduction to LEGO trains was further delayed even as I immersed myself in the delights of the LEGO Modular Buildings, Star Wars sets and other goodies.

All that changed in early 2009 when I stumbled across some early publicity shots and a video of Set 10194 Emerald Night. I initially couldn't quite believe that this beautiful steam train was even made from LEGO, such was its aesthetic beauty. I wanted it so badly that I made a special trip to my nearest LEGO brand store (which by UK standards really isn't that near.....) on the day of launch to get one.

Beautiful !
Usually I build sets, enjoy them for a few weeks or months, and then disassemble them and return them to their boxes. I've had Emerald Night built and on display in my house since the day I bought it, however. The only other sets I've kept and cherished in that way are my Modular Buildings. In my eyes Emerald Night is absolutely beautiful - perfect. Admittedly I'm no train-spotter, but to me it looks like a 'real' train, and it manages to do so without a bucketload of brand-new custom-designed parts made specifically for the set. There are a couple, certainly - the large train wheels were made specifically for this set, for instance - but by and large this set consists of 'real' LEGO pieces magically combined into a work of genius. I just love it - I love the overall design, the colour scheme, the splendid coach that comes with the set, even the grumpy-looking train driver with his red necktie. And not only that, but it can be motorised with minimal effect on the aesthetics, it runs well, and it even has a couple of lights at the front which are cleverly integrated into the design. Gorgeous !

Mr. Grumpy the Train Driver


Even the Passengers and Conductor love Emerald Night.....


My love-affair with Emerald Night is largely a harmonious one, but there are a couple of bittersweet elements to it. Firstly, I remain frustrated that the LEGO company don't sell standalone coaches for Emerald Night. Watching this magnificent locomotive pulling just one coach looks a bit pathetic to be honest. The only ways round this are either to buy multiple copies of the set and try to sell the spare locomotives to make it financially viable, or to source the parts needed to build additional coaches from the likes of Bricklink or LEGO's own Pick A Brick service. The problem is that some of the parts such as the tan window frames and light blue-gray curved coach roof pieces are quite rare and hence extremely expensive in the numbers required. I've personally already spent a fortune trying to aquire the parts for an additional 5 coaches, and some of those parts are still on order.....

The other main problem is the effect that my discovery of Emerald Night has had on me, and more specifically my bank balance. My newly rekindled love-affair with LEGO trains encouraged me to explore LEGO's back catalogue of retired trains, and in this way I've discovered a number of other superb trains and accessories from the past which have cost me a small fortune to source. These include Set 10020 Santa Fe Super Chief plus its unique coaches, which I eulogised about in a previous blog posting, and Set 10133 Burlington Northern Santa Fe (BNSF) to name just a couple. Then there's the fact that I've been inspired to plan and construct a sizeable layout for my LEGO trains which will require substantial space and cash for the 10,000+ pieces that it will take to build. After all, my Emerald Night plus 6 coaches (once completed) will need somewhere fitting to run.....

Mine, all mine !
So buy Emerald Night at your peril. It's beautiful, but it can take you down a slippery slope from which you may never return.....

Wednesday, 20 April 2011

Bleach

Like any long-time LEGO builder and collector, I have my fair share of bricks which are damaged and well past their best. A few are actually broken - spokes snapped off T.V. aerials, leaves broken off plants, plates snapped in two - but the majority are just discoloured.

It's well known that LEGO bricks can become discoloured over time, taking on an increasingly yellowish tinge. This phenomenon is not specific to LEGO, and appears to be related to bromine-containing flame retardants which are added to some plastics for safety reasons. These flame retardants react with ultraviolet light (natural or artificial) to release reactive bromine molecules which initiate a chemical reaction in the plastic causing the hated discolouration. The process of discolouration is dramatically accelerated by prolonged exposure to sunlight. I can recommend the interesting Retr0Bright website as a resource if you're interested in learning more about this phenomenon.

Anyway, for a long time it was assumed that the discolouration process could not be reversed. I was therefore surprised and delighted to stumble upon a number of online accounts of people having some success in returning their plastics, and more specifically their LEGO, to its former glory. While the specifics of the actual restoration process varies from account to account, there seem to be a few common elements. All the reports I've seen basically involve adding a strong oxidising agent (hydrogen peroxide) to a catalyst (tetra acetyl ethylene diamine, or TAED, commonly found in laundry boosters such as 'Oxy' or 'Vanish'), immersing the discoloured LEGO into the resulting mixture, and somewhat ironically bombarding the whole lot with more ultraviolet light, either by sticking it in the sun or putting it under a U.V. lamp. Some of the results do indeed appear to be remarkably good (see for instance the account on The Brothers Brick website), so I figured that I just had to give it a go.

My first effort was a total failure. I mixed some 6% hydrogen peroxide bought from the local pharmacy with some Vanish laundry booster powder, poured it into a transparent Pyrex dish, added the sickly LEGO, and stuck it outside in the weak English winter sun. After a few hours nothing had happened, so I left the ghastly concoction for the whole day, and when there was still no change, I just walked away and left it for a whole week. And despite this, still no improvement ! Thoroughly unimpressed, I put the failure down to a combination of (1) the peroxide not being concentrated enough, (2) not enough U.V. from the low winter sun and (3) it being too cold outside. And I gave up.

Anyway, I recently bought a few old sets from eBay and was dismayed to find that many of the pieces were badly discoloured. Given that the sun was out at the time and it was nice and warm, I figured I'd have another go at LEGO restoration. This time I managed to source some 9% hydrogen peroxide (more concentrated than before, but still not the 10-15% recommended by the Retr0Bright folks). I once again added some Vanish powder to the peroxide, mixed it up as best I could, and poured the mixture into a transparent Pyrex dish. Then I added the LEGO, and placed the dish outside in the warm sun. And I waited. I have have to say that after a few hours of waiting there was little if any change evident. Frustrated, I played my final card. I boiled the kettle and poured half a cup of boiling water into the mix, figuring that perhaps some heat might drive the reaction. The effects were dramatic - within moments, the mixture started to froth, and soon copious volumes of foam were issuing forth from the Pyrex dish and spilling out over the patio and beyond. At this stage I figured the wisest thing to do would be to just leave well alone and not interfere any more lest I cause an explosion. So with some choice words from my wife ringing in my ears as she inspected the state of our patio, I quickly removed myself from the scene......

I returned a few hours later to inspect the damage. Thankfully the chemical reaction I had managed to induce had ceased, and all that was left was a (fully intact, I might add) Pyrex dish containing cloudy liquid and some LEGO. I gave the LEGO a good rinse and sat down to inspect the fruits of my labour.

In presenting the results, I must first apologise that I didn't necessarily plan to share the outcome of my experiments, so I didn't take pictures beforehand. What I've therefore done is attempted to find appropriate pieces to compare with so you can see what happened. So, first off - a red 1x2 brick. This had significantly darkened in colour due to prolonged exposure to light. Below you can see a picture of the 'treated' LEGO on the right, compared with a standard brick on the left (click to enlarge)


Not in my wildest dreams did I expect the result I got..... The treated brick is now toast - pink and badly faded. Interestingly, the underside of the brick looks normal. It's as if only the parts of the brick that were initially sun-damaged have reacted, and sheltered aspects of the brick have been seemingly unaffected by the bleaching process.

Below is a treated yellow brick, shown above a standard yellow brick :


Again, the sides of the brick have been badly faded by the process, but again, the underside of the brick is unaffected. For the record, my experiments also badly faded some medium blue pieces.

As well as nuking pieces in various colours, I also seem to have invented a new shade of grey...


On the left is good old-fashioned 'old grey', on the right is the newer blue-grey ('bley'/medium stone), and in the middle is....discoloured old grey treated by my toxic mixture !

Finally, below you can see a treated white palisade brick on top of an untreated, discoloured white 1x4 Brick :


Success at last ! At least the whites seem to have improved, which is not altogether surprising seeing as the process has partially whitened all the other colours to a lesser or greater extent..... Interestingly, I treated a large, old window with a badly discoloured white surround. The surround was significantly whitened, and the clear window pane survived unscathed.

So the moral of the story ? Well, there certainly seems to be something to this process - there are a lot of success stories out there - but it's clearly not without risk, particularly if you deviate from the suggested method..... Adding boiling water, which to be fair the sources I consulted don't actually recommend, seems to have tipped the balance here, changing a fairly sluggish reaction into something quite violent and damaging. So if you do decide to have a go at treating your own LEGO, think twice before adding boiling water (!), don't treat any pieces you're not willing to sacrifice, and please be careful (don't try this at home, kids !)

Thursday, 14 April 2011

Dust

I hate dust. It's evil. Dust is one of the the enemies of LEGO. It dulls the sheen of my nice shiny LEGO pieces, and settles in crevices, nooks and crannies where I can't reach it without dismantling my models.

I was therefore delighted to find a possible solution, at least with regard to displaying my ever-growing army of minifigures. Bricklink store SimplyBricks run by Emma and Mike has started selling minifigure display cases (below) which looked just perfect for the job.


These cases were positively reviewed by Huw on Brickset, and I decided to order a load of them. I took delivery last weekend. Each trans clear case usually comes supplied with a dark blue grey 4 x 4 base upon which it fits snugly, although not with as much grip as regular LEGO bricks. The upper surface of the cases has moulded studs, and these do grip firmly. More firmly than regular LEGO bricks, in fact, if my unscientific tests are representative.

Below you can see the first residents of my new minifig cases (click to enlarge).


As you can see, I've swapped out the dark blue grey bases for black. I've also added a black roof. Finally, to ensure that my figures stand in the middle of their perspex prisons I've stood each of them on top of two black 1x2 jumper plates.

I have to say that these cases are perfect for long-term, dust-free minifig display, and the ability to stack them adds to their usefulness and versatility. On the down side,  I also tried the cases with some series 4 Collectible Minifigs, and some of them would only fit inside the cases if I confiscated their accessories. As you can imagine, the Gnome looks profoundly bereft without his fishing rod, and the Viking won't fit inside unless he's shorn of the horns on his helmet and also his shield. Then there's the fact that buying enough cases to accomodate all my minifigs would require a sizeable bank loan, although to be fair this is more down to my excessive minifig accumulation than it is to the price of the cases.....

I only wish that Emma could now source some larger cases to fit my other models.... my UCS Millenium Falcon seems to need dusting every 5 minutes to keep it clean, and I suspect Tower Bridge will be much the same. I've found standard dusters too destructive for keeping intricate models with lots of greebles dust-free, and was therefore delighted to discover a cheap and cheerful product called Supreme Duster. This basically consists of a plastic handle, out of which sprouts an explosion of yellow filaments. These apparently "attract and hold dust electrostatically" and are "non-feather and non-allergenic". I don't know about any of that, but when I waft it over my models it certainly does seem to do the trick, and at less than £5 including shipping you can't really go far wrong. Admittedly I need to take a slightly more robust approach when trying to clean more heavily dust-coated models - it's less a case of wafting and more a case of brandishing it as if I was slapping my models with a wet fish - but at least I usually get a reasonable result.

Talking of dusting large models, the mind boggles as to how long it'd take to dust the beast below.....

UCS Super Star Destroyer - coming to a universe near you ?
The picture above was discovered just a couple of days ago in the image cache on LEGO's own website. It's a huge LEGO Super Star Destroyer, and the clever money is on it being the next Star Wars UCS set, although LEGO themselves have yet to comment. It goes without saying that I want it !

Tuesday, 5 April 2011

A new place for AFOLs

As a regular visitor to, and an extensive user of, the Brickset website, I wanted to give folks a heads-up about a new discussion forum that Huw the owner of Brickset has set up and opened for business over the past few days.

My immedate reaction on hearing the news that a Brickset forum was on the way was to ask why we need yet another LEGO discussion forum. There are, after all, a myriad of well-established LEGO discussion sites already in existence. There are however a couple of aspects of the Brickset forum which suggest that it may cater for a somewhat neglected subset of the LEGO user community that other sites haven't necessarily served particularly well to this point.

Firstly, the forum aims to remain true to the ethos of the Brickset site, namely to be a resource for collectors, and many of the discussions on the forum thus far seem to be very much consistent with this. As a collector myself, I'm quite excited about this focus as I really don't feel well served by other discussion forums (fora ?) in this regard. As well as providing access to the collective expertise of a community of keen fellow collectors, it also opens up some exciting possibilities for the trading of LEGO items with like-minded individuals which would be very welcome indeed.

Secondly, the site has a "16 and over" age policy which, as I understand it, is in part driven by safety considerations (i.e. the protection of 'minors' as they say in the U.S.) but also in part by a desire to try and raise the quality of discussion beyond the level of "What set should I buy with my $20 ?" and the like. As you can imagine, this over 16's policy has predictably triggered a storm of protest amongst some younger users of Brickset (click here for a flavour of the reaction). Many of those excluded by the policy have reasonably argued that age is only one factor in the ability to behave in a mature fashion and contribute meaningfully to discussions, and that the cut-off of 16 is entirely arbitrary. Tellingly, however, the majority who have commented on the age cut-off in a discussion thread on the forum (click here to view) appear supportive of it. More than one contributor has pointed out that there are many forums which cater for fans of LEGO across the age spectrum, other forums which ostensibly cater just for older fans but which are nevertheless clearly overrun with younger contributors, but next to none which just cater for adults alone. It's clearly a divisive issue, and I can understand the arguments on both sides, but I certainly agree that there are few places where AFOLs can discuss LEGO with each other in the absence of younger fans.

So if collecting's your thing and you're over 16, why not check it out ? You can find the forum at http://www.bricksetforum.com/ (click to visit).