
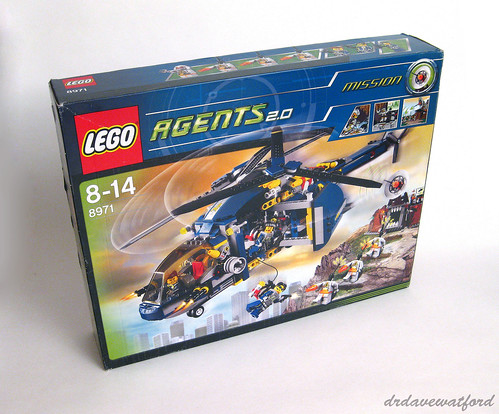
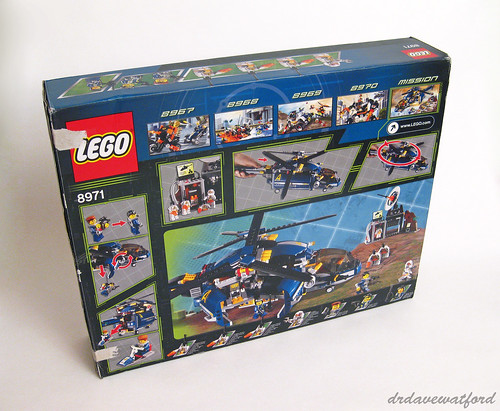
One of the things I like about the Agents theme is the consistency of presentation. This is most evident in the use of an agreeable overarching colour scheme applied across all of the sets and which, in the case of the Agents 2.0 second wave of sets released in 2009, also extends to the branding of the packaging and instructions. All the vehicles at the disposal of the eponymous agents are predominantly, or at least partially, dark blue in colour with variable amounts of metallic silver on show, and the agents themselves sport dark blue torsos and legs embellished with lime green and silver printing. Dark blue and lime green also dominate the branding of the Agents 2.0 boxes as you can see above and below. It's not just the agents either; the villains, together with their vehicles and bases, also conform to a consistent colour scheme, in this case orange, silver and black in varying proportions. The back of the box (below - click to enlarge) showcases a number of the set's play features, and a series of small panels highlight other second wave Agents releases. I wish the previous owner of my pre-owned copy of the set had been a bit more careful opening the box, but other than the damage caused by removal of the original seals the box is thankfully in reasonable shape.
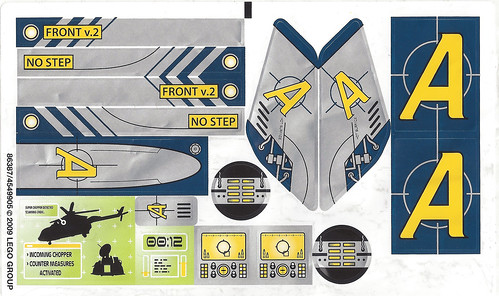
I believe that the set's 733 elements were originally packed into 4 bags when the set was new. In addition to the elements, the set contains a sticker sheet and two instruction booklets. You can see the sticker sheet below, which unusually for a pre-owned set is largely intact and unused. It won't be unused for long, however.... The sheet contains 16 stickers, and dark blue, silver and lime green are once again the order of the day.
The instruction booklets are both close to A4 in size and have covers which are the same except for the booklet number in the bottom left corner. The cover of booklet 1 can be seen below; the cover art is almost identical to the imagery on the front of the box, with only the age recommendation lacking. Both booklets are 76 pages long; booklet 1 consists almost entirely of building instructions, covering the minifigures, base and the first half of the helicopter build, while booklet 2 contains a 2-page inventory of parts and seven pages of advertising for Agents sets, the LEGO Club and a product survey as well as wrapping up the helicopter build.

The back cover of the first instruction booklet (below) contains advertising for the second wave of Agents sets released in 2009; a silhouette of the mech from Set 8970 Robo Attack looms large in the background, while in the foreground you can see the 4 x 4 from Set 8969 4-Wheeling Pursuit bottom right and the Agents vehicle from Set 8967 Gold Tooth's Getaway bottom left.
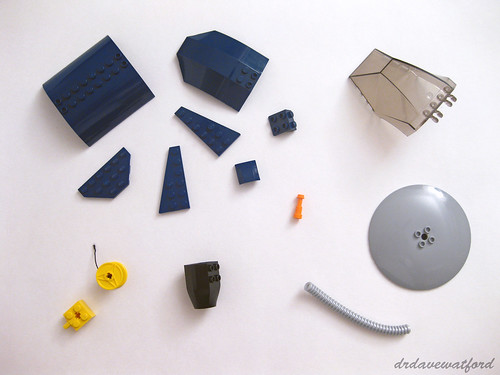
You can see a few of the less common parts contained in the set below (click to enlarge). As previously stated, the Agents theme is notable for its use of dark blue elements and that's reflected in the selection of elements on show here. The dark blue 1 x 2 - 2 x 2 bracket and curved 8 x 8 x 2 double slope are both unique to the set, while the trans-black 8 x 6 x 4 windscreen is exclusive to the Agents theme, having only appeared in this set and one other, Set 8634 Turbocar Chase. The dark blue 2 x 2 curved slope with recessed side ports has only ever featured in this set and two others, and that's also the case for the dark blue 8 x 6 x 2 curved windscreen. The black cylindrical element is a Basilisk body segment and has appeared in a total of 4 sets including this one, as has the bley 10 x 10 inverted dish, the orange telescope and the pearl light gray 7mm diameter 11L ribbed hose. All other elements in the picture have also appeared in ten sets or less to date.
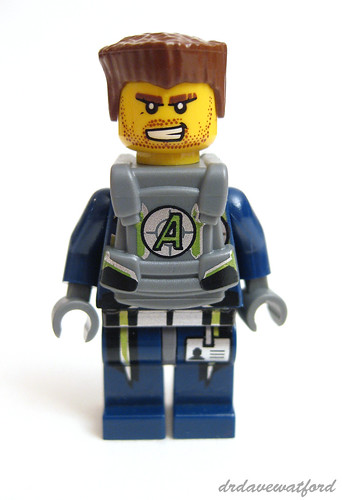
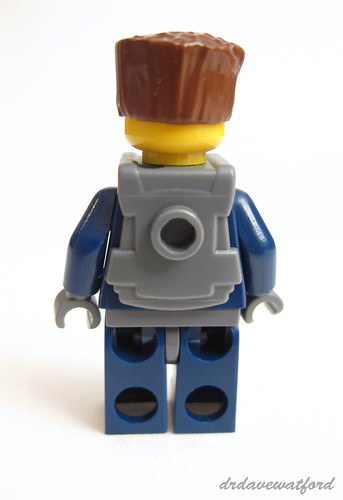
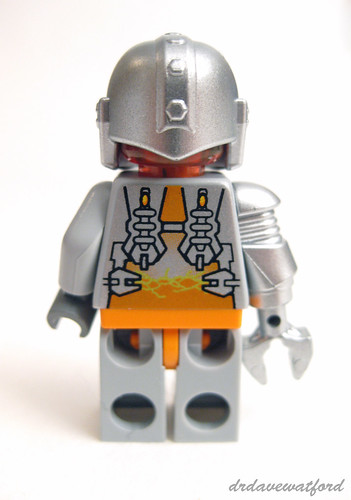
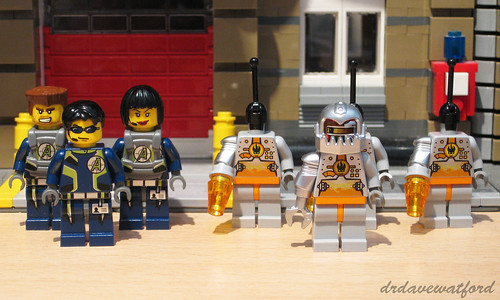
The set contains seven minifigures - three Agents, a villain and his three drones. The version of Agent Chase that appears in this set (below) also appears in two others - Set 8634 Turbocar Chase and Set 8635 Mobile Command Center. His torso is the same as that used for Agent Charge, the other male agent in this set, and indeed the same as that used for all male agents appearing across the various sets making up the Agents theme. His legs, which are common to all three agents in this set, are printed with an I.D. card and a continuation of the lime and silver pattern adorning his torso, while his head print features dark blue shades and a head-mike.
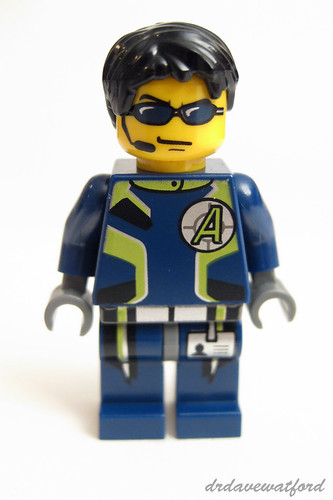
Agent Chase doesn't have a back-printed torso, but he does have a alternate expression as you can see in the picture below. Bricklink describes his alternate expression as "Angry Eyebrows and Scowl"; maybe he's on a downer because he's lost his shades.... This double-sided head is actually a "Chase exclusive" appearing only in the five different Agent Chase variants that you can see here.

Agent Swift (below) is unique to this set. Her torso print, which is obscured by her body armour in the picture below, is similar but not identical to that of the male agents and can only otherwise be found adorning the torso of Agent Trace, her fellow female agent. The body amour is predictably exclusive to the Agents theme and has graced a total of five minifigures, while as previously stated her printed legs are the same as those of the other agents.
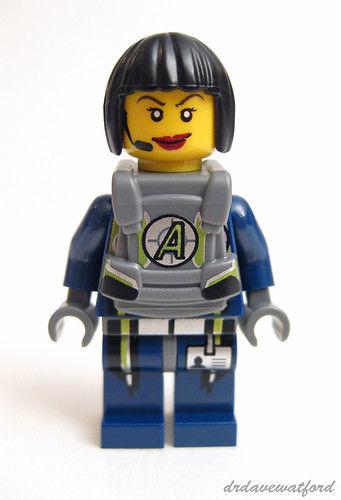
There's no back-printing on Agent Swift's torso, not that it really matters as it'd be hidden by her body armour anyway. She does however have a back-printed head featuring a scared alternate expression for all those occasions when you want to place her in peril.... As was the case with her torso, her head print is only shared with the Agent Trace minifigure.
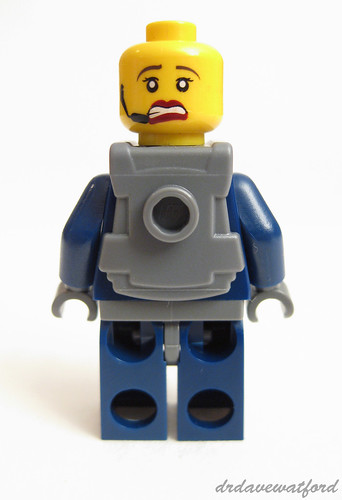
Rugged, mean-looking Agent Charge (below) is unique to this set. His torso and legs are identical to those of Agent Chase, but unlike Chase he comes complete with body armour. His snarling, stubbled face print and flat top hairstyle can be found in a variety of other minifigures outside of the Agents theme.
Similar to the other agents there's no back-printing on his torso, although like Swift the body armour would have obscured any printing anyway so no great loss. Unlike the other agents, however, he doesn't have an alternate expression, so basically you have the choice between 'mean' and 'mean....
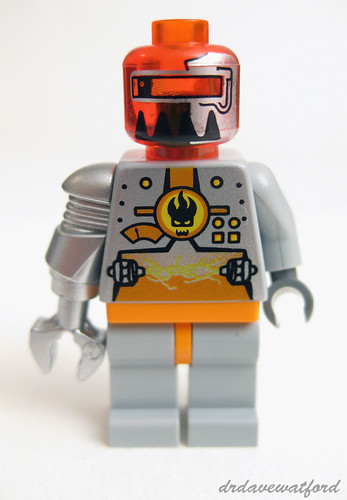
Each of the Agents sets features at least one distinctive villain, and on this occasion the bad guy is Magma Commander (below). He's unique to the set, as are his torso and printed trans-neon orange head, although his metallic silver helmet can also be found being worn by Break Jaw, another Agents villain. Magma Commander sports a metallic silver mechnical claw in place of his right hand.
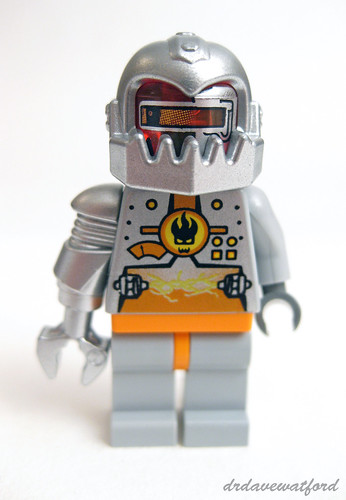
I've removed Magma Commander's helmet in the picture below so that you can get a better look at his groovy printed trans-neon orange head. The head doesn't feature any back-printing. Although his legs aren't printed front or back, they're nonetheless rare by virtue of the orange hips and this is the only set that they appear in.
You can get a closer look at Magma Commander's torso backprint and the detailing on the rear of his helmet in the picture below.
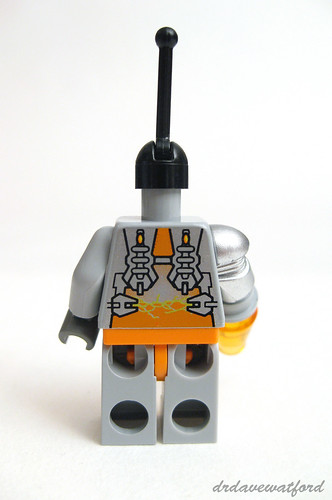
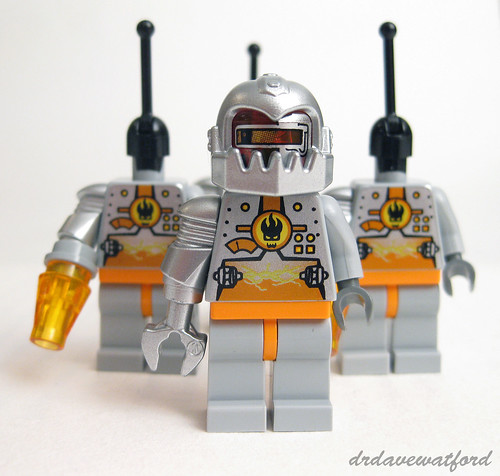
Rather than a posse of regulation goons or evil henchmen the Magma Commander is supported by three Magma Drones. These have identical legs and torsos to those of their master, although in place of his metallic silver claw on the right hand they have a trans-orange cone which is presumably meant to be some sort of weapon.

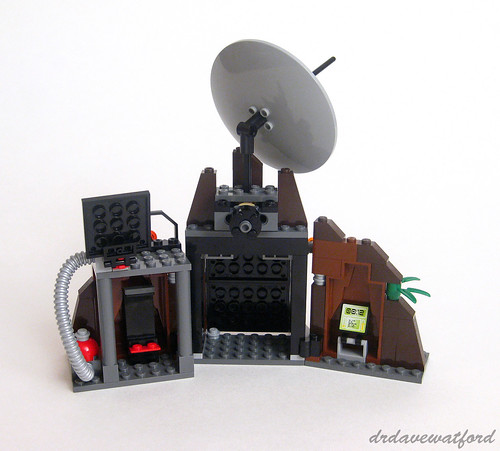
Each drone has an antenna consisting of a small black lever base with a black lever in place of a head; according to Brickipedia the drones are controlled via the large satellite dish mounted on top of Magma Commander's base which we'll come to shortly....
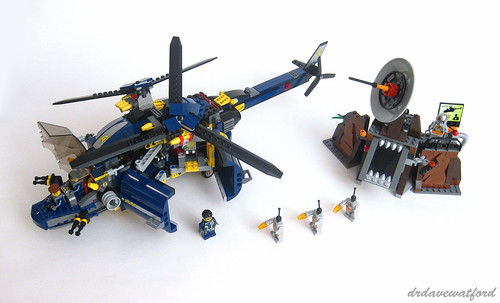
You can see the Magma Commander with his drones in the picture below (click to enlarge) - an imposing sight for our heroes. I have to say that I'm a big fan of the metallic silver, bley and orange colour scheme.
With the minifigures assembled it was time to get started on the various models. Differentiating between black, dark bley and light bley in the instruction booklets was frustratingly difficult initially and it took me a while to get oriented. First to be built was a small boat consisting of just 10 parts and a sticker; it's little more than a glorified jet ski and eventually fits into the back of the helicopter as you'll see later. Next up is Magma Commander's base (picture below - click to enlarge) which is formed from three distinct sections joined together by brick hinges. A couple of features dominate the central section of the base. At ground level there's a striking tiled black panel fringed with pearl light grey modified 1 x 1 plates with tooth. This is actually a doorway and by lifting the orange cone to the left of the panel you can raise the panel somewhat, although not enough to actually get the minifigures in or out.... Above the doorway is a huge dish which can be rotated by turning a knob at the back of the base. Bookending the doorway are a couple of smaller sections, each of which is predominantly made up of a reddish brown LURP; there's a narrow observation platform and stickered screen atop the right-hand section.
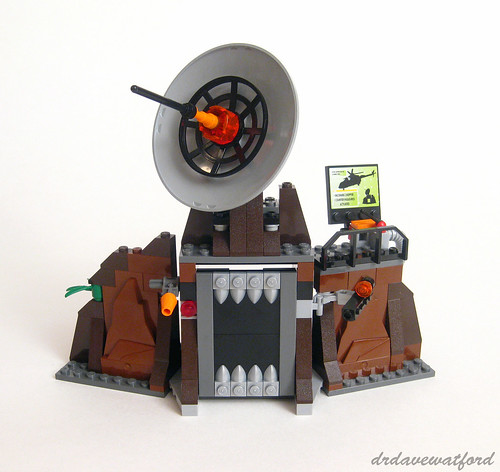
The rear aspect of the base is shown below (click to enlarge). To the right as you look there's a small control panel and to the left is a rudimentary reclining structure with a red base which can accommodate one drone at a time, perhaps for recharging. There's no doubt that the Magma Commander's HQ is small and insubstantial, but even so it does have the faintest whiff of 'Bond villain' about it and I was minded to go and build Set 8637 Volcano Base to sit alongside it and give the Agents a sterner test....
With the base completed it's time to get stuck in to the helicopter. My complaints about colour discrimination issues in the instruction booklets took an unexpected twist at this point with the realisation that black Technic pins do actually look black in the booklet and have white edges to highlight them; this means that if you insert a black Technic pin into a black element then they look like they're different colours in the booklet - really bizarre. First steps in the helicopter build involve the construction of a solid, sturdy Technic floor, after which you attach a pair of yellow winch reels and start to install structures in what will eventually be the fuselage. Next the two-seater cockpit is constructed and enclosed by the large trans-black canopy which is hinged at the back to enable easy cockpit access; you can see what the model looks like at this point in the picture below (click to enlarge).
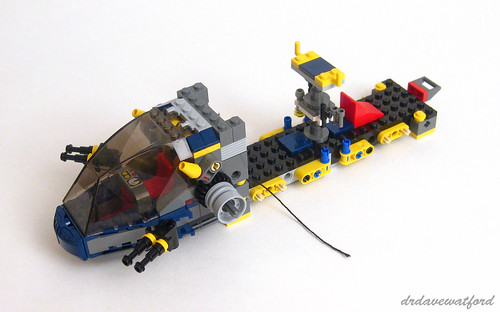
You can just about see one of the two yellow winch reels peeking out from the back of the cockpit in the picture below (click to enlarge); the two winches operate independently from each other, their string being raised and lowered by turning the bley wheel on the corresponding side of the cockpit. The small structure consisting of a yellow 1 x 1 cone mounted on a Technic axle and pin connector acts as a stop to prevent the string from unravelling when you pull on it; in order to release the string you need to rotate the yellow cone upwards.
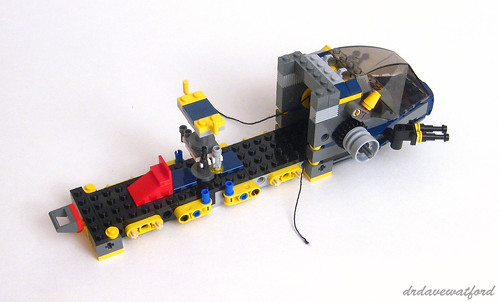
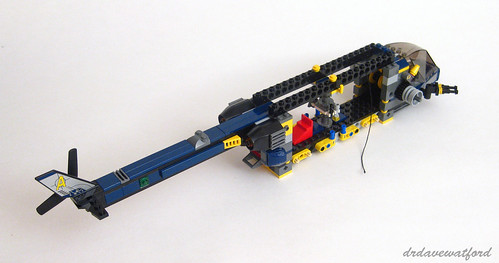
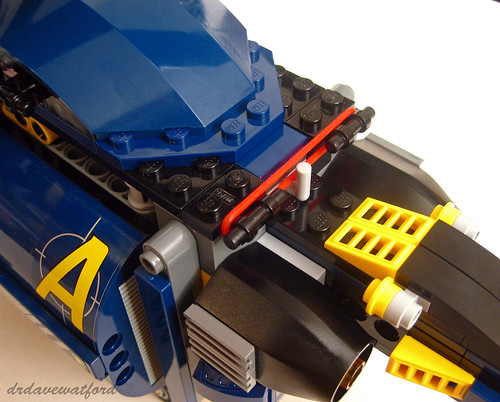
The next stage of the build (below - click to enlarge) involves construction of a lengthy tail boom and attachment of the rear rotor. The boom is largely studless, and at the point where it joins the fuselage of the helicopter it's flanked by a couple of jet engines which are fashioned from black Basilisk body segments described earlier. The cockpit and boom are then connected by black Technic bricks which form the beginnings of a roof over the fuselage.
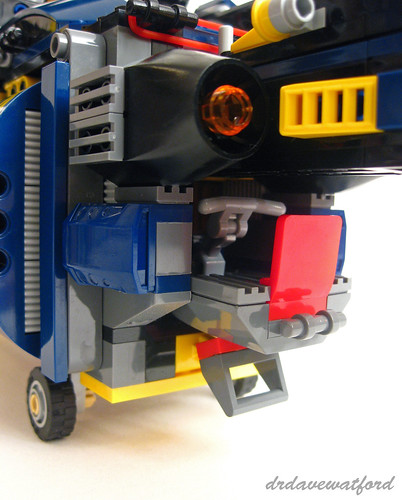
You can get a closer look at the tail boom, tail and jet engines in the picture below (click to enlarge). Attachment of the boom leaves a small space in the area beneath the point where it attaches to the fuselage; this space will be used to store the small boat described earlier.
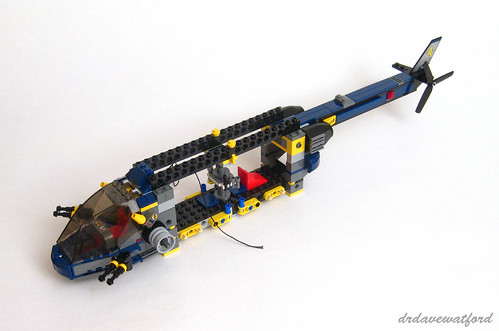
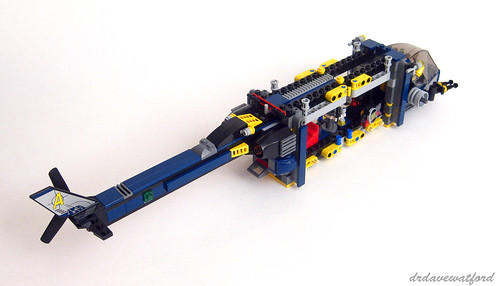
With instruction booklet one now finished it's time to move on to booklet two. The build continues with completion of the Technic frame to which the fuselage doors will be bolted, and construction of the mechanism for spinning the rotors; if you look closely at the roof of the fuselage in the picture below (click to enlarge) you can see a bley gear rack and red elastic band which form part of the mechanism. The string from the winches is no longer trailing out to the sides of the helicopter, having now been attached to a pair of what appear to be harnesses; the idea is that you attach Agent Chase and his colleagues to these harnesses after which you can lower them out of the fuselage or lift them up using the winches when the helicopter is in flight.

The mechanism for spinning the rotors can be seen a little more clearly in the picture below, and I'll describe it in more detail when I get on to talking about the set's play features. As well as the Technic-heavy work going on at this stage of the build there's also some tidying up to be done where the fuselage meets the cockpit and the boom.
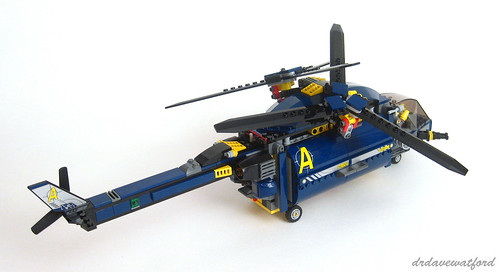
The final stage of the build begins with the construction and fitting of the four fuselage doors; if you want the finished helicopter to look as LEGO intended then there are a fair few stickers to attach at this point including a couple of larger ones which attach to the curved surface of two of the doors. I don't like stickers at the best of times, and I particularly hate trying to neatly apply big stickers to curved surfaces, so I spent the next few minutes cursing while I applied and reapplied the stickers until I finally had what I considered to be an acceptable result. With the doors fitted the helicopter then gets some rudimentary non-retractable landing gear, after which it's a case of fitting a couple of large curved roof sections, building and attaching the pair of large main rotors, doing a bit of tidying up, and then we're done as you can see in the picture below (click to enlarge).

I love the dark blue and yellow colour scheme, although I wish that there was more metallic silver which is a feature of many of the Agents sets but which only appears here thanks to the stickers. The design is surprisingly studless, with tiles and curved panels covering most surfaces and liberal use of SNOT techniques; I'm aware that some prefer a more studded design, but I personally think that the helicopter looks polished and impressive.
As well as looking good, the helicopter is packed with play features, some of which you can see demonstrated in the pictures below (click to enlarge). As well as the previously-described opening cockpit canopy, we get four independently opening doors on either side of the body of the helicopter; you'd generally expect the side doors to open via simple hinges, but in this case a more complex mechanism is employed which offers increased access by allowing each door to be pulled laterally away from the helicopter body as well as offering the ability to open outwards. Not visible in the picture below are the pair of winches behind the cockpit which can be used to lower or airlift the Agents through the open doors while the helicopter is in flight.
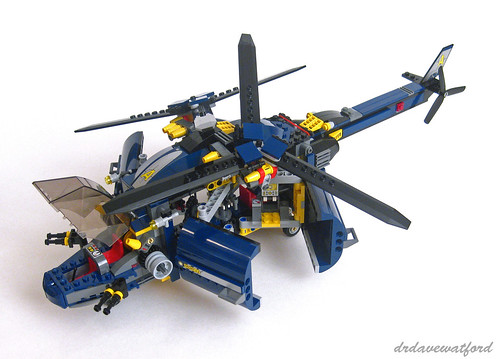
The twin rotors rotate thanks to the inclusion of a Technic mechanism; the yellow and black section on top of the boom can slide backwards and forwards which makes the rotors spin, and because the rotors are tilted and their motion is syncronised their blades never touch - clever! The recoil from the red elastic band that you can see in the picture below (click to enlarge) returns the mechanism to its starting position so you're ready to go again and keep the rotors spinning. The small rear rotor can also spin, although it isn't attached to the mechanism for the main rotors.
As mentioned previously, at the back of the fuselage beneath the tail boom there's a compartment which accommodates the small boat. The picture below (click to enlarge) shows the boat pushed halfway into its compartment. When the boat is pushed in as far as it'll go it can be secured for flight by lifting up the dark bley modified tile with handle that you can see in the picture below; having thoroughly enjoyed swooshing the finished model around the room I can confirm that the boat stays put!
In summary I think this is a superb set, and it offers a welcome reminder of what an excellent job LEGO did with the original Agents theme. The helicopter in particular looks great and it's packed with play features. For once I think that LEGO's 8-14 age recommendation is if anything slightly optimistic as the build was surprisingly challenging, featuring more Technic elements and mechanisms than I'd expected; it certainly look me longer to build than I thought it would, and I enjoyed almost every minute of it.
Reacquainting myself with the original Agents sets has been a joy, but the downside is that it's lessened my affection for the current Ultra Agents theme. Don't get me wrong - I was quite impressed with the Ultra Agents Infearno Interception set that I recently reviewed, and a couple of the other Ultra Agents sets such as the Mission HQ look pretty good - but I can't get away from the feeling that some of the original Agents sets such as this one, the Mobile Command Center and the Volcano base are at a different level and put the newer offerings in the shade. Let's just hope that LEGO builds upon the competent first wave of Ultra Agents sets and gives us a few spectacular second wave offerings in 2015 that'll mean I no longer have to reminisce about how good the original sets were....
Set 8971 Aerial Defence Unit was released in 2009 and is long retired. It contains 733 pieces and according to Brickset it originally retailed for £41.09/US$79.99. I purchased my pre-owned boxed copy of the set from eBay for £30 plus shipping last year, although I did need to replace a few missing parts; you'll probably end up paying a little more than that now for a boxed example, although there are currently a few new sealed examples available on Bricklink for between £60 and £70 plus shipping which seems surprisingly reasonable to me, so you hopefully won't need to break the bank if you're after a copy.