Wednesday, 22 May 2013

Rocky Horror ?

A while back I posted a bucket list in two parts (here and here) made up of some absolutely cracking sets which came and went while I was languishing in my LEGO Dark Ages and which I'd made it my business to track down on returning to the LEGO fold. I limited myself to 10 sets for the purposes of those posts, but truth be told there were a whole lot more sets that missed the cut but which I've also been determined to pick up at some point. Having managed to track one of them down a little while back on eBay for a good price, I thought I'd share my good fortune with you all by posting my thoughts on the set plus a few pictures.


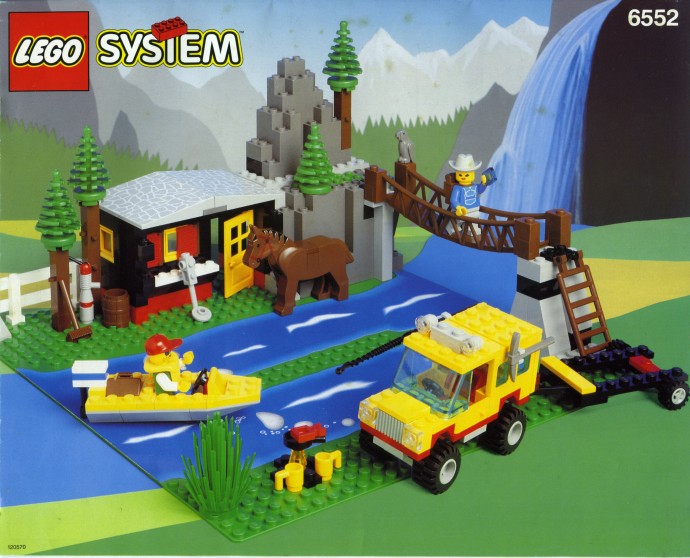
Set 6552 Rocky River Retreat was released in 1993 and contains 241 pieces. You can see the front of the box below; my copy isn't exactly pristine, but it's reasonably well preserved given that it's 20 years old. The front of the box features the completed set superimposed on a suitably wild and mountainous backdrop. Some rudimentary efforts have even been made to match the pattern on the baseplate, specifically the river, with the backdrop. Unlike today's sets there's no suggested age range printed on the front of the box.


The back of the box (below; click to enlarge) showcases some possible alternate builds. None of the suggestions are exactly earth-shattering, but thinking back to my childhood and remembering how I used to endlessly scrutinise every detail of the alternate builds, it's a great way of getting the creative juices flowing and something I miss from most modern sets.


When new, the box was evidently secured with tape seals; cutting the seals enabled the end flaps to be neatly lifted without damaging the box, and providing access to the contents which were packaged within a white, cardboard tray. My copy of the set thankfully still has the original cardboard tray, without which I think the box would probably deteriorate pretty quickly as it's not very robust.


The front cover of the instruction booklet can be seen above; it's pretty much identical to the front of the box. The back cover (below) features a larger view of a couple of the alternate build ideas shown on the back of the box.


The instruction booklet is close to A4-sized, and at only 16 pages from cover to cover it's refreshingly concise when compared with some of the bloated efforts we have to contend with these days. One reason for the brevity is an almost total absence of any advertising, be it of other sets, the LEGO club, surveys or whatever. Just about the only nod to promotional activity is the triangular panel which occupies the top left hand corner of the back cover of the instruction booklet above, although what those 200 points would have counted towards I have absolutely no idea - answers on a postcard.... The building guide occupies all but the front and back covers of the booklet, and you can see the final step of the building guide below (click to enlarge).


It's at this point during a set review that I'd generally start to highlight a few of the rare or interesting parts which can be found in the set. There are certainly a few elements worth mentioning - the light grey 6 x 8 slopes with slate roof pattern and the brown rope bridge for starters - but truth be told they all pale into insignificance in the face of the quite wonderful baseplate (below) which is unique to this set. LEGO seem to be increasingly moving away from including baseplates in sets at all, let alone patterned beauties like this one; while in many respects set design has come on leaps and bounds over the past couple of decades, I do mourn the demise of the likes of Green Baseplate 32 x 32 Island with River Pattern and its ilk.


The set contains two minifigures and an old-style horse which comes complete with a red saddle. The unnamed female minifigure is descriptively but not exactly snappily titled Jogging Suit, Light Gray Legs, Light Gray Cowboy Hat, Backpack by the folks over at Bricklink, or par046 for short. Although none of her constituent parts (head, torso etc.) are unique to this minifigure, the specific combination of elements comes together to create a minifigure which doesn't appear in any other sets. If you're thinking that she has an unusually long neck then you'd be right - her backpack hangs around the peg on the top of her torso, and this prevents her head from sliding down on to the peg to the full extent. I do have to briefly mention her torso; when I bought this set from eBay and checked through it to make sure that all the parts were present and correct, I was dismayed to discover that I'd been sent the wrong torso for this minifigure. More in hope that expectation I checked my (modest) collection of loose LEGO and to my astonishment discovered that the only loose blue torso I owned just so happened to be the correct torso for this minifigure.... Strange but true.


The unnamed male, Jacket Green with 2 Large Pockets - Blue Legs, Red Cap, or just pck001 for short, can be seen below. While he's made up of some pretty commonplace parts, similar to his female counterpart above this specific combination of head, torso, legs and cap comes together to make a minifigure that isn't very common at all, only appearing in one set in addition to this one. I do love his stubbly face, complete with blue-tinted sunglasses. Although he wisely leaves most of the heavy lifting to his companion in the form of her sizeable backpack, he does at least come equipped with a small brown suitcase......


Once the minifigures have been assembled it's time to do some real building. First up are the trunks of the trees which are made up of brown modified 1 x 1 x 2 bricks with shutter holders; the shutter holders themselves lend a pleasing, knobbly appearance to the tree trunks, a simple but surprisingly effective technique that I've not seen used before. While these modified 1 x 1 x 2 bricks aren't exactly common, either in brown (a colour which has now been retired) or in reddish-brown (the modern equivalent of brown), they aren't really uber-expensive to buy on Bricklink either. Don't therefore be too surprised to see a few trees 'borrowing' this technique in my City Layout, assuming I ever get around to completing and landscaping it. I probably won't be copying the foliage, though, which merely consists of small prefab pine trees plonked on top of the tree trucks and looks distinctly odd....


The yellow 4x4 (below - click pics to enlarge) is classic 4-stud wide fare, in contrast to the 6-stud wide vehicles we're generally served up nowadays. The wheels look a little oversized, but it's otherwise a nice looking, fully loaded little vehicle featuring opening driver-side and passenger-side doors, a sunroof and an opening tailgate. There are even clips to side-mount a fishing rod and a pickaxe. The 4x4 comes with a trailer and speedboat, the latter featuring a rather neat little retractable outboard motor. In some ways it brings to mind Set 4433 Dirt Bike Transporter and actually stands up reasonably well to the comparison despite the difference in scale and an almost 20-year difference in release dates.


Last to be built, but definitely not least, were the cabin and scenery (picture below; click to enlarge). I got a huge buzz out of building on that wonderful baseplate, but the building pleasure was almost criminally shortlived, lasting as it did for a paltry 10 building steps. The end result might seem slightly blocky to readers of less advanced years but it's also utterly charming, and the baseplate works beautifully. Interestingly, the positioning of certain features - a couple of the trees, the bush and the campfire - differs between the building guide and the box art as you'll see in later pictures.


You can see the finished set below (click to enlarge) complete with all minifigures, horse and vehicles laid out consistent with the box art. While I'm definitely not a fan of large, prefabricated LEGO elements like the rock faces (known in AFOL parlance as BURPs and LURPs) and the rope bridge, even those can't spoil the view and (say it quietly) they actually work rather well in the context of the set. It's quite hard to believe that the set only contains 241 pieces as there's so much going on - definitely a case of "less is more".


A rear view of the set (below; click to enlarge) reveals the interior of the cabin. There are some rudimentary furnishings to be found within, and the cabin is connected to a secret cave which extends beneath the rock formation - delicious !


As you may have gathered, I think this set is epic. From the brilliant baseplate to the vehicles and scenery, everything just works a treat, and thanks to some excellent and thoughtful design the set is so much more than just the sum of its parts. It looks lovely, and there's also lots to like in terms of play opportunities for the younger builder; certainly my youngster was drawn to the set like a moth to a flame.

I got a good deal on the set from eBay, but they don't come up that often, so if patience isn't your thing and you're looking to get hold of a copy quickly then Bricklink is your best bet - at the time of writing there are 17 copies of the set listed for sale there in varying states of completeness. You can pick up a complete, boxed example for less than £25 plus shipping; you'll need to shell out around £100 plus shipping for a mint, sealed example, however. Although for a bona fide classic like this, it might just be worth it....

Thursday, 9 May 2013

Yellows !

My passion for LEGO exists, as much as is reasonably possible, in a vacuum, unaffected by most environmental factors. Regardless of whatever else is going on in my life, be it work, illness, holidays or whatever, my enthusiasm for collecting and building LEGO remains largely undimmed, even if the actual time available is limited. Truth be told, a passion for LEGO is actually a welcome relief from day to day pressures.

I have to confess to feeling pretty distracted right now, though. My beloved Watford Football Club, a.k.a. The Hornets, have reached the Championship Play-offs, and are potentially only 3 games away from claiming a place in the English Premier League. They actually had the chance to gain promotion outright last weekend without the need to endure the Play-offs, but having failed to grasp the opportunity for a variety of reasons, they now get a second chance, starting tonight (Thursday) with an away game at Leicester City. Given the trials and tribulations of Watford Football Club over the past few seasons, even having reached third place in the rankings at the end of the regular season constitutes a massive achievement and cause for celebration, regardless of the outcome of the Play-offs to come. And so it is that by way of a tribute to my yellow-clad heroes, I thought I'd write a football-related posting on Gimme LEGO this week.

Me, sort of
So, football-related LEGO, then. Well, the good news is that over the years LEGO have produced a surprisingly prodigious number of football-related sets. According to the Brickset database, a total of 71 football-related sets were released between 2000 and 2007, from individual footballers and promotional polybags to some more substantial sets such as 2006's Set 3569 Grand Soccer Stadium (below) which contains 386 pieces.

Set 3569 Grand Soccer Stadium - spot the LEGO....
The bad news is that I don't actually own any of these football-themed sets.... They do come up on eBay and elsewhere on a reasonably frequent basis, and they're generally available at bargain basement prices. Problem is that I've never actually bothered buying any of them as they look, well, a bit rubbish. I was therefore facing the prospect of abandoning my idea of a football-focused post when it suddenly struck me that LEGO have in fact produced a football-related set much more recently. This year, in fact. And not only that, but I actually own it. Problem solved....


Yes, yes - I know it's a Friends set, but it's the only football-related set I've got, and beggars can't be choosers. Anyway, there's no point in me pretending to be all macho about this - I already blew my cover by previously admitting here to liking the Friends minidolls more than I expected, not to mention raving about all the new colours and interesting parts that you get in the sets.

My copy of Set 41011 Stephanie's Soccer Practice (above) is a bit squashed thanks to the local postie's insistence on trying to cram anything smaller than a housebrick through my letter box regardless of the degree of damage incurred in the process. The branding of the 2013 Friends sets is very similar to that of the 2012 sets, although the group shot of the girls on both the front and back of the boxes has taken on a more cartoony, and dare I say it cruder, appearance. The back of the box (below) highlights the play-features of the set, such as they are - Stephanie's football, a mechanism for mechanically propelling the football towards the goal, and, er, Stephanie holding a banana. It was half-time oranges in my day.


Opening the box reveals two sealed bags (one big and one small) of parts, a folded instruction booklet, and a green 4 x 12 plate. The front cover of the instruction booklet is almost a carbon-copy of the front of the box. The booklet itself weighs in at 32 pages cover to cover, which is quite a feat considering that the set only contains 80 pieces. The 23-page building guide culminates in a line-up of all the set's constituent elements (picture below - click to enlarge). We're also treated to an aerial shot of Heartlake City, which is where our football-loving heroine resides, a page of snapshots of the 5 Friends going about their business, advertising for some of the 2013 Friends sets, and a two-page inventory of parts, amongst other things.


Parts-wise we get a typically eye-searing combination of colours, something which has been a feature of the Friends theme from the start. The set contains parts in 18 different colours, rising to 21 if you include the parts making up Stephanie. This seems incredible given the modest piece count. Furthermore, some of the colours such as bright green, bright pink, dark orange, magenta and medium azure blue, are found relatively rarely in LEGO sets. You can see a selection of some of the more interesting part/colour combinations in the picture below (click to enlarge). The football is unique to this set, and all the other parts appear in 10 sets or less in their respective colours.


The set contains just one minifigure, or more accurately minidoll, that of Stephanie in her football kit (below - click to enlarge). She's unique to the set in this attire, although 5 more versions of Stephanie wearing other outfits can be found in a variety of 2012 and 2013 Friends sets. Stephanie's football kit  - white shirt with light blue sleeves and magenta trim, dark blue shorts - isn't obviously based upon the kit of any real football team that I can think of, and she's really not going to get very far with those football boots, but when all is said and done she does kind of look the part. Except for her huge hair, which she'll really need to tie back....


As you can see below, there's no backprint on Stephanie's torso, not even a number nor (and you'll need to take my word for this) her name at the top of the shirt in modern footballing fashion. There is however some very prominent text - "(c) 2009 LEGO" - embossed just above the waistband; I'm not sure if this is an indication of LEGO's product development cycle, the date when LEGO patented the minidolls. or even both of these.


Assembly of the various structures included in the set (below - click to enlarge) takes but a few moments. Stephanie is provided with a goal, a dugout and bench plus water cooler,  some cones to dribble round, and a rudimentary structure to flick the ball into the goal. The latter seems a bit pointless, to be honest, capable as it is of propelling the ball a few centimetres at best. All of these structures are characteristically garish in true Friends style.


You can see all the elements of the set laid out below; in addition to providing Stephanie with everything she needs to hone her footballing skills, LEGO have also thoughtfully provided Stephanie with a puppy, which as every true football fan knows is an indispensible part of any football practice.


Set 41011 Stephanie's Soccer Practice retails at £9.99 / $9.99, although as I write this the set is currently available at 33% off RRP (£6.66) from Amazon.co.uk. Folks in the U.S. will have to pay pretty much RRP (click here to buy) although it still works out cheaper than the UK price.

And now, with the set built and my posting written it's unfortunately time to return to reality and start biting my nails again in anticipation of tonights Play-off game. If you've enjoyed this posting then please do me a favour and keep your fingers crossed for a Watford victory...

Come On You Hornets !

Get your Watford shirt on - you're going in goal....


* Custom Dr. Dave Watford F. C. minifig crafted by Minifigs.me - cheers, Caz & Nick !

Monday, 29 April 2013

Gold Rush


OK, so at the risk of sounding like a broken record, here we go once again....

I've previously moaned here and here about LEGO's increasing tendency to dangle limited edition merchandise, be it ultra-rare Super Heroes minifigures or Star Wars sets, in front of LEGO fans. The practice unfortunately shows no signs of abating, however, and now it's spreading to the Collectible Minifigures.

I'm referring of course to the infamous "Mr. Gold" (below). LEGO have hidden 5,000 of these gold-chromed but otherwise fairly unremarkable minifigures in cases of Series 10 Collectable Minifigures and have thus predictably sparked a frenzy amongst collectors and completists. A couple of early examples turned up in Germany and were duly listed on eBay for 999 each, and others are starting to pop up elsewhere, including the UK and the US.


So why are LEGO doing this ? They must surely be aware that the chances of any of these figures ending up in the hands of children, who us AFOLs are repeatedly reminded are the target demographic, are next to nil. And I'm struggling to believe that the LEGO company actually set out with the intention of lining the pockets of eBay scalpers. Which does beg the question of exactly what they're trying to achieve by doing this. Is the popularity of the Collectible Minifigures starting to wane, necessitating a publicity stunt like this to try and re-invigorate sales, or is it just good, old-fashioned greed and a desire to milk the Collectible Minifigure cash-cow for all its worth ?

I think it's fair to say that reaction to this latest development hasn't exactly been overwhelmingly positive (see for instance here and here to get a flavour of some of the opinions out in cyberspace). It's interesting that some folks have reacted by stating that they won't buy Collectible Minifigures any more as a result - they can realistically no longer guarantee that they'll be able to acquire full sets of figures, and as such there's no point wasting time and money trying to "find 'em all". In fact, it's not inconceivable that I may well end up going the same way - I've quite enjoyed collecting all 9 series of figures so far, not to mention the Great Britain Collectible Minifigures produced for the 2012 Olympic Games, but now that I'm unlikely to be able to complete Series 10 my enthusiasm for keeping it going has evaporated somewhat. So Series 10 might be my last if LEGO goes down the same route for Series 11 and beyond.

Some may argue that rare though the figure may be, we all at least have a chance of finding one. Except maybe not, if allegations of underhand behaviour by some retailers are to be believed. There have been more than a few reports of supposedly new, full boxes of Series 10 Collectible Minifigures having seemingly been rifled through by store staff before making it on to retail shelves; certainly the current resale value of Mr. Gold is hardly a discouragement when it comes to skulduggery perpetrated by the unscrupulous.

In its Mission Statement, LEGO speaks of a desire to foster creativity, but it's hard to escape the conclusion that the only creativity this initiative is likely to foster is the discovery of new and creative ways of surreptitiously searching (and indeed opening) packets of series 10 CMF's in stores in order to try and find Mr. Gold. I suspect that's not what LEGO had in mind when it first came up with this brainwave, but you reap what you sow. For my part I just hope that there's sufficient backlash this time round for LEGO to reconsider its decision and refrain from subjecting us to this chase figure nonsense for Series 11 and beyond.

Thursday, 18 April 2013

UCS AT-AT : Raising the Roof

Having struggled through the construction of the AT-AT's left side last time out, I couldn't bear the thought of building the right side quite yet, so I decided to skip it for now and build the roof next instead. The roof will eventually be suspended above the internal skeleton and body of the AT-AT. On the basis of the LDD file, the roof, which is made up of just 346 pieces, looked like it'd be fairly simple to build, and would thus provide some welcome light relief.


You can see a screenshot of the LDD file for the roof above (click to enlarge). Shortly before loading up the LDD file I was delighted to finally figure out how to reactivate the "Outlines on bricks" option on LDD which had mysteriously disappeared after I upgraded to the latest version of the Mac OS a while back. If anyone else has been struggling with this issue, the fix involves going into the 'Preferences' menu in LDD and checking both the "High-quality rendering..." boxes, whereupon the greyed-out "Outlines on bricks" option will be magically available for you to select. Thanks are due to Eurobricks member vynsane for this invaluable tip.


LDD quickly generated the building guide (sample page above - click to enlarge) which consisted of 118 steps. Brick outlines were thankfully also visible on the building guide which made following along significantly easier. That having been said, the sample page above illustrates that LDD hasn't lost its ability to frustrate - a significant irritation during the construction of previous sections has been the software's propensity for generating building guides which bizarrely and totally unnecessarily leave multiple pieces floating in mid air until a later stage of the build, and that tendency is still very much in evidence here.

The roof of the AT-AT consists of 3 sections. The section at the front (picture below - click to enlarge) is the smallest and simplest part of the roof. It's just 2 plates thick, and aside from its mix of tiled and studded sections it has minimal detailing. Construction of this section takes just 15 steps of the building guide to accomplish, so it was done and dusted in a matter of minutes.


The mid-section of the roof (picture below) is the biggest component; while it's again just 2 plates thick over most of its area, it has various elements stuck on the surface or embedded within it; these are purely cosmetic, but add a welcome organic, random feel to a surface that might otherwise have been rather plain. I can't vouch for the accuracy of these details as movie stills which clearly show the top of an AT-AT from above are surprisingly hard to find, but knowing cavegod he'll have done his homework. Certainly the dark grey vent-like structures that you can see in the picture below extending downwards from the front of the mid-section are movie accurate, at least.


The rear-most section of the roof (below) was definitely the trickiest to build and has the most surface detailing. The hinged section at the very back, which consists of a number of 1 x 6 tiles that wrap around the back edge of the roof, is quite fragile and needs to be handled with care. The darker grey greebled section that you can see on the right side of the picture corresponds to the sample page of the building guide that I showed earlier, and it's those greebles that are supposed to be just left suspended in mid-air for a period if the building guide is to be followed religiously. LDD bashing aside, however, the greebling looks excellent and is certainly worth the effort.


You can see the three sections of the roof laid out in the pictures below (click to enlarge). The first picture shows the sections laid out from front to back as you move from the left side of the picture to the right, while the picture below it shows the sections from back to front. The roof sections aren't directly connected to each other; I'm guessing that each section will end up suspended between the upper edges of the left and right sides of the body, held in the correct position relative to the others by gravity alone. We shall see....


As expected, building the roof did indeed turn out to be pretty straightforward, nothwithstanding LDD's absurd sequencing of building steps. With another 346 pieces used up, by my reckoning I'm now almost 5,500 pieces into this massive build, and it's starting to sink in that with barely 700 pieces left to go I'm finally on the home straight. Next up I have the small matter of the right side of the AT-AT to assemble, and then it's crunch time (probably literally as well as metaphorically) as I take my life in my hands and try to put all the completed sections together......

 < -- Building the AT-AT : Part 8                               Building the AT-AT : Part 10 -- >

Wednesday, 3 April 2013

Jabba Dabba Doo !

Having regularly perused the LEGO Star Wars forums over at Eurobricks for the past few years now, not to mention keeping an eye on Star Wars-related comments on the Brickset Forum and elsewhere, it became quickly evident that Set 4480 Jabba's Palace was one of those sets which cropped up the most whenever there was a discussion about which Star Wars sets LEGO should remake.


Given this, it's no surprise that many rejoiced when LEGO announced that they would indeed be releasing a new Jabba's Palace set, and true to their word, Set 9516 Jabba's Palace was duly released in the Summer of 2012 to generally favourable reviews. 

Having bagged a copy of the new version, I was all set to dive in, but at the last minute I decided that it might be interesting to revisit the original version first. So here we go....


The original Jabba's Palace was released in 2003 at an RRP of £27.99 / $30.00. At only 231 pieces it's interesting to note that of the 19 different LEGO Star Wars sets released that year it was nevertheless the sixth largest in terms of piece count.

The front of the box (above; click to enlarge) provides a fairly simple overview of the contents of the box against a backdrop of what looks like a movie still of the interior of Jabba's Palace; there's some rudimentary Photo-Shopping in evidence as a blurry Luke Skywalker minifigure falls through the trapdoor of Jabba's throne room into a (non-existent) Rancor pit, and movement is also simulated for some of the other characters. The back of the box below features a number of panels; some of them show off play features of the set, others contain movie stills of the some of the characters which have been immortalised in minifigure form in this set, and there's even an alternate build picture. Finally, two panels highlight some of the other 2003 LEGO Star Wars releases.


The full roster of characters contained in the set is displayed on one of the sides of the box (picture below). I say "characters" rather than "minifigures" as it could be argued that the set only actually contains 3 minifigures in the true sense, with the rest being either larger moulds in the case of Jabba himself or brick-built characters. I won't get into the debate about whether brick-built characters constitute minifigures or not or we'll be here all day.....


Access to the box contents is provided via thumb tabs; it thankfully doesn't look as if they were used by the original owner of my pre-owned example, however, as the box is still in pretty good shape. As an added bonus, it appears that the previous owner included all the bags that the pieces came in - six bags to be precise, of various sizes. 

The front cover of the instruction booklet (below) is well-nigh identical to the front of the box, with only the age rating omitted. It's surprisingly slim, weighing in at only 32 pages cover to cover.


The back cover of the booklet (below - click to enlarge) suggests that Yoda has a penchant for surfing the Net when he's not battling the Sith; more specifically, he's been caught checking out LEGO's Star Wars microsite. The eagle-eyed might have spotted that the picture on the back cover predates the set by a good few years, as much revered Star Wars Set 7191 UCS X-wing Starfighter, released in 1999, is shown as being "NEW !"


The set contains 6 minifigures and characters, and a more varied line-up you'd struggle to find. At the more conventional, even glamorous, end of the spectrum we have Slavegirl Leia (below).  This set predates the appearance of flesh-coloured minifigures in licensed themes, so we're treated to a largely naked yellow torso complete with some subtle shading to indicate cleavage and belly button, plus a gold bikini to keep her decent. Leia's legs are printed, which was relatively unusual back in 2003.


The grey neck bracket you can see in the pictures allows a chain to be attached to the back of Leia's torso. There's no back-printing on the torso, and no alternate expression on the back of the head. This version of Leia is unique to the set.


The Luke Skywalker minifigure (below) is also unique to the set. It features a simple torso print, but there's no back-print on the torso nor printing on the legs or an alternate expression. He does however sport a black fabric cape. A nice touch is the option of either a tan hairpiece or an interchangeable cowl - both are provided.


EV-9D9 is the third minifigure which is unique to this set. According to Wookieepedia, this sadistic supervisor and interrogator droid is actually a 'she' rather than a 'he' - living proof that you learn something new every day, even at my age.

EV-9D9, from Wookieepedia
The LEGO version features a dark red minifigure head with a unique face print mounted on a dark red upturned 1 x 1 tile with clip, but it's otherwise put together pretty much the same way as a standard battle droid, albeit in light grey and dark red rather than tan.


Moving from minifigures on to characters we come to Jabba the Hutt (below - click to enlarge). Jabba is made up of three separate parts - a large body section and two pieces which form his tail. While his sand green body is undoubtedly suitably corpulent, and his face is appropriately repugnant, the lack of printing is nevertheless disappointing. Jabba's arms are moveable at the shoulder, and he has standard minifigure hands, but in contrast to standard minifigures they don't rotate at the wrist. This version of Jabba appears in one other set - Set 6210 Jabba's Sail Barge from 2006.


There are two 'brick-built' characters. The simplest is the humble GNK Power Droid, better known as a Gonk Droid. This version is unique to the set, although there have since been two alternative versions which can be found in Set 10144 Sandcrawler from 2005 and last year's Star Wars Advent Calendar. The body is a dark grey 2 x 2 x 2 container, and the printed door at the front, which opens, is unique in this colour.


Last up we have B'Omarr Monk. Wookieepedia tells us that the B'Omarr were a mysterious religious order based on the planet Tatooine; the B'Omarr monks believed that cutting themselves off from all physical sensation would free them from distraction and thus allow them to achieve enlightenment. Once enlightenment was achieved, the monk would have no further use for their senses or physical body; at this point their brain was surgically removed and transferred into a nutrient-filled jar where it could contemplate life, the universe and everything for the rest of its days. When it was necessary for it to be moved, the brain jar could be transported by a BT-16 perimeter droid (below). So now you know...

B'Omarr Monk, from Wookieepedia
The LEGO rendition consists of 13 parts. The obvious highlight is the 'brain', which is in fact a trans neon orange 1 x 1 round plate inside an upturned crystal ball globe, and the legs are katanas joined to the body by robot arms.


Some of the more interesting and/or unusual parts that you can find in this set are shown in the picture below (click to enlarge). Pride of place probably goes to the trans neon green plain minifigure head which is unique to this set. The old brown stairs only ever appeared in one set apart from this one, and the modified 1 x 2 brick with pin in old brown was included in just 3 sets in total up until the time that the old brown colour was phased out and replaced with reddish brown. The two different types of tan arch and the two sizes of inverted tan dish that you can see in the picture have each graced less than 10 sets to date, and the variant of tan 2 x 2 brick with dome found in this set can only be found in two other sets. Finally, the trans green frog at the top of the picture has appeared in a total of just 6 sets to date including this one.


The build is short and sweet, requiring just 25 pages of the instruction booklet to guide you through. There's no baseplate, the lower level of the Palace (below) comfortably resting on just a few standard plates. There's a nice printed 1 x 2 tile at the entrance which presumably represents the controls to the front gate, and you can just about see a brown 1 x 2 brick with hole on the right side of the photo halfway back; this allows for the attachment of Set 4475 Jabba's Message to expand the Palace. There's similar provision on the other side of the Palace to attach Set 4476 Jabba's Prize, albeit via a 1 x 2 brick with a pin, but you get the general idea.


Once the lower level is complete it takes just a few minutes to complete the build. Structures of note on the upper level include Jabba's raised light grey 'throne', and a trapdoor to cast the unwary into the rancor pit below. Jabba's throne, which features an arch, a transparent neon green bowl to store the transparent green frog I highlighted earlier, and a chain to restrain Leia, slides forwards and backwards a short distance; when the throne is pushed backwards as far as it'll go the trapdoor drops open. Once released, the throne springs back to its starting position thanks to a couple of elastic bands on the sides.


The front of the Palace is hinged, allowing it to be opened up (above) or closed (below). Closing the front of the Palace reveals the black 'iron' gates which provide access to the area under the upper levels. You can also better see the steps on either side which lead to the upper level.


You can see the completed Palace below (click to enlarge) populated with its full complement of minifigures and other characters. Luke is poised to plummet through the trapdoor into the rancor pit below, although luckily for him (although not us) there's no rancor down there....


So what's the verdict ? Well, this 2003 version of Jabba's Palace is distinctly modest in size and scope, even when the two small add-on sets mentioned earlier are factored in to the equation; certainly it's dwarfed by the 2012 remake. The set was surprisingly expensive when released, coming in at well over 10 pence / 10 cents per piece, and I'm sorry to report that it hasn't got any cheaper with time, either. The cheapest complete, boxed example on Bricklink right now will set you back around £85 plus shipping, and if you want a MISB example it'll cost you well over £100. This hefty price appreciation can in large part be explained by the inclusion of all the unique minifigures and characters, and the fact that collectors are willing to pay a premium to own them.

For collectors of the LEGO Star Wars theme this is a must-have set, of course - a no-brainer. Other interested parties would however probably be better off picking up the 2012 remake which has three times as many pieces, builds into a far more identifiable rendition of the subject matter, and comes with more minifigures. There seems to have been a bit of a run on the 2012 version in the wake of some recent controversy, but prior to that the set was available at a decent discount and I've no doubt that it will be once again prior to its eventual retirement.