My next job was to disassemble the Rock Cutter, after which it was time to get to work on my first GBC. I had initially planned to reverse engineer the GBC, which was designed by Great Ball Pit, from a video clip but I ended up paying to download a set of instructions instead which, as it turned out, made my life a whole lot easier. The download, which is in .pdf format, consists of a total of 62 pages and you can see a full listing of the content in the screengrab below. As well as a 54-page building guide the document also incorporates other content including hints for fine-tuning the GBC mechanisms and instructions for upgrading the module with Power Functions. The building guide is fairly easy to follow; at each stage the parts you need to add are highlighted in pink, and the build is logically sequenced.

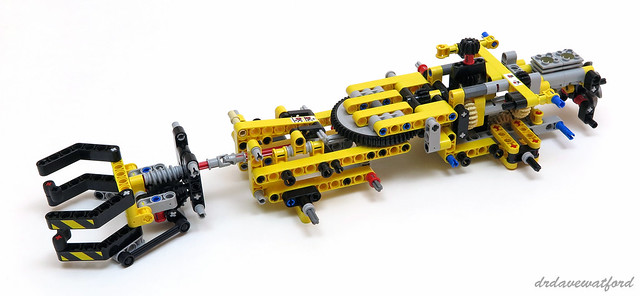
I was about a third of the way through the build when I took the photograph below. The GBC module has been designed to be mounted onto a trailer, and the trailer chassis is pretty much done by this point. A pair of wheels will later be attached to the axle that you can see in the foreground, while the various gears embedded into the chassis are part of the mechanism that makes a single cylinder move up and down in the chassis-mounted engine block when the GBC module is activated. The stickers that you can see here and in subsequent pictures are a reminder that we're using recycled elements from a donor 42049 Mine Loader set, and they don't have any significance with respect to the GBC module.
With the chassis complete it's time to get to work on the section of the GBC which is responsible for moving the balls (below). The mechanism consists of a series of sweeper arms which pass the balls along the line as they rotate. The arms obviously need to work together in perfect harmony to make this happen, and in order for the arms move in unison they're connected underneath via a system of gears. Timing is critical - one sweeper arm can't pass the ball to the next unless the rotation of the arms is carefully coordinated - and for this reason specific instructions are provided to ensure that the sweeper arms are correctly positioned relative to each other.
Another important part of the module can be seen on the left side of the picture above. A black 1 x 6 Technic link connects the spindle of the first sweeper arm to a pivoting structure; as the spindle turns it rocks the structure backwards and forwards, which has the effect of feeding balls from the "in-basket" to the first sweeper arm in the finished module.
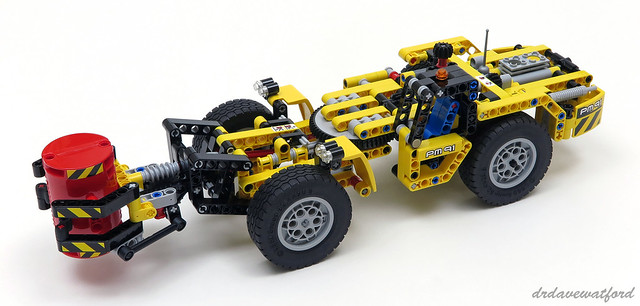
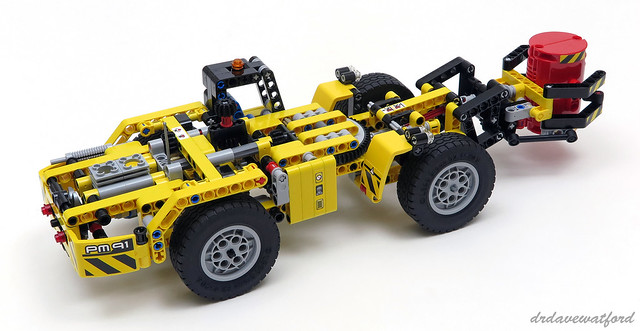
You can see how everything fits together in the pictures above and below which show the completed GBC module from the front and the back. The GBC mechanism is activated by turning a crank which is located to the left of the wheel in the picture above. Once the balls are swept to the top of the slope by the arms they're 'recycled' along a rear return channel and roll back down into the in-basket, thus creating a perpetual loop. The light bluish grey exhaust pipe element at the top of the slope diverts the balls down the return channel, but if you want the balls to be transferred to an adjacent GBC module instead then the exhaust pipe can be removed and the balls will then drop off the end of the conveyor and into the in-basket of the next module.
You can motorise the module quickly and easily by replacing the hand crank with a LEGO Power Functions motor. I used a standard XL Motor powered by a Battery Box containing six rechargeable eneloop AA batteries and you can see the result in the video clip below; if you're having difficulty viewing the embedded video clip then you can watch it here instead.
Occasionally the ball at the front of the queue needs a nudge from one of the returning balls in order to launch it onto the conveyer, but otherwise the mechanism runs smoothly and the balls are quickly and efficiently whisked up the slope. Watching the module operate is actually quite hypnotic, and it's certainly given me a taste for more. There's still the issue that I don't have many loose Technic elements, but having now built a GBC with the aid of instructions I at least have a better idea of what I'll need in order to build one of my own design and I've also picked up a few techniques that I can potentially make use of so overall it was a valuable learning experience.
If you'd like to build this GBC then you can purchase instructions from here for €9.95. I don't have any financial interest in the sale of these instructions, incidentally, and I paid for my own copy.

I was about a third of the way through the build when I took the photograph below. The GBC module has been designed to be mounted onto a trailer, and the trailer chassis is pretty much done by this point. A pair of wheels will later be attached to the axle that you can see in the foreground, while the various gears embedded into the chassis are part of the mechanism that makes a single cylinder move up and down in the chassis-mounted engine block when the GBC module is activated. The stickers that you can see here and in subsequent pictures are a reminder that we're using recycled elements from a donor 42049 Mine Loader set, and they don't have any significance with respect to the GBC module.
With the chassis complete it's time to get to work on the section of the GBC which is responsible for moving the balls (below). The mechanism consists of a series of sweeper arms which pass the balls along the line as they rotate. The arms obviously need to work together in perfect harmony to make this happen, and in order for the arms move in unison they're connected underneath via a system of gears. Timing is critical - one sweeper arm can't pass the ball to the next unless the rotation of the arms is carefully coordinated - and for this reason specific instructions are provided to ensure that the sweeper arms are correctly positioned relative to each other.
Another important part of the module can be seen on the left side of the picture above. A black 1 x 6 Technic link connects the spindle of the first sweeper arm to a pivoting structure; as the spindle turns it rocks the structure backwards and forwards, which has the effect of feeding balls from the "in-basket" to the first sweeper arm in the finished module.
You can see how everything fits together in the pictures above and below which show the completed GBC module from the front and the back. The GBC mechanism is activated by turning a crank which is located to the left of the wheel in the picture above. Once the balls are swept to the top of the slope by the arms they're 'recycled' along a rear return channel and roll back down into the in-basket, thus creating a perpetual loop. The light bluish grey exhaust pipe element at the top of the slope diverts the balls down the return channel, but if you want the balls to be transferred to an adjacent GBC module instead then the exhaust pipe can be removed and the balls will then drop off the end of the conveyor and into the in-basket of the next module.
You can motorise the module quickly and easily by replacing the hand crank with a LEGO Power Functions motor. I used a standard XL Motor powered by a Battery Box containing six rechargeable eneloop AA batteries and you can see the result in the video clip below; if you're having difficulty viewing the embedded video clip then you can watch it here instead.
Occasionally the ball at the front of the queue needs a nudge from one of the returning balls in order to launch it onto the conveyer, but otherwise the mechanism runs smoothly and the balls are quickly and efficiently whisked up the slope. Watching the module operate is actually quite hypnotic, and it's certainly given me a taste for more. There's still the issue that I don't have many loose Technic elements, but having now built a GBC with the aid of instructions I at least have a better idea of what I'll need in order to build one of my own design and I've also picked up a few techniques that I can potentially make use of so overall it was a valuable learning experience.
If you'd like to build this GBC then you can purchase instructions from here for €9.95. I don't have any financial interest in the sale of these instructions, incidentally, and I paid for my own copy.