Tuesday 19 May 2020

Poor Relation?

OK, so I don't need anyone to remind me that I haven't exactly been prolific over the past few years when it comes to posting on Gimme LEGO.... That having been said, what I have posted provides a big clue to the identity of possibly my greatest passion when it comes to LEGO, namely space sets. A quick skim of the index of previous posts reveals that even if you exclude Star Wars I've served up significantly more reviews of space sets than of any other theme; vintage space sets such as 924 Space Cruiser, 6896 Celestial Forager and 6897 Rebel Hunter have been particularly well represented. A recent trawl through some of those old reviews whetted my appetite for more, so I thought I'd dig out an old space set from a subtheme that I'd not previously covered on Gimme LEGO and share it with you.


6900 Cyber Saucer was released in 1997 as part of the UFO subtheme of LEGO Space. The front of the box (above) looks frankly psychedelic, showcasing the completed craft flying above a green quasi-organic planet surface which is almost as retina-searing as the trans-neon green accents of the ship itself. Blurred clouds of magenta space dust and stars provide a suitably vivid backdrop. The back of my bashed box (below) is dominated by images of a couple of dubious-looking alternate builds. There are also a couple of panels which illustrate play features of the set, namely a rotation function and what appears to be a temperature-sensitive print on one of the elements.


The front of the instruction booklet (below) features the same image as the front of the box, but with one interesting difference, specifically the inclusion of an alternative set number (6999) alongside the actual set number. I initially assumed that 6999 was the number of the set in the US or elsewhere, but it turns out that 6999 was in fact the set number of a limited edition bundle consisting of a copy of 6900 plus a hard plastic promotional mask. The instruction booklet comprises 15 pages, all of which are occupied by building instructions; there's no advertising, which is always a bit of a shame in older sets, while the back cover is pretty much identical to the back of the box and therefore not shown here.


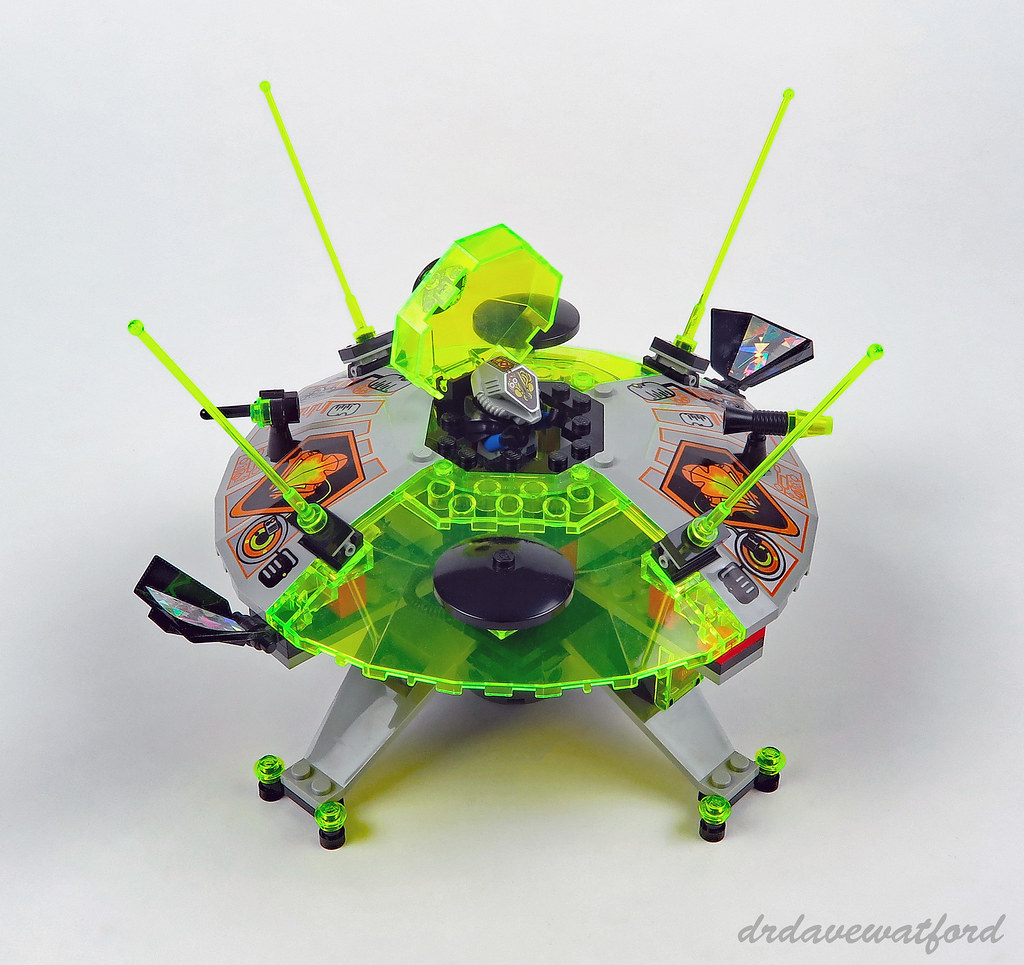
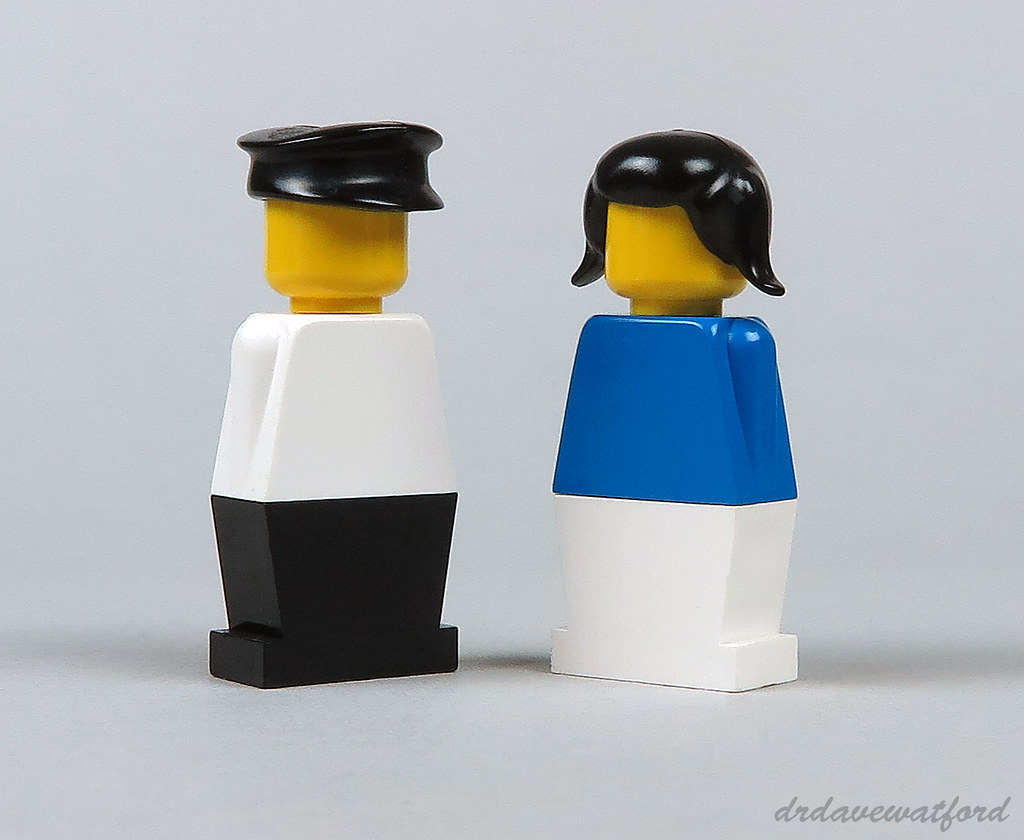
The set contains a solitary minifigure, designated as UFO Zotaxian Alien - Blue Officer (Commander X) by Bricklink. This minifigure only appears in a single set, 6975 Alien Avenger, in addition to 6900 and 6999. The torso and legs, with their intricate prints, are exclusive to this minifigure. The black breastplate and shoulder protector is shared with a number of other minifigures across the UFO and Insectoids space subthemes, while the light grey printed helmet is shared with a UFO Zotaxian Red Pilot minifigure which appears in a number of other UFO sets.


Beneath the Predator-esque helmet is a printed trans-neon green minifigure head. As was the case for the printed torso and legs, the head print is exclusive to this particular minifigure. There's no back print on the head.


The breastplate and shoulder protector also provides substantial protection for the upper back. In marked contrast to the extensive and complex printing on the front of the minifigure there's no printing at all on the back of the helmet, torso or legs.


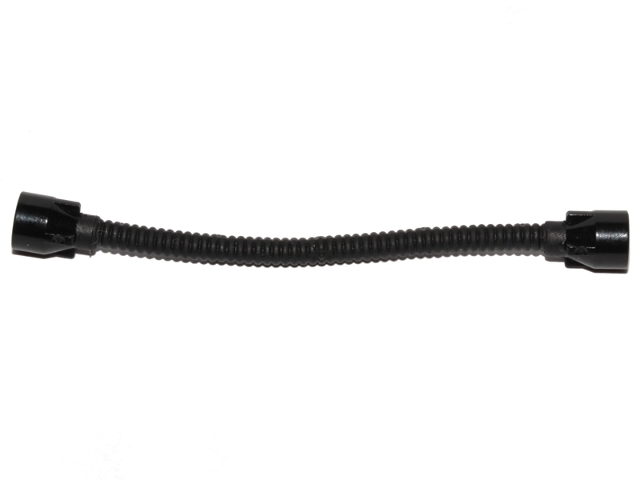
Moving on to the saucer, the shape is largely defined by four 10 x 10 x 2 1/3 quarter saucer top panels. Two of these panels are trans-neon green in colour and have appeared in just 4 sets including this one and 6999, while the other two are printed old grey left and right variants which have each appeared in a total of 5 sets. The orange, black and silver prints on the latter two elements are great, featuring a stylised representation of the alien minifigure helmet from above together with some additional detailing. The quarter panels surround a simple brick-built cockpit containing a solitary red seat. A couple of decorative black 8.5L flexible hoses attach to the sides of the cockpit beneath the panels, while a pair of 3 x 5 deltoid panels attach to the outside edge of the saucer on opposite sides. Given the shiny silver stickers which are attached to them I suspect that they're supposed to be solar arrays. In addition to the deltoid panels, the exterior of the saucer is embellished with numerous other attachments including trans-neon green 8H whip antennae, black 4 x 4 inverted dishes, a minifigure loudhailer tipped with a trans-neon green 1 x 1 cone, and a minifigure space scanner tool. All of the attachments can be either rotated or tilted on small hinges, thus boosting the play value.


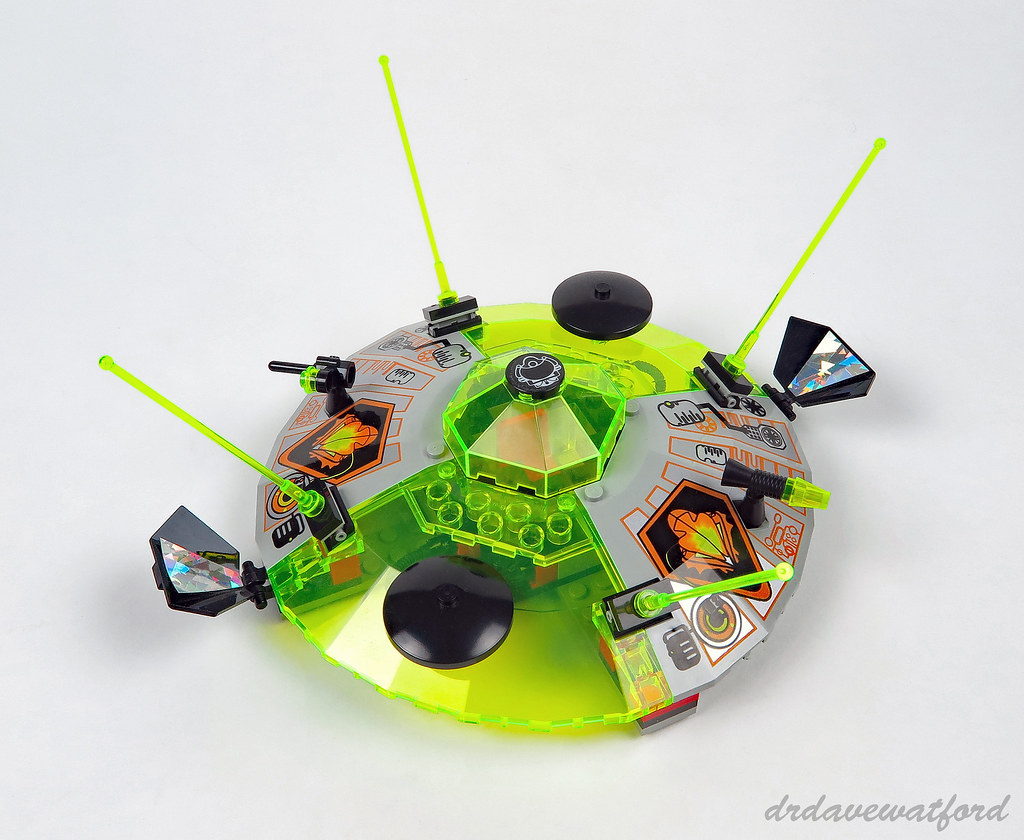
The cockpit is enclosed by a trans-neon green 6 x 6 octagonal canopy which is hinged at the rear to provide easy cockpit access. A black 2 x 2 round tile sits on top of the canopy. This tile is decorated with a heat-sensitive sticker, which is something that I've never encountered in a LEGO set before. When the sticker is cold the central area is blank, but when the sticker is pressed and warmed with a fingertip a dark green pattern appears in the central area. This 'play feature' is demonstrated in the instruction booklet (below). The sticker in my copy of the set shows a faint olive green pattern even when untouched, however, similar to what you can see here; I'm not sure whether that's because the ambient temperature is currently quite high in my LEGO room, or just because the sticker is now at least 23 years old and therefore not operating quite as efficiently as it was when it was new.


The saucer sits on top of a simple landing stage. This is supported at its periphery by four light grey bi-level wings and centrally by a pillar which incorporates four black 2 x 2 x 2 stands. The bi-level wings are quite rare in light grey, having appeared in just four sets in this colour including 6900 and 6999. There's a black 2 x 2 x 2 container mounted on one of the peripheral supports. The open face of the container is enclosed by a trans-neon green door which opens to reveal a printed tile that's presumably supposed to represent tech of some sort. The landing stage is topped by a red 4 x 4 turntable with square base.


The neon-green and light grey elements incorporated into the landing stage provide some welcome consistency with the saucer's colour scheme. The saucer fits neatly on top of the landing stage, and since the only point of attachment is the 4 x 4 turntable it can consequently rotate freely through 360 degrees.


I have to admit that I was initially quite sceptical about this set, and was ready to pretty much write off the UFO subtheme as a poor relation of the much-loved Classic Space sets of the late 1970s and early to mid 1980s. The colour scheme is less appealing to me than the palette of the older space sets, and the preponderance of large, prefabricated elements such as the 10 x 10 quarter panels and the landing stage supports made the build all too brief and had me wishing that I had chosen to assemble a set which didn't rely so heavily on such short-cuts. Now that I've built it, however, I'm feeling a little more charitable - I like the minifigure, the saucer is more swooshable than I expected, and the build is crammed with play features - literally everything attached to the upper surface of the saucer can be tilted or rotated and the saucer spins freely on its landing stage. Furthermore, the design does a decent enough job of aping the cliched flying saucer stereotype, and I'm mindful that there are probably legions of twenty-somethings out there who look back misty-eyed at the UFO sets of their youth the same way as older AFOLs revere the Classic Space sets.


Set 6900 Cyber Saucer contains 114 parts and was released back in 1997. There's clearly love for the set out there as at time of writing the cheapest complete boxed example of the set is listed at almost £50 plus shipping on Bricklink. Complete unboxed examples start at about half that, however, and you might also be able to find one cheaper on eBay.

Tuesday 21 April 2020

Unfinished Business

Back in the summer of 2019 I revealed that I'd be exhibiting my 10224 Town Hall-inspired railway station MOC (below) as part of a collaborative display at the 2019 Great Western Brick Show, but that it'd need some fairly substantial modifications in order to fit into the display.


The display, a LEGO city made up of fan-designed modular-style buildings complemented by brick-built roads, roadside structures, a canal and appropriate landscaping, would also feature a working passenger railway. The plan was for the railway to be elevated for part of its course, and Simon the display organiser asked if I'd be willing to modify my MOC to incorporate a platform at the rear in order to serve the elevated section of track. This seemed like an interesting challenge so I agreed. Simon sent over some specifications and a few photographs to illustrate how my station would fit into the overall display, including the exact dimensions of the plot it would occupy and how high the platform needed to be, so I got to work. As usual I worked in LDD, modifying a previous LDD file to reflect the new design brief, and eventually I came up with the sketch below.


As you can see, my plan was for the elevated section of railway to run on top of the ground floor of the building, which would mean that I had to extend the ground floor backwards to a considerable extent. The roof of the new, extended ground floor section would serve as the track bed, meaning that it would have to bear the weight of the track and train and be constructed accordingly. I'd also need to build a station platform at second floor level and attach a canopy a suitable height above it. The 16 x 6 area of open studs at the rear and to the side would eventually accommodate a bridge support, carrying the rail track from a bridge onto the station. From a purely technical perspective the build would be pretty straightforward, but the existing rear of the station (below) would nevertheless require substantial modification.


After double- and triple-checking that my design would fit the specified dimensions I sent an LDD screengrab to Simon for his approval, and after a bit of back-and-forth he was happy with it and I had the green light to get cracking with the modifications. To my surprise it turned out that I already had most of the LEGO elements that I needed for the build, but there were inevitably a few parts that I didn't have. This necessitated a gratifyingly small, if depressingly expensive, Bricklink order. Still, at least the parts arrived quickly and in perfect condition, so I was soon ready to build. It was the first meaningful LEGO project that I'd undertaken for a while on account of work, holidays and family commitments and it felt great to get my head down and do some building, so much so that I really got into it, burned the midnight oil and managed to complete most of the work in just a couple of nights.


As you can see from the picture above, I didn't make any modifications to the front of the building. The rear (below) was however much altered. I followed my LDD sketch pretty much to the brick, although I did make a couple of additional minor tweaks at the end, supporting the floating platform canopy with four lengths of black rigid 3mm hose and swapping out the old window sills with tan 2 x 4 tiles to make them look a bit less chunky. The building remains modular and splits into four sections, namely the expanded ground floor complete with track bed, the second floor which includes the station platform, a third floor to which the canopy attaches, and the roof which features the clock tower.


With the modified station now complete my next job was to figure out how to get it to the Great Western Brick Show venue in Swindon intact, and transporting it turned out to be a bigger challenge than I had anticipated. While the upper levels of the building just about squeezed into a large plastic crate, the expanded lower level was too big to fit into any box or crate that I owned or could lay my hands at short notice. I therefore ended up having to wrap it in a bed sheet and shoehorn it into the pitifully inadequate boot/trunk of my car and just pray that it survived the 80 mile journey without disintegrating, which it thankfully did, just about. Simon had arrived at the venue the previous evening, as had many of the other exhibitors, so the display was already in an advanced state of completion when I arrived at the venue on the morning of the show. All that was left for me to do was drop the station into the vacant plot, stand back and admire the view.


My station was assigned a nice central position in the display. Thanks to some impressive planning by Simon the station was flawlessly integrated into the display's rail loop by way of a pair of elegant dark green railway bridges complete with tan bridge supports which flanked the station on either side as you can see in the picture above. The narrow pavement in front of the station conceals electrical wiring which supplies a number of working LED street lamps, and beyond the pavement lies a section of brick-built road, some more pavement, and then a canal which is spanned by a pair of brick-built humpback bridges. A small courtyard completely enclosed by a number of buildings lies to the rear of the station beyond the rail track (below).


In addition to the integration of new features such as a working railway loop, an automated level crossing and LED street lights, the display had also physically expanded to a significant degree since its debut appearance at the 2018 Great Western Brick show. Click on the image below for a brief video tour of the city; if you're having difficulty viewing the embedded video then click here to watch it on Flickr or here to watch it on YouTube.


To my knowledge there aren't any plans to display the modular city at any further events. Even if future displays materialise I'd probably be hesitant to include my station as I don't think it's ideal for the same MOCs to keep appearing at multiple events over an extended period. It's therefore time for my station to come home and once again grace my own MOC City Layout. That'll mean that a lot of the recent changes will need to be reversed in order for the station to fit into its allocated space, but hey - it's all part of the fun!

Stay at home if you can, and keep safe.


Monday 13 April 2020

Taxi!

Given everything that's going on in the world right now, I've felt in desperate need of some light relief to lift the spirits. One thing that works for me is to take solace in an old LEGO set and wallow in some much-needed nostalgia. My latest trip down memory lane was 368 Taxi Garage, released in 1976. I spotted my copy of the set perched atop of a bunch of other sets on a bookcase and I thought it would fit the bill nicely.


The front of the box is dominated by a simple image of the set contents assembled and ready to be played with, together with a 6+ age recommendation. The back of the box features a number of panels containing images of alternate builds including a small taxi stand, a vintage taxi and two quite respectable reimagined versions of the taxi garage. The alternate builds don't stop there, either - there's also a horse-drawn taxi carriage on one of the side panels of the box.


To open the box you just slide off the outer sleeve. This reveals a white inner tray containing the parts and an instruction sheet.


The building instructions are printed on a large double-sided sheet more than half a metre long and 27 cm wide. This folds down into a square measuring around 13.5 cm x 13.5 cm, and once folded the image above appears on the front 'cover', while the back 'cover' (below) showcases a selection of the alternate builds which adorn the box.


The set includes a pair of what LEGO have termed "stage extra" figures (below) which are I assume supposed to be a taxi driver and his female passenger. Figures like these were the precursors of modern minifigures and started to appear in sets in 1975. Unlike their modern counterparts they don't have moveable arms and legs, and there isn't any printing on their heads or torsos, although they did occasionally feature stickered torsos as you can see here. They were superseded by modern minifigures in 1978 so weren't produced for long, but they remain an interesting and important evolutionary step in the development of the minifigure. While the individual elements making up these particular figures could be found in numerous sets, this is the only set which included the taxi driver figure, while the female passenger only ever appeared in two sets in addition to this one.


According to Brickset 368 Taxi Garage contains 156 elements, although Bricklink reckons the part count is 144 plus an additional 8 elements for the figures. The garage itself is constructed on a green 16 x 32 baseplate with rounded corners which only ever appeared in two sets including this one. The set also includes a number of printed elements. The 1 x 4 yellow brick with black 'TAXI' print is unique to this set, as are a pair of black 2 x 3 bricks with white sans-serif 'TAXI' print; of note, a black 2 x 3 brick with white serif 'TAXI' print was produced in 1971 and can also only be found in one set, 605 Taxi. Other notable printed elements include a black 1 x 4 brick embossed with a chrome car grille print and a white 1 x 2 brick printed with the Shell logo.


I built the taxi first. In most respects it's identical to the vehicle in the 605 Taxi set but there are a couple of differences. Firstly, as mentioned above a different font is used for the 'TAXI' print on the side. More notably, however, the rear end has been redesigned; the older standalone taxi is just two studs long behind the rear wheels, but the newer taxi has been inexplicably lengthened by a stud and the rear looks dreadful. A yellow 1 x 2 tile is wedged between studs on the roof of the vehicle, indicating that the taxi is available for hire; this building technique wasn't uncommon back in the day but was later deemed "illegal" by LEGO as it places undue stress on the elements concerned.


By 1976 LEGO had stopped printing a dot pattern on baseplates (like you can see here, for instance) to guide placement of elements so the 16 x 32 baseplate supplied with this set is consequently unprinted. Construction of the taxi garage is predictably quick and straightforward, requiring only 12 steps on the instruction leaflet. As previously stated the yellow 1 x 4 brick with 'TAXI' print on the garage roof is exclusive to this set, while the pair of 1 x 4 x 6 yellow doors which enclose the garage appeared for the first time ever in this set before going on to appear in a further 9 sets between 1976 and 1990.


With the notable exception of the modular buildings, most buildings which appear in modern sets tend to be open at the back, ostensibly to facilitate play, but also to minimise the parts count and hence the cost. Here, while the rear of the building is undoubtedly simpler than the front, it is at least enclosed, and efforts have been made to embellish the appearance of side and rear walls via the use of red 1 x 4 brick arches which only started to appear in sets the year this set was released.


With the building finished all that was left to do was to construct the Shell-branded petrol pump and attach it to the baseplate along with a 4 x 4 x 6 2/3 large pine tree and the figures. Lovely! While I have no doubt that the warm fuzzy feeling I experienced while inspecting the completed build was largely driven by nostalgia, it's undoubtedly an attractive set and still looks almost brand new; I picked it up from eBay almost 10 years ago as part of a job lot of older sets and can't believe how pristine most of the elements are.

368 Taxi Garage contains 156 elements and was released in 1976. At time of writing, complete boxed examples can be had for less than £30 plus shipping on Bricklink, and if you're willing to forego the box then you'll potentially pay less than £20. Bargain!